Cow Patty News
Bimonthly Newsletter
January / February 2003
The Anniston RC Flyers & Talladega Radio Control Club

God Bless Amereica
What is in the newsletter this month?
Click On Topic
|
Anniston RC Club Meeting
January 2003
The Anniston RC Club had its regular monthly meeting on January 6, 2002 at Ryan's in Anniston. Fifteen members attended the meeting and we had a good dinner as usual. Cecil chaired the meeting and we had a treasury report by Ken. The members discussed a few concerns about the field grass and we decided to wait until this spring to see how the grass was doing. The club officers will be elected at the February meeting. All members need to be present for this meeting so please plan to be there for the election. The Mall show for 2003 was also a topic for the meeting. It was voted that the club will participate this year and we will decide at the February meeting how we will arrange the show. The meeting adjourned at 8 pm and a few members (including me) had their usual lingering talks as always. Overall, the meeting was nice and I look forward to the next one.
|
Talladega RC Club Meeting
January 2003
The Talladega RC Club has its quarterly meeting on January 13, 2003 at the Western Sizzling in Pell City. There was a good turn out with about 20 members present. Dr. Barksdale chaired the meeting; he was filling in for me because I was sick at home. I would like to apologize to all club members for being absent. This is the first club meeting I have not been able to attend. One of the main topics was the election of club officers. We only had one change of officers and that was the president. Lin Smith is now the president of TRCC and we are lucky to have him.
We now have a safety net that spans 100 feet in front of our shed at the field. It is four feet high and a bright orange in color. This will give some of our members a more secure feeling while flying. It is a good idea and we should have acted on it sooner. Thanks to Jody for getting the project kicked off.
|
In order to have a better newsletter we need more input from the members. I am asking that each member of TRCC and Anniston RC write at least one article this year. The article doesn't have to be long and if you don't like writing you can give me the facts and I will write it for you. All members would like to hear about your projects you have under way and how you plan to finish the plane. All modelers take pictures of their planes so why not share them with other members? One member has promised me an article on a plane he built three years ago, I am still checking my e-mail for it, maybe it will show up this year. Seriously, we do need some more input and anything will be greatly appreciated. Until I get flooded with incoming articles I think it will be best if I publish on a bimonthly schedule.
|
Roll and Pitch Coupling
By James Goss
My last fun fly plane I built is known as Flubber and I built it to do mainly one thing, flat spin. It will flat spin as well inverted as it will upright and come out of it as soon as you release the sticks. It spins as flat as a pancake even with reduced throttle and I believe it will do a flat spin landing and survive. I have attempted a flat spin landing with other planes and had pretty good luck some of the time. At least it is an unusual approach to a landing and doesn't take much distance for the approach. Flubber is also a great landing plane even though it is very tail heavy. I have it tail heavy for good flat spins. It will slow down to a crawl without stalling and kiss the ground with ease. It will also hover well with the .91 os four stroke up front. I built this plane with the horizontal stab setting a full inch above the center line of the wing and much longer than most planes this size. The wing is 41 inches long and the stab is xxxxxxx inches long with a very large elevator and rudder. Knife-edge is another story because it will not hold a good knife-edge at all.
When you apply the rudder while in knife-edge position the plane will either roll out or pitch to one side. This was shocking when I first flew Flubber because I was hoping for good knife-edge characteristics. I have had Flubber at the field several times now and have seen all of its little idiosyncrasies. My next step is to correct the pitch and roll coupling. To find out if your plane has either pitch or roll problems is simple. Get your plane in a knife-edge position and let go of your aileron and elevator stick, the right stick in mode two. Your plane should fly straight and true. If it has roll problems it will either roll back toward an upright position or to an inverted position. If it has a pitch problem it will travel toward either the belly of the plane or the canopy. Here is how you correct these unwanted aerobatic maneuvers. If your plane develops roll coupling you will have to use aileron control to counter it. You can do this by mixing your rudder and ailerons on your computer radio. You set it up so the rudder becomes the master control surface and the ailerons become the slave control surface. This means that if the master surface is moved by your command the ailerons will also move. If you command the ailerons to move the rudder will not move. How this coupling is programmed will be found in your manual that came with your radio. With a computer radio this manual is like gold, be sure not to loose yours.
If your plane has pitch problems and travels toward the belly of the plane or towards the canopy while in a knife-edge, here is how to correct it. You will need to mix the rudder and elevator this time. Again the rudder will be the master and this time the elevator will be the slave. When you activate the rudder the elevator will also move. The direction and amount of movement will be set during the programming sequence. This mixing is only on when you want it to be on. On my T6XA Futaba radio the mixing is activated when the elevator dual rates switch is in the low position. I will probably make these corrections to Flubber the next time I am at the flying field. I believe it will make this plane one of the best I have ever owned.
I believe what makes a plane have the tendency to have roll and pitch coupling is the fact that it has such a large rudder. When you activate the rudder to the maximum position like we do in a knife-edge, the air over the horizontal stab is upset on one side more than on the other. In other words the air current and pressure on one side of the stab is reduced while the other side is normal. This is when the roll and or pitch come into play. Having the elevator halves with different airflow over them will create the same effect as will the ailerons when activated, a rolling action. Also changing the airflow over the elevator will reduce the efficiency of the elevator and allow it to create less up or down control that allows the plane to travel toward its belly or canopy. A plane that has its rudder both above and below the horizontal stab will have less pitch and roll coupling. With the rudder in this position it will have the tendency to maintain the same pressure above and below the elevator instead of a differential pressure that allows the plane to rotate or pitch.
Flubber is a prototype so I think on the next version I will divide the rudder so half will be on top of the horizontal stab and half will be on the bottom. It will be interesting to see the difference. The thickness of the wing on Flubber is a full three inches. It seems that the thicker the wing is the better and slower the plane will fly. I haven't seen any fun fly plane with a wing any thicker than this. I guess the next step is to go with a four inch thick wing, or maybe go on up to six inches thick. We won't know until we try it, but this concept may be a valid approach to a new fun fly style. Remember that the concept of the profile was slow to catch on, so who knows what the future holds. At first I didn't think a three-inch thick, 40-inch wing would perform as well as it does. It amazes me how fast these thick wings will fly; I thought they would be slow and sluggish with all that drag. So I think my next Flubber will have a six-inch thick wing.
|
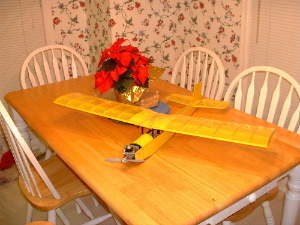
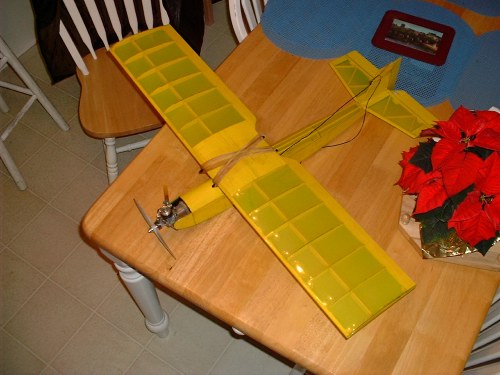
Review of the Airtronics Q-Tee
By Jim Woodard
Hello James,
If you are interested for the next or a future newsletter, Here is a brief review of the re-release of the Airtronics Q-Tee from the mid 70's.
I have wanted one of these since I was a young and up and coming RC Pilot. This plane has always looked fun to me. With a simple cox engine and 2 channel control, this looked like it would really be cool. My first attempt at 1/2A flight was with a "Craft Air" "Piece of cake". I seem to remember that you, had a "Butterfly", the bigger brother to the Piece of cake. These kits built quickly and were really cheap, I think you could buy one for about $15.00 or so. I used a Cox Babe Bee for power and had many slow lazy flights. I wish I had known back then that I could have gotten more power out of my engine if I had only used the proper fuel. At that time the Talladega Radio Control Club, was purchasing Red Max 10%fuel by the 30 or 55 gallon drum. This fuel would run the small cox engines but not to their potential. I later built a Sig hummer, (still kitted) and had poor luck with a Cox Tee Dee .051. It flew one time with that engine after a very harry hand launch at just at stall speed. I later installed a Cox medallion .09 and it flew pretty well. Again I wish I had known about the nitro requirements for those engines. Sorry I digress.; Anyway, with the great smaller radio gear we have now, I thought What A great time to try another simple RC design. You know how I like the small engines!
Check out my new Q-Tee. I was looking for a small plane to fly at a local park and not offend anyone and I ran across the Q-Tee. It is now being produced by Dream Catcher Hobbies. WWW.dchobby.com The Q-Tee is now laser cut and very well done. The landing gear are optional if you want them. I choose no gear for mine. The instructions have an update to include to the original photo instructions but I found myself building this kit without the instructions. I only used the plans for a guide. The horizonal stab is built on the plans from sticks and the vertical stab is laser cut balsa. The laser cut fuse sides and formers go together quickly and straight. One should take extra care while building and installing the wing supports as a mistake here could yeild a tilted wing or worse,,,, The wing ribs (all laser cut) fit well on the lower spar. Be sure to use the provided dihedral guage to align the inner ribs. The two piece wing is then joined with epoxy and the center section is sheeted and fiberglassed. I covered the entire plane in transparent yellow monokote.
I am really pleased with the way this kit assembled and how quickly it was framed up. I worked on it for 2 evenings before it was ready to cover. I purchased a new Norvel Startup .061 engine for this plane. Using Sig 25% nitro fuel, the Norvel started up quickly on my test stand and has been very reliable. I am using a Thunder Tiger 7-4.5 prop. This combination gives me a mild sound and pleanty of lifting power. For retro reasons, I found a like new Cox QRC engine on Ebay and bought it. I am sad to report that this Cox engine did not have near the power to fly my Q-Tee properly. Perhaps a new one would be better. Maybe a new Black widow would do the job. (I have a sentimental attachment to Cox engines as I cut my teeth on their control line planes as a kid). The Norvel Startup .061 is a perfect power plant for this plane. I have only to lightly launch the Q-Tee into the wind for a smooth takeoff. Flight control is the typical rudder/elevator control. Not the most responsive plane at slower speeds but fully controlable in flight. After a couple to 3 minutes of easy turns and the occasional loop, the engine stops and I begin to plan my approach for hopefully a smooth belly landing. So far so good!
This is a good project for someone wanting to slow down a little. You may recall my Lil' Bubba with the Norvel .061 RC, What a difference!
Hope to see you soon!
Jimmy Woodard
  Thanks Jim for this fine article!
|
**** How Hard Is Your Epoxy? ****
By James Goss
Like most modelers I use a lot of epoxy and I like to keep a good supply in stock. I never know when I will need eight or ten ounces to sheet a wing or to repair a crashed plane. How long will epoxy keep? This is a question I hear a lot and I now have a better answer for it. I have been using Tower epoxy for many years and have had good luck with it until the last few years. I think the problem is that I try to store it too long in advance before I use it. About two years back I received an order from Tower for five 9-ounce sets of epoxy resin and hardener. When I received the order I discovered that the resin was as hard as a brick, of course Tower made it good. Since then I have got several other epoxy orders from Tower and the resin would go hard in just a few months. Several times I simply discarded it instead of being bothered with sending it back. Tower's epoxy has a date on the bottom that recommends it being used by that date in time. It is easy to keep the epoxy stored far beyond this date before you have a need for it, especially if you are not in a building cycle during this time. When you go to get the epoxy off the shelf you are out of luck if it is hard.
This happened to me just last week. About a year back I was getting ready to sheet some really big foam wings so I ordered twelve 9-ounce bottles of epoxy. I have always liked to use small bottles instead of getting the epoxy by the gallon because it is easier to handle. A little while after I received the order I began some home remodeling and was out of my shop for about six months. I finally got caught up on my home project, or at least to a resting place, and decided to build planes again. The first thing I needed was some epoxy so I went to my epoxy storage and grabbed one of the twelve bags. You guessed it; the resin was as hard as a brick. I pulled another from the shelf and it too was hard. All twelve had gone bad and I thought I was dead in my tracks. In the past I have actually used some of the hard resin to make a mix and it did work ok, but the resin was still a past and not completely hard like this batch was.
This time the resin was so hard you could not press the plastic bottle by hand. The resin had formed a crystallized lattice covalent bond that was so tight the resin would break like glass before it would bend. There was no way to use it in a mix. It is always the resin that gets hard and never the hardener. I was getting ready to dump all twelve bottles of resin when I had an idea. I have always used the microwave oven to warm resin and hardener when it was cold and hard to get them out of the bottles, so why not try the microwave. Trial and error showed that it takes about 30 seconds in the microwave for a full 4.5 ounce bottle of resin. After it is heated allow about 10 seconds to react and then squeeze the bottle for about 10 seconds. The crystallized resin will return to a liquid and it is good as new. It works every time and reactivates the resin no matter how hard it has become.
This has given me a new outlook on storing epoxy on the shelf for many years. I don't think the hardener will ever go bad, but I am not 100% sure. The epoxy I used in this experiment was 30-minute epoxy. The method will work on any epoxy, slow or fast, because the resin is the same regardless of its setting time, only the hardener is different. I hope knowing this will help your modeling experiences as it has mine.
|
Recent e-mail
#1
Hello James,
You are a demented fellow.
I very much enjoyed Dave McD's website, and was encouraged by his presentation to visit your site.
I DID like your website, and your aircraft are wonderful,
Your shop/work area is immaculate.
This is less than acceptable and, in your case,
horrendous!
You should be working on aircraft and NOT cleaning that
shop for photo ops!
If my children required medical surgery I would be pleased
for it to be conducted in that workshop!
Please devote your time to design or fabrication, or at least send me the bill for the cleaning lady's next visit!
Thank you very much sir,
Rich
#2
From: [email protected] (Reg Liebrecht)
Hi, I came across your nice site and was hoping to ask
for some info. I see that you have some twin engined
plans. I am interested in getting into twins and was
wondering if the Pica Dualist would make a good first
twin. For info: I have trike, tail dragger, high wing,
low wing, and warbird experience in both 40 and 60
size planes. I am interested in your opionion and
comments. Regards, Reg Liebrecht
Hello Reg,
Thanks for visiting my site. The Pica twin is a well designed twin engine and I think it would make you a good first twin engine plane. There is a lot of building time required for this plane, but it is worth it. The Twinstar 40 is also a nice first twin plane. It is an ARF andwill fly with one engine better than any other twin I have flown and it lands so easy. I used two Magnum .28 engines and they really sound great with plenty of power. Good luck! James
#3
Hey James, I thought I would let you know that I have my stamp plane going. I have flown it maybe 10 times and I have never had so much fun. I hope to see you soon to show you my progress. Roy
#4
ubj: 6 mil Stamp
Date: 12/09/2002 12:57:08 PM Central Standard Time
From: [email protected] (L Scheideman) Hawaii
James
I have been following your stamp projects on your page and am building a 6mil stamp with a 40 FP for power. I'm interested in adding flaps and wonder what you recomend for better takeoffs & landings, the split or vectored flaps.
Thanks
Lou Scheideman [email protected]
P.S. come visit us at our club in Hawaii, I'll even clean up my building room ( our guest bedroom ) so you have a place to stay.
|
Wayne's New Hobby
 |
 |
Doughnuts
By James Goss
I guess I like doughnuts as well as anybody, especially those that are cream filled and chocolate covered. I also like to see model airplanes perform doughnuts (ground spins) on the ground before they take off. If you haven't seen a model doing a doughnut it is hilarious. To do a doughnut you get your plane spinning around in a circle without moving forward, it just sets there spinning. Some planes will do a doughnut better than others, but most all planes will eventually tip over if you keep it spinning long enough. Of course you are asking for damage to your plane every time you attempt a doughnut. I have seen wings broke in half while doing a ground spin because they flipped over and hit on the wing. I wouldn't want to use my best planes for doughnut practice.
I have found that a good doughnut plane is one that has its main wheels spaced a good distance apart. Of course the plane must be a tail dragger and not a nose gear plane. A nose gear plane will not do a good doughnut at all; so don't even try it because you will damage your plane for sure. A wide wheelbase on a tail dragger will give your plane the stability it needs to keep it from tumbling end over end. My high speed Postage Stamp plane will do doughnuts better than any plane I have ever had. The wing is 24-inches wide and the wheels are spaced 24-inches apart. Doughnuts should always be done in a counterclockwise direction to take advantage of the engine torque. Your prop torque tries to turn the plane CCW so why not take advantage of that. Give the plane full left rudder and full throttle; normally right aileron is needed to help hold the plane on the ground. Your plane should set there spinning like a fool.
I have always wanted to see a model plane takeoff while doing a doughnut. This may be impossible to do, but my Fast Stamp might be able to do this stunt. I took the Stamp to the field today (8-21-02) and gave it some more test flights. After I had flown for a while I decided to try the doughnut takeoff. I landed and got it in position at midfield and gave it the gun. I was taking it to the left, or counterclockwise as viewed from the top of the plane, and it was really moving with good stability. I gave it max right aileron (elevon) but it didn't leave the ground. I couldn't understand why because with that speed I thought it might. When I got home later that night I was thinking about it and realized that I should be giving it left aileron instead of right. Right aileron helps to keep it on the ground. By rotating CCW the trailing edge of the wing that was attacking the air, which was the left aileron, was positioned down. This would put downward pressure on the wing instead of up lift. I now realize that I need to get the plane spinning while holding right aileron to keep it flat on the ground and then suddenly give it left aileron. It may not leave the ground, but it will have the best opportunity of any plane to do so.
If it does leave the ground what do I do then? If the nose will stay pointed up I think everything will be all right. Maybe I can immediately go into a hover and get my wits straight and become oriented. Chances are slim that it will leave the ground, but I will never know until I try it. One thing I really like about these Stamp planes is that experimentation is at our fingertips. With what other plane could you even be thinking about this kind of stunt? Being so easy to build and inexpensive, not to mention tough as nails, I don't mind trying any trick in the book, and some that hasn't been written yet.
|
Why Does Your Two Stroke Engine Not Run?
By James Goss
Our two-stroke engines are about as simple as an engine can get. They are easy to understand and easy to disassemble. For an engine to be so simple in design, they can really give a modeler a hard time at the flying field when they don't work like they should. There is not much that can keep your engine from running if we just stop and think before we jump to conclusions. How hard can this engine be to analyze? It only has three moving parts while the engine is running, if you count the piston and rod assembly as one unit. The piston assembly, the crankshaft, and the ball bearings (if used) are all that moves. The carburetor does have moving parts, but they are for control purposes and their movement will not stop your engine from running. It may not run proper, but it should at least run if you set the throttle at a fixed point and leave it there.
If the glow plug is hot and fuel is being pumped to the top of the piston you will have ignition. Lets take a new engine for an example and say that it ran fine for a couple of weeks and then would not run at all. The first thing that we do is to change the glow plug because that is the easiest thing to do. Most new engines, especially the high rpm jobs, will have some metal wear during break-in and will deposit a metal film on the glow plug that makes it run cooler. Changing the glow plug will either fix the problem or it will not. We will say that it didn't fix the problem and the engine still will not run at all.
With a good glow plug and a known good 1.5 volts across the plug, we now know that the problem must be in the fuel delivery to the combustion chamber. There are quite a few possibilities here because of the fuel tank and tubing associated with it. I would recommend that you do this first. Remove the supply tubing that comes from your fuel tank and also your pressure line from the muffler. Since you have been trying to crank the engine there will be some fuel in the crankcase that you need to remove to insure that the engine is not flooded. Remove the glow plug and place a paper towel on top of the engine to catch the fuel, turn the engine over with your electric starter to blow the excess fuel from the crankcase. You can check the towel for dampness and if dry you can replace the glow plug. So we now have a dry crankcase and the engine is disconnected from the fuel tank. At this time we need to see if the engine is capable of ignition. To do this place a few drops of fuel in the carburetor. With your glow battery in place try to start the engine, it should fire for a few cycles. If not, add a few more drops to the carb and try again. What you are checking is the fuel delivery system from carb to combustion chamber atop the piston.
If the above test went ok then everything from the carb output to combustion chamber is good. If the engine never fired, then you will need to check the bypasses and porting in the cylinder. On a new engine it is highly unlikely that these are stopped up, so the above test probably went ok. Most engines will have either 1,3, or 5 bypasses cast into the cylinder base. The fuel travels from the carburetor through the center of the crankshaft shaft (this is what front induction refers to) and then through the ports in the cylinder and arrives in the combustion chamber. All this occurs on the down stroke of the piston. When the piston moves up it sucks fuel into the crankcase, when it goes down it pumps fuel to the ignition chamber.
With the fuel tank connected the engine still does not run. We now know the problem is in the fuel tank system or the carburetor. Fuel is not getting to the output of the carb and we can see plenty of fuel at the input. To go from the fuel tank to the carb output the fuel must pass through the needle valve. The needle valve meters the fuel so the engine will not receive too little of too much fuel. The needle valve housing is the smallest area that the fuel must pass on its journey to the engine. If a small object (trash) enters this area it will become trapped and hinder the fuel flow. Nine times out of ten this will be the problem. This means removing the carburetor and cleaning it out. It is a standard practice to use a small piece of fuel tubing connected to the needle valve input nipple and blow through the carb. This may send the obstruction on through the carb or it may just wedge it tighter. A better way instead of using pressure is to use a vacuum to pull the obstruction out. Remove the needle from the needle block assembly and connect that same piece of tubing connected to a large syringe, like the Sig fueler, to the valve body. Give the syringe a hard pull and out comes the obstruction. The syringe is a good tool to have in your flight box for field repairs such as this. It may keep you from having to remove the carburetor from the engine and let you get back in the air sooner.
If fuel is not getting to the carb input or you can see bubbles in the line to the carb, we have fuel tank problems. The most common is getting holes in the tubing, either inside the tank or outside the tank. What I like to do here is temporarily connect a small fuel tank onto the side of the plane, at the same height as the main tank, with rubber bands. Connect the fuel lines as always. If the engine now runs we know the main tank has a problem. If the engine still behaves in the same manner, it is not the tank. If you find out that it is not the tank you have saved yourself a lot of time by not having to remove the tank and then reinstalling it.
I had much rather work on an engine that will not run at all instead of one that is intermittent in its operation. Take the case of an engine that runs fine and all of a sudden it stops abruptly. The question as to glow plug or fuel supply comes up again. First change the most likely thing, the glow plug. If that doesn't cure it the fuel supply is being interrupted. Knowing the path that the fuel must take it is just a mater of time until you find it. Again there may be some foreign material trapped in the needle valve assembly. This material may move around and cause different symptoms from one run to the next. Using an inline fuel filter will help prevent a lot of problems such as this, but the filter can also be a problem if it leaks and allows air to be sucked into the line.
Air leaks is also a common thing with a two-stroke engine. A common place for an air leak is around the carb base, the needle valve, the head, the glow plug, and the back plate cover. I have had engines that after a few minutes of running time they would quit. Each time after the same amount of run time they would again quit. It turned out to be a loose back plate. After the engine heated up, the aluminum would expand and pressure would escape. When the piston moves down it produces pressure in the crankcase that pushes the fuel through the intake ports to the top of the piston for ignition. By having a leak in the back plate, the pressure is not great enough to force the fuel through the ports so the engine quits running.
A leak around the needle valve will prevent the engine from sucking the fuel; it draws air instead of fuel. A leak anywhere along the fuel supply line will do the same thing. This includes the tubing inside the fuel tank, the line with the clunk on it. If the pressure line from the muffler is leaking, the fuel tank will not develop its 1-psi of pressure and fuel will not flow to the carb the way it should.
As I said earlier, the engine is a simple device that can still give you a lot of trouble when they are not running the way they should. Just remember, if the glow plug doesn't fix the problem it must be a fuel flow problem, too much or too little fuel reaching the combustion chamber. All you have to do is to determine which it is, usually too little. Don't overlook the remote possibility of having bad fuel. Try some different fuel just to be sure.
|
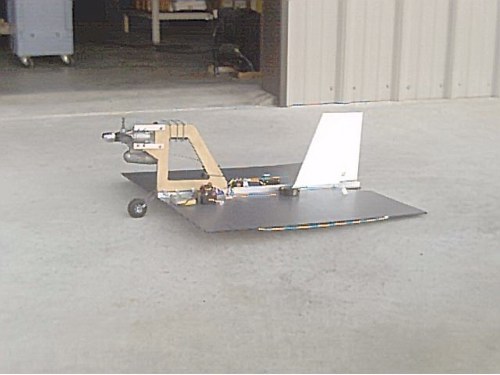
A New Stamp Design
By James Goss
It has been three or four months since I was in my shop for anything other than home remodeling related jobs. Today (January 22, 2003) I decided to spend the day in my shop and build an airplane. I was thinking about working on my bucket plane, but on the way to the shop I had another idea for the Stamp. How about having a Stamp with no wheels, but it will be able to takeoff from the ground like any other plane, simply let the plastic skid across the grass. Raise the engine by using a pod so the prop will clear the ground. This sounded good so I made a sketch and went to work. A couple hours later the plane was ready to try. I had made the pod from ¼ plywood and was not sure the pod would support the TT .36 engine without excessive vibrations. The first test was to see how the pod performed. With engine running the pod was surprisingly stable and appeared to have plenty of strength to do the job. The next test was to see if the plane would move forward with no wheels. It would move in some areas of the grass, but not in the rough grass. I made a modification and added a small single wheel under the engine. This little wheel really did make a difference. It will handle any rough terrain now. You can't see the tiny wheel in the grass so the plane looks like it is floating on the grass. Having a low center of gravity I think it is going to be a good doughnut machine. It also turns even sharper than my other Stamps. I will probably test fly it this Saturday if it is not too cold. I don't have a good name for this version of the Stamp yet so if you have one pass it along to me.
I think one of the advantages of having an inclined thrust line is that the rudder will be almost twice as effective when it comes to turning the plane. I already know that on the ground the rudder has more than enough control to turn the Stamp in a tiny radius. With the raised engine the rudder sees nearly all the prop blast so it is very active. The centerline of the engine is about six inches above what it is in the standard Stamp. I am not sure how the elevons will respond. At higher speeds I think they will be ok, but at hover speed I am just not sure. In a hover they may not have enough airflow over their surface for the correct leverage to produce the fast rolls the Stamp is accustomed to. On the other side of the coin the plane may hover with more stability due to the offset thrust line. The only way to know for sure is to get it into the air (if it will rotate) and see how she will perform. All planes have some unique maneuvers they will do; I wonder what special maneuver this plane will have? With all the rudder control it is going to have I wouldn't be surprised if it would do a pinwheel. I have only had one plane that would perform a pinwheel and that plane was my Spinsation. Remember that a pinwheel is when you bring the plane to a vertical stall with chopped throttle. Give it max throttle and left or right rudder and the plane will spin like a pinwheel as it falls. Usually two or three spins will be the limit, but it is a real impressive maneuver to see. I am also anxious to see how it flat spins, if at all. From what I have seen it do on the ground it may be the best ground-handling plane I have ever seen. I will update you soon.
I think if the pod is moved back toward the CG or beyond, the plane will skid across the grass with absolutely no wheel up front. Also a 4 or 5 degree up thrust in the engine might help it move across the grass with less resistance. The pod also has another advantage I hadn't planned on. Everyone that has flown a Stamp knows that this plane is a little awkward to carry around while the engine is running (that is all except my Pusher Stamp). The pod makes a perfect handle to carry this plane from the flight line to the field. This is an unexpected added bonus.
 Update
1-25-03
It was really cold at the flying field today, but I had it in mind to test fly the Gooseneck Stamp today so I endured the cold. (Dave came up with this name Gooseneck Stamp) After charging and fueling I noticed something was wrong with the charge of the receiver battery, it didn't wont to take a charge. I had charged it a little the day before so I checked it with a loaded voltmeter and it showed ok. I decided to go ahead with it so I ran it allover the field and couldn't believe how well it stuck to the ground with unbelievable turns. Finally I brought it around and headed it down the field and brought up the throttle. It steered straight as an arrow and it did rotate to leave the ground. I had been wondering if it would rotate because the wing was so close to the ground, so this answered that question.
When it got in the air it needed a little aileron trim and a little down trim. It didn't take long to get comfortable with it and it seemed to handle about the same as my regular Stamps. I made several circuits and was about ready to bring it in to see if it would hover in for a landing when it started to act up with me. It was making a few moves of its own so I new something was wrong. I didn't have full control and it set in for a hard landing. It did receive some damage; the ½ inch aluminum spine broke where I had drilled to mount the pod. I think I will move up to a ¾ inch aluminum spine for the next one because there is no way around drilling the aluminum to support the pod. Having the pod places a great deal more stress on the spine than in a conventional stamp. I also think I will go ahead and move the pod to the rear a little.
By and large, I was pleased with the results of the test flight and I feel this plane has some real potential. Just to see it operate on the ground makes it all worthwhile. It shouldn't take me too long to have another Gooseneck Stamp ready to test and then I will be able to see what it will really do.
|