Cow Patty News
Monthly Newsletter
November & December 2002
The Anniston RC Flyers & Talladega Radio Control Club

God Bless Amereica
What is in the letter this month?
|
The November newsletter is late due to site difficulties. I have decided to combine the Nov and Dec edition to get back on schedule.
Don't forget to renew your AMA card before the end of December.
|
Christmas Get Togeather
Anniston R/C club will be having a Christmas get togeather for all Anniston R/C members and all TRCC members. It will be on the first Monday in December at Ryan's in Anniston at 6:30 pm. All members are urged to come and bring your wife and family members. So mark your calendar and plan to attend.
|
Last month I had an article on finding the center of gravity by weighing your plane. Jerry McCuistion has some good additional information on the subject.
I have a minor addition to your tip on how to determine the cg by weighing. This is the same method used to weigh full size aircraft. They do this on new planes and ones that have been altered or have had major repairs to them. In order to get an accurate reading the plane must be level side to side and fore and aft. If the plane is a tricycle gear the nose wheel may be adjusted up or down to level it. With a tail dragger you will have to use a stand on the scales to raise the tail to level then subtract the stands weight from the weight of the tail. If the plane isn't level when it is weighed it will throw the results off slightly. Most full size aircraft have a designated frame rail, seat rail, or the top surface of the stabilizer that is used to determine when the plane is level.
Thanks Jerry
|
High Torque Servos
By James Goss
I thought it would be interesting to compare the radiation generated by a servo for low and high torque servos. I consider anything over 50 ounces of torque to be a high torque servo and when it gets up to 100 ounces and above we are beginning to really get serious. Servos as high as 200 and 300 plus inch ounces of torque are available. Everyone that has been in the hobby for a while understands about keeping the servos away from the antenna and receiver when possible. This is due to the radiation produced by the servos and being picked up by the receiver, amplified again and inducing a glitch in the servo.
The radiation I am referring to is a result of current flow in the servo and servo pigtails. When current flows in a conductor a magnetic field is generated. It starts at the center of the wire and expands outward into the area around the wire. How far out from the wire it travels depends on the amount of current in the conductor. When the servo is at neutral it is pulling minimum current and the magnetic field is at minimum also. When the servo is commanded to move, a larger current value will flow through the dc motor and its torque will move the control surface. At this time the radiated magnetic field expands and covers a larger area surrounding the servo. The higher the mechanical load is on the servo the more current it needs to generate the required torque. High torque servos do require more current for their operation, even at neutral. This higher current creates a larger radiation field around the servo and its wires.
A while back I decided to run an experiment and measure the radiation generated by a standard servo (44 oz) and a high torque servo (108 oz). I set my scope up and used a 220 mh coil as a pickup sensor. I wasn't trying to measure the noise field by any standard; instead I wanted to compare the two servos and measure the radiation generated in microvolts across the 220 mh coil. With both servos at neutral it was easy to see that the high torque servo had more radiation and for a much greater distance. When a mechanical load was placed on the servos the distance really increased. For the standard torque servo a distance of three inches gave a reading of 50 microvolts. For the high torque servo it produced the same 50 microvolts, but at eight inches away from the servo. The mechanical load on the servo was my hand, not calibrated very well, but did place an unknown load on the servo. The actual load on the servo was not important for this experiment. It is easy to prove that high torque servos do have more radiation. I think this will hold true for all brands of servos.
You may wonder why it is important to know about radiation from servos so here is an example. In my quest to improve the Postage Stamp planes I decided to replace the standard servos for the elevons with some high torque, high speed, coreless servos. The results was amazing, the plane was all over the sky. Glitch after glitch, I only had half control of the plane, the other half of the control was coming from the servos. I flew it a few more times with the same results. Moving the antenna didn't solve the problem; the receiver was picking up the radiation. The plane flies fine with standard servos so this is just another case that shows high torque servos radiate more energy than low torque servos.
If you plan to use some high torque servos on an upcoming project be sure to keep this in mind and watch where you place your servos. A lot of sport planes today have their servos in the tail section so be careful about running the antenna within a few inches of high torque servos.
|
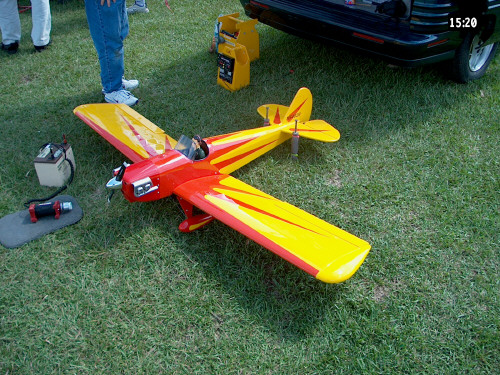
Dr. Vic Cestaro and his new Spacewalker
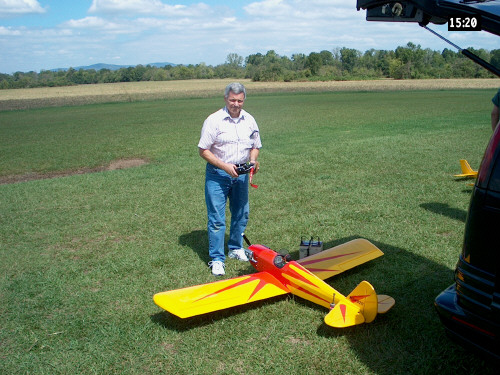 Data
Wingspan: 80 inches
Weight: 11 pounds
Engine: Thunder Tiger .91 four-stroke on a Dubro aluminum, vibration damped motor mount with Master Airscrew 14x6 prop
Servos: (2)Hitec HS-77BB 61oz-in. on ailerons, (3)Hitec HS-605BB 77 oz-in on pull-pull rudder and elevators with separate and independent servo on each elevator, (1)HS-81 mini-servo on throttle.
Radio: Hitec Supreme 8-ch receiver
To date the plane has 8 flights. It wound up being a little tail-heavy and required about 12 oz of weight attached to the motor mount to get the CG right. It is a delight to fly at one-third throttle (kind of like a cub) and practically lands itself. Half-throttle takeoffs are the norm. The .91 four-stroke has loads of power and should get it through most aerobatic maneuvers (after I get more familiar with the airplane).
|
Nobody can detail an airplane better than Dr. Vic.
 |
Servo Warning
By Jerry McCuistion
Something you might put in the news letter is an item I came across on Horizon Hobbies Webb site. JR has had some servo motor failures with their DS8411 digital servos. According to them it only happens to those servos used in helicopters. They said it happened only to the people using .70 or .90 engines in extreme 3D flying. If anyone has these servos they will replace the motors and other parts to upgrade these servos to the same standards as the servos that will replace the DS8411. The webb site said that no one using these servos in airplanes has experienced this problem.
I don't know if anyone is using these servos or not but if they are they need to send them in and they will fix them at no charge.
|
Tires For Your Model
By Garland Minor
Most all modeler's use the size tire that the plan calls for or what comes with the ARF kit. Neither the plans or the kit know just where and what surface you will be flying off of, and here the tire size can make a difference in the plane's performance in takeoff's and landings. If you have your plane set up and flying good from a hard surface runway and then visit another club who has a grass runway you will experience some disappointment with the performance when you first takeoff and land. A grass runway and the tire size in use will have a huge effect on the takeoff and landing roll. If you know you are going to be flying from a soft surface field, such as grass, then take some larger diameter tires with you and use them while you are there. Keep in mind that not all grass runways will be the same. There will be variations in the type of grass, thickness and when it was last mowed. The use of wheel collars makes it very easy to change tires for a given runway surface. Of course with a model that has retracts the wheel wells are more that likely made just to accommodate one size tire so this option will be limited.
I have seen many new model's, trainers mostly, where the nose wheel will be somewhat too long compared to the main gear. And all have the recommended tire size or what came with the kit. This creates a plane that has a greater than normal angle of attack and increases the quickness at which the plane leaves the ground during takeoff. Now comes the landing! The plane will have to have an angle of attack on approach that's close to or above the stall angle in order to keep the nose wheel from touching the runway first. In most cases the nose wheel touches first and then you race down the runway bouncing up and down and not in good control. Not very pretty looking. Got an ARF and can't shorten the nose gear? Then put a smaller wheel on the nose and place a larger size tire on the mains.
Be prepared to use a different tire size when visiting another site but most of all ask the local members what would be best for your plane on their field.
|
Wing Webbing
By James Goss
Adding wing webbing is one of the cheapest things you can do to insure that you have the strongest wing possible. It adds very little weight and cost to the overall project and only takes a few minutes to install. In case there is somebody reading this that does not know what wing webbing is, let me describe it for you. You create wing webbing by adding balsa between the upper and lower wing spars in each rib bay for the length of the wing. This applies to built up wings only and not to foam core wings. It is important to arrange the balsa wood grain in a vertical position to insure maximum strength. If you take a piece of 1/16 balsa and try to pull it apart with the grain running toward each hand, it is very difficult or impossible to do. If you try it with the grain running at a right angle to your hands it will almost fall apart. 1/16-inch balsa makes a very strong web for your wings. How much weight do you think a piece of 1/16 balsa, only 1-inch wide will support? I have just completed a series of tests doing just that, testing the strength of balsa, actually the tensile strength, by seeing how much weight it will pick up and hold. Here are the results: 1/16 balsa, 1-inch square, will lift and hold 12 pounds without separating, of course this will vary with different grades of balsa. If you place 1/16 balsa webbing in five rib bays, on both sides of the spar, you will have increased the separation strength by 120-pounds. This is more than any high G force maneuver can develop. In larger planes we sometimes find 1/8-inch light ply for the webbing. Light ply has a much higher tensile strength, but it is not much stronger than balsa as far as longitudinal strength.
What you are doing by installing balsa webbing is tying the top and bottom spar together to make them into an I-beam or channel, just like a piece of channel iron. You know how strong steel I-beams are. Some modelers will place the balsa in the center of the two spars that makes it a true I-beam for maximum strength. This takes a lot more time so most modelers will simply glue the webs to the sides of the spars, either on the front or the rear side. If you really want to make a strong beam you can place the webs on both sides of the spars. The webbing has to be able to withstand both pushing and pulling forces that act on the wing. If it had to only handle pulling forces then material such as ca hinges would be ideal because of their strength and lightweight. While in flight the wings have a tendency to bend while in a stressful maneuver such as a snap roll, a high-speed dive, or some of the tumbling that we do. On one of my giant scale planes the covering actually split on its leading edge from the wing bending during a high speed tumble, now that's scary. We would probably be amazed if we actually knew how much our wings do bend while under stress, even on a small plane.
When you place the webs it is not necessary that they touch the ribs. This is because the ribs with their grain running cord wise of the wing would add nothing as far as tensile strength to the webbing. I always leave space between the webs and the ribs so I can have access to get more glue to the leading edge sheeting after the sheeting has been installed if it needs it. Have you ever seen the time that you wished you could still get some glue to the leading edge sheeting? You have some areas that are loose and maybe it puffs up here and there where it didn't make contact to the rib while you were gluing it. By having these access holes you can very easily drop some thin ca glue in that area and let it run down the front edge of the rib and sheeting. You can also take a pin and perforate the area in need with small holes and let thin ca run through them, place a piece of waxed paper over the area and hold down until it cures. This is where I usually glue my thumb to the sheeting.
Remember that you are trying to make the wing as strong as possible while keeping the weight to a minimum. A full set of 3/32 balsa webbing in a sixty size plane installed with ca glue will only add about one ounces of weight. I don't think this amount will keep anybodies plane from going vertical. I have never seen a wing panel break anywhere other than at the root joint of the wing, or within a few rib bays from the root, other than on large gliders that have polyhedral in their wings. The wing is like a leverage bar with the tip of the wing being the holding end of the bar and the root end being the prying end of the bar. The longer the wing the more prying force is felt at the root end of the wing. So the longer the wing the more your plane will need webbing at the root end.
I have seen a lot of planes fly without any webbing in their wings at all. Some that were designed to have it but the modeler forgot to install it or just decided not to use it. These planes did seem to perform ok without the webbing, even in some stressful maneuvers, but when they hit the ground in a minor mishap the wing did break into several pieces. So why take a chance with the wing breaking in flight or when it hits the ground during a hard landing. Beef the wing up with webbing and then if it breaks you will know that it wasn't your building skills, it was your flying skills that got it.
|
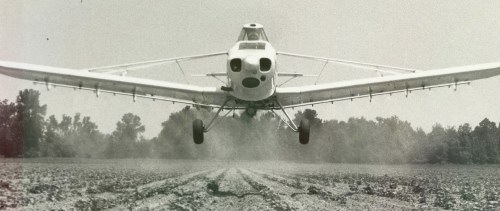
Crop Dusting
This is how club member George Langham spent his workdays back in 1963. George is cruising along at 90 miles per hour at just four feet above the cotton. His plane is a Pawnee and if you look close you can see George in the cockpit. This picture was taken near Holly Springs, Mississippi just before the photographer hit the ground. George is a real asset to our club.
 |
Bucket-O-Fun
By James Goss
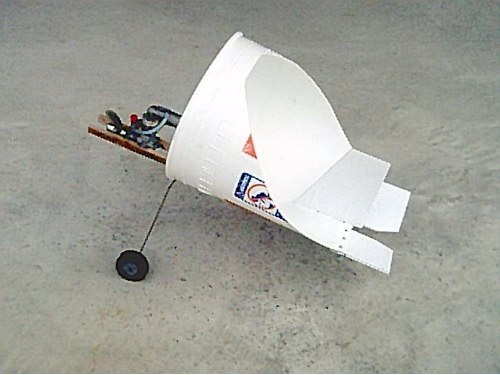 For the last few weeks I have been inactive in my shop because we are in another phase of our home improvement project. I was able to sneak down to my shop last Thursday for a few hours, I told my wife I would be in the attic pulling some wire if she needed me. I got caught though because she didn't hear the normal bumping noise and came looking for me. Before she found me I had enough time to get a project underway. I have been thinking about a new design, a pipe plane, ever since I built the Postage Stamp Mailbox. I haven't spent any more time on the mailbox, but I am sure it will fly well when balanced. For the pipe plane I wanted to use a pipe of some type for the wing, I just didn't know what to use. A couple of weeks back a nice fellow by the name of Chris Watkins came over to visit my shop and to pick up a Stamp plane, Chris is from Georgia. While he was here Chris showed me a small paper airplane that his son had been flying. It was round and would fly very well in a straight line of flight. I was amazed at how well it flew and I visualized using a pipe, in the shape of this paper plane for my project. If this design actually functions in the air I will give credit to Chris for the idea. You can see the little paper plane in the picture.
The five-gallon bucket is a discarded detergent bucket my wife gave me. It is white plastic and has less weight than the black buckets such as the ones that driveway sealer comes in. It also weighs less than sheetrock mud buckets, but they will probably work fine also. The pipe plane is very fast to build and I can see many advantages for this design, assuming it will fly. The durability will be even better than the Stamp/PBF planes. No spine will be needed because the round forward section of the wing supports itself. With the upper part of the pipe this plane is something like a biplane.
The diameter of the bucket is 11-inches, this gives about 35-inches for the circumference. With elevons the overall length of the plane is 16-inches. It is kind of short and could probably use more tail moment. It has about as much wing area as my Stamps have, but some of that is vertical. For its first flight it will have a vertical fin only and not a rudder. If it does get off the ground and actually behaves like an airplane I will add a rudder. I am going to use a Magnum .28 engine and the plane will weigh about 2 lbs 6 oz. I will probably have it ready to test this weekend if I can get some free time to install the radio gear. If you have an idea for a name for this plane please let me know. So far it is a pipe plane, a bucket plane, or sky bucket.
Update
I made it to the field today with my Bucket-O-Fun. I didn't get it in the air, but I did learn two things about it. First it tracks very well down the field and the rudder steers ok. Second, the CG needs to be moved to the rear about an inch. I thought I had it balanced at 3.4 inches, but it was 3-inches exactly. I am going to move it to 23% or 4-inches from leading edge. It just would not rotate off the ground. It came close a couple of times, but needed more speed. I may go ahead and change the engine from the .28 to a .36, but I will probably try it again with the .28 after I relocate the CG. I forgot to carry some lead weights to the field today and as usual nobody had any. I may get to try it again tomorrow if the weather holds. I didn't figure it would fly the first go around anyway. It does look odd sprinting down the field and I also found out it tumbles well on the ground. Maybe it will do as well in the air.
Update
I decided to try it again today, Saturday 21, 2002, and see if I could get the bucket off the ground. This time I used my backyard test field, it is rather small with trees close by and with a bumpy runway. It takes me about 40 minutes to get to my regular flying field so this saved me a lot of time going back and forth for the tests. Using my local field was equal to three or four trips to the main field because I had to return to my shop several times. For today's test I had installed a larger .36 TT engine and had moved the CG back to four inches. Wind was calm and it was about 4 pm with the sun to my back. The problem I had today was mainly tracking on the rough field. I knew if I got it in the air I would have to set it back down quick because of the small area.
On the first flight I could see that it did want to rotate this time. The .36 engine elevated the bucket with ease as long as I could keep it going straight until it gained the speed it needed, and that didn't take long. It would lift off the ground and do a quick loop. After several tries to make sure I didn't have too much elevator, I decided it was tail heavy. The CG at four inches was changed back to three inches. This was accomplished by moving the engine ½-inch forward and then installing a heave hub spinner nut. This was about the twelfth test flight and it tracked well down the field and rotated without looping. It gained altitude fast and was at 50-feet in no time, and was also approaching the tree line at the end of my field. I throttled back and let it drop back to earth. It remained kind of flat as it came down. Out of about ten more tries I got it up two more times with hard landings. Even though it was hard to get into the air, it did fly and this makes all the effort worth while. No pictures, I was alone. Knowing that it can fly, if everything is just right, I am going to make a few modifications and have another go.
It is so short in length it likes to tumble when it hits a bump on the ground. I would like to increase its overall length by about three of four inches and leave more of the bucket wall on top. This will capture more of the prop blast for thrust lift. No longer than it was in the air I could tell the orientation was going to be difficult to keep up with, larger will help here too. The bucket I used was not a full five gallons. I would like to find a larger one, maybe seven or eight gallons. I will be keeping my eyes open for something larger, if you know of anything that may substitute the bucket please let me know.
Update
I have found a 9.25 gallon bucket (trash can) that I think will be just right for the bucket plane. It has the length I needed for the longer tail moment. I will probably install the gear in it today Nov 7, 2002 and try it this weekend.
|
Combat
By Wayne Long
Fellow RC Pilots,
Loren from The Talladega RC Club and I had our first full contact combat match last Saturday at the Munford field.
Judging by the physical damage done to the planes I would have to say that Loren took the honors. Although the damage to my plane was minimal Loren's plane had no damage at all. With only one actual contact { it's harder than it looks} Loren's prop chewed away my left wing tip leading edge. Time to break out the tape. I think I can honestly say that I have never had a more fun or intense time flying an RC plane. This is something that every RC pilot needs to do at least once. But look out, it seems to be very addictive. I cant wait to return and seek my revenge. I still have a few Stamp kits to give away but only to those who promise to do combat with them.
Wayne Long
Wayne is right, there is nothing more fun than trying to destroy your plane in combat. Of course you need to use a plane such as the Stamp or other non-valuable plane. Combat with streamers is also fun, but nowhere near the fun as full contact combat. The adrenalin rush will keep you high all day long. So get you a stamp and have a go at it.
|
Changing Your Radio Frequency
By James Goss
As you probably already know you can change your radio channel by simply changing your crystal in the receiver and transmitter. With Futaba radios the receivers are center tuned for either the low band or the high band. Channel 11 - 35 make up the low band and channel 36 - 60 make up the high band. So the low band frequency is 72.010 - 72.490 Mhz. and the high band is 72.510 - 72.990 Mhz. Center tuned refers to the receiver being tuned and peaked out to the center frequency of the low or high band. In the low band the center frequency would be 72.250 Mhz. and in the high band the center tuned frequency will be 72.750 Mhz. There is no doubt that the receiver will work best at or near the center frequency and produce the greatest range because that is where the receiver is peaked out. It will be difficult to have a flat response curve all the way through the low or high band so that channel 11 will have the very same amplitude as channel 35 when the signal reaches the IF amplifiers in the receiver, or that channel 36 will have the same amplitude as channel 60. This is why they tell you that if you change your crystal you must be sure to range check before you fly, you may not have the same range characteristics.
Knowing this I have always desired to use a channel at or near the center frequency of the low or high band. Channel 23 has the exact same frequency as that of the center tuned low band and channel 48 carries the same frequency as the center tuned high band. So if you are using these channels the receiver and transmitters are tuned for them. This is not to say that the equipment is not tuned for all our channels, but these may develop the greatest amplitude. When I say the receiver is peaked out for the center frequency of the low or high band, this means at those frequencies the oscillators have been tuned by adjusting coils, and in some cases capacitance, to oscillate at those frequencies. By changing the crystals the oscillators are forced to change their frequency also, but the farther we get from center frequency, the more difficult it is for the oscillators to sustain oscillations, and their output will tend drop off. The same theory takes place in the transmitter and receiver so either can be altered. Both systems use phase locked loops and these circuits are very accurate in maintaining an oscillator on frequency, but nothing in electronics is perfect.
You might wonder why they just don't have one band that reaches from channel 11 to channel 60 and center tune to channel 35 or 36. This would be trying to get too broad a bandwidth and the lower and upper channel amplitude would drop off radically. Basically the cutoff point is known as the half power point and this is reached when the signal amplitude reaches 70.7 percent of what it was at the center frequency. If the voltage amplitude drops off to 70.7 percent of center frequency max, the current capability will also drop and this produces half the power in watts as compared to the developed power at center frequency. The 70.7 percent reference is used to determine if the amplitude of a signal is useable or not. If its amplitude falls below this reference it is not useable.
I just feel better knowing that I have a receiver near the center-tuned frequency instead of one near the 70.7 mark. I always use channel 22 and 48 for that reason. If you use channel 20 - 26 or 46 - 50 you are close to the center frequency of the high and low band.
|
R/C Mottos
If you have a good R/C saying and would like to post it here, simply send it to me and I will post it.
...we've never left one up there!
Eat, Sleep, Fly 3D
|
Recent E-mail
You have a nice site and I've spent some time here reading. I hope to build a stamp or two soon. I have the 4mm Coro. Say, in your article you say that to land, you bring it in, pull up while throttling up and let it land vertically. Are you saying you're letting it down at a slant or incline, sticking the tailskid in the ground and then it flops over on the mains? Seems like the 1/8" mains would bend on the bounce letting the prop hit the ground killing the engine. I just need some more explanation here to visualize your landing. The guys on the SPAD site don't use landing gear and belly flop 'em. I don't want to do that. I want to do what you do... if I knew what it is that you do.
I had a brain storm while reading on your site. I just love how you experiment. Anyway, my idea is to have the fin extend below the wing making a cross. I'd then take off and land just like the Pogo of years ago. You remember the Pogo? I'll attach a pic. (I got one of those kits around '55) The fin would have to be big enough to allow vertical support, but not so large that it inhibits those nice rolls you talk about. Nah, it'd be too big... better yet, you could make some sort of wire (1/8"-5/32") LG above and below the Stamp, leaving the regular LG off. With the piano wire, you'd retain the fin as is, but have support for vertical take-offs and landings. Wouldn't that be cool? I'd just make sure the PVC starting rack was high enough to clear the lower wire. You could have a bend on the end of the wire go into a hole in some wood on the Stamp center line, travel aft for an inch or two in a groove in the wood so I could have a strap or two over it and then head off aft at say 45 degrees to its end. The upper one would have to clear the fin. On the end of the wire, I might screw on a red Skotch-lock (wire nut).
... "you", "I", I'm getting my pronouns mixed up here. I'm thinking out loud.
Well, thank you for all you've done for the hobby and nice meeting you Jim. Take care,
Richard in Michigan AMA 70290 [email protected]
Thanks for visiting my site. You have the right idea about landing the Stamp. When you pull up the nose and add a little engine power it will set down on its tail and then fall forward. The 1/8 gear will support the plane without collapsing when setting down vertically. It will sometimes fold if you land with a lot of forward speed, but will bend back to shape with little effort. The gear has to be long enough to keep the prop clear of the ground during landing. There is nothing more fun than setting the Stamp down vertically and then taking off again. I can recommend this little plane to any sport and fun fly pilot and can guarantee you will love it after you have a few flights on it. Keep in touch Richard and good luck when you build the Postage Stamp. James.
Thanks for the great website on your experments with flat plate airfoils. I am so jazzed up about it I ordered a mixer and found a coroplast dealer here in Memphis off the SPAD website.
Looks like a lot of fun and like you, I love to experment to, it's just difficult now to find the time.
More later and thanks again
Al Robinson
KF4QFY
(near)
Memphis,TN
You mention on your site that the smallest Postage Stamp you recomend is 16'X16". Have you built one this small and what did you power it with?
I have built one this size and powered it with a Norvel .074 and micro gear, with a weight of 15 oz. I'll be trying it out this weekend and just need reassurance that it may be successful. I keep looking at it's size and wounder if it's too small.
Oh well, I'll try it anyways.
Hi Frank,
At 15 oz the plane should perform ok. I used a Magnum .28 on my 16-inch square Stamp. It did fly ok, but it was really sensitive in the air. I forget what the weight was, but it was somewhere around 2 lbs 4 oz. Let me know how your test flight goes, James.
James:
Thanks for the quick reply. There are four of us, all building different
sizes for the weekend. I just wanted to be different with my "mini" or
"personal pan" sized Pizza Box Flyer. I'll let you know if it works and how
much fun we have.
Frank
|
The Simplest R/C Plane To Build and Fly
By James Goss
The simplest radio controlled airplane in the world is saying a lot. I don't know of any plane that is simpler to build and fly than the Postage Stamp. The Postage Stamp is a sport and fun fly plane that is very aerobatic and I am improving the design as time goes on. This is not an article on how to build a Stamp plane, but instead it describes why they are so much fun to build and fly. If you want to know how to build one of these planes I already have that information on my web site, http://nav.to/jgosscacc, simply click on Postage Stamp planes and you will find a step-by-step building guide. About three years back I set out to build a hovering machine that would be a training aid for learning to hover. The machine didn't have any wings and only an x tail section. I spent many hours trying to get the contraption to function like I had envisioned, but never did. Had I only known how simple the task really was, I could have kicked myself. All I needed was a simple piece of flat plastic and an engine, why couldn't I think of that back then?
When someone first sees the Postage Stamp plane they think it can't possible fly, I also had that thought when it was being built on my workbench. When I seen it part with the ground for the first time and begin to fly, and fly well, I was truly amazed and thought, It really does fly. I had already been flying some of my other flat planes, but they all had a fuselage. Here is a plane with no fuselage at all and it is still flying. How can a plane fly with no fuselage? I had just always assumed an airplane must have a fuselage of some type or another and that the wing must have an airfoil in order to stay in the air. Once I got past not having a fuselage, the bells started ringing and I visualized many possibilities for this type plane. I have seen many special purpose planes in the past such as the flying stop signs and the like, but they all had a fuselage. Why carry that extra weight around if the plane doesn't need it to fly. By dropping the fuselage the thrust to weight ratio will allow the plane to do some amazing stunts that otherwise would be impossible.
The Stamp has really proved itself as being one of the easiest planes to build and fly. I have built ten in the last two weeks; it only takes a few hours to build a Stamp. It is also the toughest and most durable plane I have ever seen. It is not totally indestructible, but it is not far from it. Most crashes at worst will only break a prop or bend the landing gear a little; you are back in the air in no time at all. I have seen only one Stamp so far that was not able to return to the air after a crash. The radio gear failed and the Stamp went in at full throttle with an Enya .45 engine pulling it like a streak of lightning. The engine was damaged and the vertical fin was ripped off. If the engine had not been damaged we could have gotten the Stamp back in the air in short order. So by and large the Stamp can survive a crash. This is one of the things I like about this plane so much. I can remember over the years when I would have a crash and completely destroy my plane that took me months to build. Here is a plane that only takes a few hours to build and get in the air. If it crashes, and it will, you can keep on flying crash after crash and not have to worry about destroying your plane. If by some chance you do destroy it, that's ok because you already have three more built and ready to fly.
Some modelers feel that this plane is too hard for them to fly. I guess it looks intimidating by the way it likes to fly around with its nose up attitude. This is really the easiest way to fly the Stamp, keep its nose up at a 45-degree angle of attack. It is in its most stable mode of flight at this time and can be flown as close to the ground as you like. Hover it like a humming bird for as long as you like and then set it down in a vertical landing or touch its tail and go. I admit that it is different from flying your regular plane, but it only takes two or three flights to learn its characteristics. After that you are in for a treat, this plane is fun to fly and I am serious when I say that. Anybody can learn to fly it no matter what type plane you are now flying. Soon we will be seeing even the TOC pilots having a ball flying this type plane. No matter how good of a pilot you are there is nothing wrong with flying a Stamp. Everybody needs to get away from his or her everyday routine of flying and have some RC fun without the fear of crashing. Believe me when I say that it will allow you to relax and really enjoy flying for a change, and at the same time give you more esteem and a new outlook on the hobby.
I am not trying to sell or make money from my Postage Stamp design. I simply want to share with my fellow pilots the joy I have found by building and flying these planes and would love to see everyone having the same enjoyment. I think one of the most intriguing aspects of the Stamp is its cost to build. You can actually build the basic plane, everything except the radio and engine, for less than $10. I bet there is no other RC plane on earth that can be built for that price and still fly as well as the Stamp, and that is the price if you buy your material retail. If you already have some of the materials it may not cost you anything. It just can't get any better that that, a free airplane to fly and have the time of your life.
If you noticed above I said that you would crash this plane. It flies so well at ground level, and that is where the most fun is, that you will spend most of the time hovering around one or two feet above ground. No room for error at this altitude so you will eventually conk the ground during some of your flights, this is normal Stamp flying. If you are not hitting the ground you are not getting the full benefits the Stamp has to offer. Now don't get me wrong, you can fly the Stamp at a nice high altitude and really take it easy and may never crash as long as your engine is running. Remember that this plane flies by the engine creating thrust and if the engine stops the plane is going to come down fast. It will glide somewhat if the altitude is high enough when the engine stops, but it is not a glider by anyone's imagination.
Another plus for the Stamp is that it can be flown just about anywhere you choose. It will hand launch or it will do a conventional takeoff. I fly it in my front yard where there are power lines and other obstacles. It will takeoff in a few feet and you can immediately go into a hover and hold it there, get it stable and then start to fly it around at high alpha (nose high) attitude and then do a vertical landing. With a little practice you can make this plane go where you want it to go instead of it going where it wants to go like some planes do. You can fly a full tank of fuel and never get more than ten feet high in an area as small as 50 square feet. This is where the Postage Stamp gets its name because it takes such a small area to fly it. The Stamp takes less area that a control line plane on a 50-foot flight line. Park flyers will not even fly in an area as tiny as the Stamp will. Now that I think about it the Stamp is the best plane in the world after all.
The Stamp will accommodate a wide range of engine sizes depending on how you choose to build the plane. If you use landing gear and a tailskid an engine in the .25 to .46 sizes will have plenty of power for hover and vertical flight. If built lighter a smaller engine will be ok. The .32 to .36 ranges seem to be a really good match for this plane.
So let me sum up by saying that for an airplane that doesn't look like an airplane, it flies better at ground level that any other fun fly plane I have ever flown. These little planes are spreading at an exponential rate and soon we will see them at every flying field in the world. This is because a plane that is this cheap to build, extremely fast to build from materials readily available everywhere, will fly and hover like we have always wanted a plane to do, it is unique in that it is only a flat piece of plastic 4 mm thick and 24 inches square, there is no reason not to have and fly this type of plane.
There is one club member that has converted to all gas engines and swore he would never fly glow engines again. After seeing the Stamp perform at ground level he has changed his mind and is going to get a Stamp. I am sure that all modelers will not accept this simple little plane as being a real airplane, but then we are all entitled to an opinion. The ones that have lowered their standards, so to speak, and accepted the Stamp are the ones having the fun. Speaking for myself I have been mesmerized by the Stamps flying ability and think it is the cats pajamas.
|