Cow Patty News
Monthly Newsletter
July 2002
The Anniston RC Flyers & Talladega Radio Control Club

God Bless Amereica
What is in the newsletter this month?
|
How to Build the Ultimate Fun Fly Plane
By James Goss
Fun-fly planes have been around for many years now and I guess I have built most of them. A lot of them were indeed fun to fly, but they were all missing something. I didn't know exactly what they were missing until I built the Postage Stamp, a fun-fly plane that I am now flying. I am finally 100% happy with this plane and I am no longer searching for the fun-fly plane of my dreams. Who would have thought that a little plastic plane with absolutely no airfoil and a small bushing engine could satisfy a modeler of thirty some odd years, I still can't believe it. But this is the truth; I get more pleasure and relaxation from flying this little plane than I do from any of my giant scale or regular planes that I have been flying for years. I guess it is the fact that it doesn't cost much to build and it is a very rugged plane. You can do aerobatics while only three feet off the ground and you are not worried about a crash. If it does hit the ground (and it will sooner or later), most of the time you just restart the engine and let it go. Flying one foot off the ground has its advantages when it comes to damaging your plane. With a little experience you can bring this plane in for a landing and hover at mid field about ten feet above the ground, reduce power and do a vertical landing with the engine still running, take off in five feet and do it again.
With this plane I spend most of my flying time just above the ground, but it will perform well at high altitude also. It does a nice flat spin and has a really fast roll rate. A nice maneuver I have just started doing is to hover it about three feet off the ground, power up and give max ailerons, don't wait for it to torque roll. While it is gaining momentum going up it is rolling very fast and really looks nice rolling that close to the ground. Its inverted flight is about the same as any other plane; it needs a little down in the elevators. It is so nice to be able to fly this close to the ground and be able to see the plane so well. Being able to see the plane makes all the difference in the world when it comes to hovering.
One of the amazing things about this little plane is that it doesn't try to fall to the sides when you have it in a hover position. When it torque rolls it is easy to keep up with and maintain a vertical attitude. It would probably hover fine without a rudder, but the rudder is nice while on the ground for steering the plane. I think I will build one without a rudder and vertical fin, and also leave off the landing gear. This would save a lot of weight, about eight ounces or more. I bet it would really increase its vertical thrust.
I have had many request for information about building this little plane so I thought I would write it up and put the information on my site. I would like to see many of these planes in the air with different engines so we could do more research and determine the best combination. You will be amazed at how easy it is to build compared to how much fun you will have with it. Two or three evenings and you are in the air and already thinking about your next one that you are going to build for a backup. This plane flies by angle of attack, but at times it will fly as level as any plane and you will wonder where the lift is coming from. I am amazed each time I take it to the field at how well it performs and the new stunts it will do. Even with a dead stick it glides better than you would think. So I say Airfoil! Who needs it?
I always build the wing first; actually the wing is the whole plane other than the vertical tail. There is no fuselage on this plane; the servos are mounted in the wing. The wing is flat with no airfoil at all. It is build from coroplast, as is the vertical fin and rudder. You can get coroplast from any graphic sign shop or order it from harbor.com (this is not Harbor Freight). Cut the wing 24 inches square with your hobby knife and a straight edge. You have built the buck of the plane in three minutes! The corrugations of the plastic run from left to right (or right to left) of the wing and not front to rear. This gives you maximum strength. The elevons are also quick to build. They are five inches by eleven inches and are made by removing one side of the corrugation plastic. Be sure not to cut through both sides when you cut them. Sometimes I place a bass wood strip in the slot so I will cut into it and not go through the other side of the plastic. Any place that you install a screw through the plastic you will need to install wood to prevent the plastic from crushing. I use 1/8 by 3/32 bass wood strips for this. I have found that the hollow slots in the plastic (corrugations) come in different sizes, depends on where you get the plastic. Light ply will also work fine. When you insert the small strips of wood into the corrugations hold the wing up to a bright light and you can see through the plastic to position the sticks.
Next build the engine rails for mounting the small engine. They are made from any hardwood, but pine or plywood will also work fine. They need to be spaced to fit your engine and need to project out in front of the wing to allow enough room to slide the engine forward and aft to balance the plane. Mount the engine last and use it to balance the plane at five inches from leading edge of wing. This is a good starting point for the CG. The rails are ¾ by ½ -inch stock and are attached to the plane with three 6-32 screws on each rail. They extend eight inches from the leading edge of the wing toward the rear and are installed on the bottom of the plane.
Now is the time to cut your servo holes in the wing. They will be cut to fit your servos and are spaced for best balance. The elevon servos are located at the rear of the wing at 8 ½-inches from the rear of the elevons to their centers and use solid metal 2-56 push rods to attach to the elevon horns. The elevon servos are spaced ½-inch from the aluminum channel that will be running down the center of the plane. The rudder servo is just forward the elevon servos at 11-inches from the rear of the elevons and is also ½-inch from the channel. The rudder servo can be mounted on either side of the aluminum channel; I mount mine on the right side. The throttle servo is mounted up front; try to locate it around the CG point that is about five inches from leading edge of wing and about one inch from the channel. The throttle also uses a solid 2-56 rod with no outer tubing.
Next I run a ¼ by 3/8 basswood down the center on the wing on top. I guess you could call this the fuselage. This gives the wing rigidity and also allows you to attach the receiver pack to it by using nylon tie straps. Place the receiver and battery in an 8-ounce fuel tank that has the front cut off. This makes an ideal package and you can replace the front of the tank with rubber bands. The servo leads exit the stopper hole in the tank and the tank is pointed to the rear of the plane.
A better way that I now use is to replace the ¼ by 3/8 basswood with a ½ inch aluminum channel that you can get at Lowes Building supply. It makes the wing much stronger. Be sure to drill tie down holes for the receiver in the channel before you mount it to the plane. Save the mounting of the receiver and battery till last, with the engine, to achieve balance. Mount the channel so its flat side is down toward the top of the wing and its open side faces up. You may want to taper the front of the channel to remove its sharp corner. The channel is mounted to the wing with five 6-32 machine screws spaced so they do not interfere with the vertical fin. Remember to put wood strips in the slots where the screws go through. I use three slots at each screw to place wood in, one under the screw and one on each side of the screw. I place the wood strips in position by using a 4-40 rod to push then in place. The strips are about two inches long. Place a pin through the plastic to hold the wood in place and allow some thin ca to run down the slots by holding the wing vertical; this will hold the wood in place for good. Place a paper towel on the bottom side to catch any ca that runs all the way through.
The vertical fin and rudder measures 8 inches across the bottom and 5 ½ inches across the top. Of that the rudder is 2 1/2-inches wide. The fin is 8 inches high. Taper the rudder at the bottom so it will have clearance of the elevon horn. The rudder and fin are build from coroplast and the rudder is hinged the same as the elevons. The fin and rudder size are not critical, almost any size will work fine. Mount the fin by placing it in the channel slot so it is flush with the rear of the plane. Place two popsicle sticks on each side of the fin running lengthwise of the channel and place two 6-32 screws through the fin, sticks, and channel. This allows for easy removal if needed. The plane works best if you have a tail wheel. Place a small hardwood block about two inches by 3/8 thick by 5/8 wide on bottom at the rear of the plane. Attach it to the aluminum channel with 4-40 or 6-32 screws. Mount your tail wheel to this block. It does not need to be steerable, with a little speed the plane will steer fine on the ground.
The main landing gear is built from 1/8-inch music wire in two pieces. They mount to the motor mount rails by having the end at a 90 degree angle and ¾ inch long to fit into the hardwood rail. It then comes across the bottom of the other rail and is shaped to give your prop plenty of clearance from the ground. You will need this clearance when you are doing vertical landings and the plane bounces as it sometimes does. Having this clearance will keep the engine running. Place a nylon-landing strap across them to hold in place. They should be located so the 2-½ inch wheels are just under the leading edge of the wing when you look down on the plane. With this information and the pictures in the May newsletter you should be able to build this plane and start having the ultimate fun-fly experience. If you need any more help just let me know.
Happy Flying
|
"Free Stamps"
Even though the US Postal Service is going up on their rates you can still get free postage stamps. That's right, a free postage stamp fun fly plane. I am getting ready to build more postage stamp planes and I would like to make you this offer. Having flown them I know it is one of the best fun fly planes around and I would really like to see more of them in the air. In a few months or so I will begin production and plan to build ten postage stamps in addition to several for myself. It doesn't take long to build a stamp and I figure I might as well build several while I am in production. This offer is for TRCC and Anniston R/C club members only. If there is not enough participation from our club members I will make this offer to non-club members as well. Here is how it works: If you are interested in a free stamp send me your name and I will place it on a list. You will receive a free stamp plane ready for your flight pack and small engine. I am using an OS .46 LA and it has plenty of power to pull out of a hover. Any small engine will be ok; I am going to use a Thunder Tiger .36 on my next one. All hardware and wheels will already be installed. This will be a true ready to fly plane and I know you will like it. In a few cases I will even install your radio gear for you.
If you agree to take a free stamp your only obligation is to install an engine within the next month and fly the plane on a regular basis and have a lot of fun. Let me know how it flies and if there are any modifications that you think might help its overall flight characteristics. I am very interested in seeing how the plane performs with many different styles of flying and a variety of engines. It is a very low maintenance plane and you will be amazed at how well it does fly, even on a windy day. So go ahead and get on board this great research project and help pioneer flat airfoil planes. You have nothing to loose because I am investing all the time and money into the project. If you think you are interested in this venture simply e-mail me at: [email protected] or phone me at (256) 268-2927. See you at the field!
|
New Members
I thought I would start announcing our new members for TRCC and the Anniston RC club in the newsletter. This month we have a new member to TRCC. His name is Mark Brewer and he is from Sylacauga Alabama. Mark is well versed in the R/C hobby and is an excellent flyer. I have known Mark for several years and I have seen some of his work. He is a master builder and I think he is like me; he likes to build as much or more than he likes to fly. Marks profession is the remanufacturing of boat starter motors. These are dc motors similar to our airplane starters so we may be able to get some good info from Mark about our starters. Marks address and e-mail is posted on the TRCC member list if you need to get in touch with him.
|
CLEANING OUT THE CARBURETOR
-by Clay Ramskill
Every now and then, when we just can't get an engine to run right, the culprit will be dirt in the carburetor. We have already checked for the clunk hung up in the fuel tank, for kinked fuel lines, tried someone else's fresh fuel, and have probably even screwed in a couple of new glow plugs. But we couldn't get full power consistently, or the engine is super critical to adjust, or it gets hot, or won't idle or accelerate right- and it used to be just fine. The symptoms center around not drawing fuel properly. Backing the needle valve way out doesn't seem to allow the engine to run rich like it should, for instance.
Perhaps at this point it's time to clean out the carb. Let's face it- those little holes in the carb ARE little; one hair, one bitty piece of dirt is all it takes to mess you up, big time. The best way to clean the carb is to remove it, disassemble completely, and thoroughly clean out all passages, using a hat pin or whatever to probe through every hole. But out at the field, a quick fix is to BACK FLUSH the carburetor with fuel. This doesn't require carb removal, and can be done in just a few minutes.
Here's how:
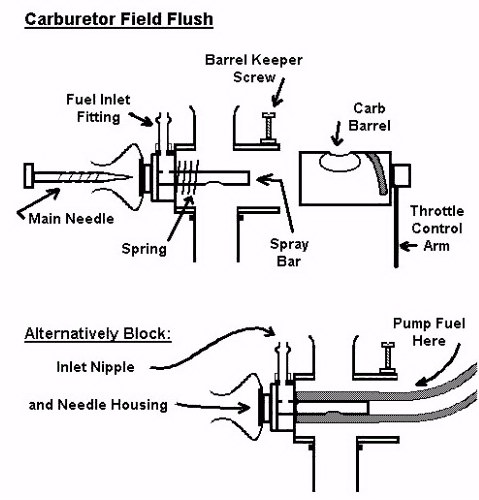
1) Check to see where its set, and then remove the main needle valve screw, then the fuel inlet tubing, and also disconnect the throttle control rod or cable from the throttle arm.
2) Remove the carb barrel; loosen the screw that holds in the barrel (on some carbs, the idle stop screw- the barrel keeper screw will be very close to the end of the carb where the throttle control arm is), and slide out the carb barrel. Note: look for and keep track of the spring on the inside end of the barrel; some carbs have them, some don't.
3) The hole in the end of the carb body, where the barrel came out, should expose the spraybar. Slide a fuel tube from your pump over the end of the spray bar. If this is not a snug fit, you will have to push the tubing against the end of the carb body to hold pumping pressure.
4) Now you can turn on the pump! Alternatively, put your finger over the fuel inlet nipple and over the needle housing so both passages are thoroughly flushed. (Need I say, watch where your face is during these proceedings?)
5) Reassemble; be sure that the spring, if you had one, is inside before inserting the barrel. And be very careful that the barrel keeper screw actually is in its little slot before tightening much.
And 6) -Go Fly!
|
 |
WHEN YOUR PLANE TRIES TO TELL YOU --
by Clay Ramskill
Once upon a time your author had a new pattern plane. On the first few days of flying it, everything was fine. But one day, on the first flight, it required several clicks of down trim (odd...) after take off -- and after each turn or maneuver, the pitch trim would be off again (VERY odd...). Only when it took full down stick to fly inverted (JEEPERS!) was your author smart enough to realize something was wrong. After landing, the problem was obvious: I had not bolted the wing to the fuselage! But the plane DID "try to tell me"; I just wasn't listening. Only new, tight-fitting wing dowels had saved the plane from destruction -- it certainly wasn't the pilot! Recapping later, I thought of a number of things that would have caused similar symptoms: servo or servo tray loose, bad servo centering, broken elevator hinges, loose control horn, et cetera. The point is, ALL of those things are BAD! And with the plane not behaving properly, WHY did I keep flying??
Just suppose you're getting an occasional glitch from your radio; something that doesn't normally happen. This could be an antenna problem; it could be metal-to-metal vibration causing home-grown interference, or a loose crystal. Will any of these get better while you keep flying? And speaking of vibration, what if you start hearing it in the air? It's your plane talking to you -- loose muffler, engine mount, worn wing dowel holes, loose cowl mounting. Again, such problems don't get better, only worse.
One more example -- this has happened to all but the most careful pilots. Your engine goes lean and sags at the top of a loop. It's TELLING you that the mixture is loo lean. But you don't listen and keep flying; a minute later, while doing another loop, you're suddenly dead stick!
The sky gods know -- we have enough problems that pop up suddenly, and we don't have any opportunity to prevent them. Other times the plane "tells you" that there is, or will be, a problem. Unless you really enjoy repairing or rebuilding -- LISTEN! Cutting a hop short to check out a possible problem is much quicker (and vastly cheaper) than building another plane!
|
 |
Clay is right about your plane talking to you. I don't know at the times I have heard some strange noise from my plane and continued to fly. Later a muffler would fall off and never be found or landing gear would drop off. Canopies are also good about talking to you before they blow off the plane. It has taken several years and many lost mufflers, but I now listen to what my plane is saying.
|
Jumping Diodes
By James Goss
Is it ok to jump the diode that is in line (series) with your charge jack on your radio transmitter? Yes and no, the diode is in there for a reason and the manufacturer thinks that it is best to have it. The purpose of this diode is to provide polarity protection for your radio. Polarity simply means negative or positive on a dc system. Batteries are dc so they have polarity, a negative terminal and a positive terminal. The battery in most of out transmitters is a 9.6-volt pack and is used to operate the radio electronics. Its negative and positive leads are also brought out to a charging port on the side or rear of the radio. This is where you plug up your charger and this is where the confusion comes in.
All radios do not have the same polarity on their charge jacks. Your charger has a female terminal that plugs into the radio that has a male terminal. On Futaba radios the center of the male terminal needs to be positive. On Airtronics radios the center is also positive, but on JR the center is negative. If you have several different radios around like a lot of modelers do, it would be easy to pick up the wrong charger. With the inline diode to block the reverse current flow there would be no damage to your radio. Without the diode in place your radio will be damaged as soon as you plug in the wrong charger. It only takes seconds and it is all over for your radio. You could blow every chip and transistor in the radio. Even if the charge plugs are not the same size, as a lot of the different radios will have various sizes of plugs, you will still make and break contact as you try to plug in the charger and damage will occur.
You may be wondering why anyone would want to jump the polarity diode in the first place. If you have ever tried to cycle your transmitter battery you have found out that your cycler will not discharge the battery, or that it will discharge it. This is one way to check to see if your radio has an in line diode. If the cycler will not discharge the battery, then you do have a diode in line. If it will discharge, then you do not have a diode in line. Jumping the diode will not alter the operation of the radio at all. With Futaba it will not void the warranty, but other makes may, I haven't checked because I only use Futaba. So if you want to cycle your radio without removing the battery and it has an in line diode, the diode must be bypassed. Jumping the diode actually will allow more energy to be placed into the battery while charging because the in line diode drops about .6 volts while the battery is charging, unless the diode is a special low resistance diode. I have about twelve or so radios and most of them had the diode. The first thing I do when I get a new radio is to jump the diode. It only takes about five minutes to solder a jumper wire across the diode and you can then cycle the battery without removing it from the radio. I don't like the idea of unplugging the battery time after time because of developing a faulty connection. Same way with unplugging your transmitter rf module to impound it instead of the whole radio at a fly in.
Anyone that can do basic soldering can place a jumper wire across the polarity diode and experience no problems at all if you use the right equipment. Use a low wattage soldering pencil (iron) around 40 watts or less and some .030 diameter rosin core solder. It will require just a very small amount of solder to be added to the pads on the board to install the small wire, 22 awg will be fine, solid or stranded. Just be sure not to create a solder bridge between two printed conductors. If you do not feel comfortable doing this soldering job get someone in the club to do it for you. There is always someone that can do it and will be glad to do so. Again let me say that if you have a mixture of radios in operation I would not recommend strapping the diode, it will just be a matter of time until you make the mistake of picking up the wrong charger, I know I would.
|
Hard Landings
This month we have a few harder than normal landings to report on. First were Dr. Vic and his Airmadillo. Dr Vic has done the impossible when he totaled an unbreakable plane at the Eastaboga field. It is not known for sure why the plane crashed, but Dr Vic has new parts on order and the Airmadillo will be back in the air soon.
Danny Prince had a mishap with one of his giant scale gas planes at the Munford field. A little way into the flight Danny lost the elevators and the plane went down. It really hit hard in the cornfield and there were pieces everywhere. Danny said he had been flying this plane for many years and it was time for it to go. Danny had the customary ritual ceremony and built a nice fire with the remains.
Ralph Sertell lost a beautiful Ultimate biplane with gas engine last month at the Munford field. It appeared to be a slow speed stall and went in with the engine at full throttle; Ralph was trying to get it under control. It was somewhat repairable, but Ralph decided not to go that route and gave it the ritual when he got home.
|
Technical Tip
If you have a computer radio like most pilots have today and it has a liquid crystal screen, here is a tip that may help you. When you set your radio down on the ground or on its stand, be sure the liquid crystal screen is not facing the sun. On a hot day the sun's rays can damage the screen. Try to keep your radio in the shade, especially if it is going to set for some time. The radio does not have to be turned on for the damage to occur. So when you set it in your vehicle for several hours make sure that the sun will not hit the screen as the day progresses. Also never touch the screen, especially if it is a hot day.
|
Tool of the Month
By James Goss
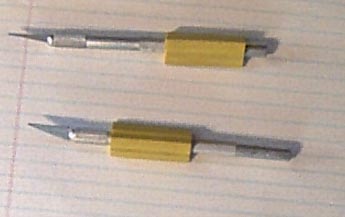 Cecil Ledbetter brought this idea to my attention and it is well worth trying. I am sure you have had your hobby knife to roll off your worktable and stick in the floor or your foot at one time or another. This is the end to all rolling knifes and bodily injury in our hobby. Simply go to your local office supply and ask for some pencil grips. They will fit your hobby knife and it will never roll again. If you position it close to the front of the knife you can use it as a soft grip. If positioned close to the rear of the knife you can still grip the knife as always. The grip is made of rubber and is a triangle shaped device. They come with five to the pack and if you are lucky they will be different colors. I like the different colors because I can keep one knife for cutting covering and other knifes for general woodcutting. By having colors on them it is easy to identify each knife and keep them separated. If you do a lot of knife work you have got to try this idea! Thanks to Cecil our hobby is a little safer.
|
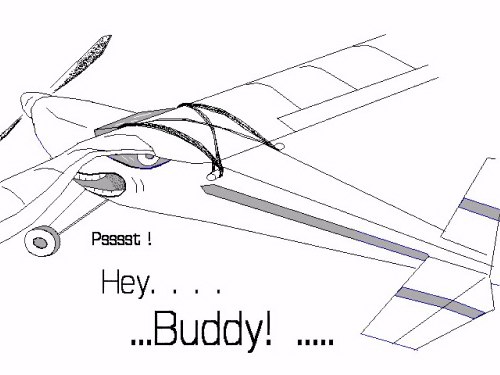
Buddy's Sea Cruise Adventure
Here you see Buddy discussing model building and what a wonderful hobby it is.
 |
Here you see Buddy and Jackie getting ready to leave port.
 |
Here Buddy and Jackie returns to home port.
 |