Cow Patty News
Monthly Newsletter
May 2002
The Anniston RC Flyers & Talladega Radio Control Club

God Bless Amereica
What is in the news letter this month?
|
|||||||||||||
Delta Peak Negative Pulse Chargers
By James Goss
This is a real mouthful of technical words for us average RC modelers to swallow, much less understand what they actually mean. These pulse chargers have been out on the market for a few years now and they do seem to work well. I have been using one on my giant scale planes now for about two years and I really do like it. I am going to switch all my chargers over to the negative pulse system because they completely do away with cell memory. With negative pulse charging you will never have to cycle your battery packs again to prevent memory. Your battery packs can be placed on charge at any time and no matter what state of charge they are in the pulse charger will charge them to the peak level. It will then switch to a maintenance mode that will keep them fully charged for any length of time. Pulse chargers may be used with nickel cadmium, nickel metal hydride, and lithium ion batteries. I would still recommend placing a new battery pack on an overnight slow charge before using the peak charger or any other type of fast charger. This is due to the individual cells having different peak charge times. The peak detector senses the average charge of the pack and not the peak on any one cell. If you only fast charge the pack and never slow charge it the lagging cell (the one that is slower to charge) will become under charged more and more as time goes on. A slow charge will allow each cell to become closer to being fully charged so it is wise to use slow charges after every five or six fast charges.
Delta peak negative pulse chargers get their name because the charging current is not a steady dc current flow. Instead the charging current is broken up into one-second pulse intervals. After the one second of current flow there is a rest period for about two milliseconds where nothing happens. A pulse is defined as a sudden change in voltage or current, so you can see where the name Pulse comes from in the title. Now to explain the Peak part of the title. This is the easy part because peak refers to the battery being fully charged. During the idle state the battery is checked to see if its voltage has increased since the last voltage check. This voltage check is made about every 1.007 seconds. If the microprocessor sees that the voltage has indeed increased in its value, another cycle of charge current will be applied to the battery. Delta is a letter in the Greek alphabet that is normally used to indicate a small change in some variable in an equation. In this case a change in voltage is indicated by the word Delta.
How about the Negative in the title? This is where the pulse chargers are in a class by themselves. This is the ingenious or creative part of the charger that separates the men from the boys so to speak. After the one-second-charge pulse and the two-millisecond rest period a reverse polarity pulse of about 5 milliseconds is connected across the battery. Actually this reverse polarity is the same as connecting a heavy load across the terminals of the battery for that amount of time. This is how the charger removes any memory that may be formed in the battery. Actually memory refers to the formation of gas bubbles on the plates of the cells. These gas bubbles are a normal formation while in the charge cycle and they tend to insulate the plates of the cells from the electrolyte. These insulating bubbles will reduce the chemical activity around the area of the plates and reduce the capacity of the battery. The reverse polarity pulse tends to remove these bubbles and lets the cells work at their maximum capacity.
So the complete charge cycle for a Delta Peak Negative Pulse Charger consists of a one second charge pulse, a two millisecond rest period, a five millisecond negative pulse, another rest period so the microprocessor can check for delta peak, and the charge cycle starts over again if needed. After peak voltage is detected the charger switches over to its maintenance mode where it applies a charge pulse at the rate of one pulse every fifteen to thirty seconds. As a backup to the delta peak voltage sensing circuit most manufacturers will add a timing circuit so that after a given amount of charge time the charger will automatically go into its maintenance mode. So on large capacity packs you may have to charge two or three times to get them to cycle at their full capacity. This is ok because you can charge them as many times as you like because the pulse charger will not over charge the pack.
Remember now that you still need to cycle your battery from time to time in order to check its condition. The pulse charger does not tell you if your battery has its rated capacity or not. The only way to get that information is to cycle your battery and get a reading in milliamp hours. (Read my article Minutes of Milliamp Hours) If you didn't already understand what a Delta Peak Negative Pulse Charger was all about maybe this has helped you a little.
|
|||||||||||||
|
How Do You Finish Your Cockpit Interior?
By James Goss
I have seen many beautiful model airplanes over the years that I could truly say I wish that was my plane. It was evident that the builder had spent many hours getting everything just right. There are two main components of a finished model that really stands out, and has the greatest impact on the overall looks of the model. These are the cockpit and engine cowling. I consider these to be a separate component from the rest of the plane and should be treated as an individual project when it comes to finishing them. If you end up with defects in either one, no matter how perfect the rest of the plane is, the job will now be less than it could have been. Of the two, I would say the cockpit is the greatest challenge to get right and this article will deal with how you can improve this task.
The method you choose for the cockpit will depend on what type of finish the fuselage will have. If it is glassed and painted you will use one method, if it is covered with a film you will use another method. Since film is the most popular way to finish a model at this day and time, I will discuss it first. No doubt the most common approach with film is to glue the canopy to the film after the interior of the cockpit has been also covered. Then run some pin stripe tape around the edge of the cockpit to hide the edge line. This method does look nice when finished and I have used it many times over the years. A big disadvantage of using this method is that wrinkles may develop where you covered the inside floor area and you have no access to remove them. They become part of the interior and just get worse as time goes on. I remember on one plane, I think it was a twin dualist 40; I had these wrinkles to develop on the first hot day of the season. They really made the job look second rate. I decided to use a magnifying glass to cast a hot spot on the covering through the plastic canopy. To my surprise the magnifying glass did work. I thought, hey this is a great idea, about that time I burnt a hole in the covering. If you use this trick be careful, once you burn a hole in the covering, the hole looks worse than the wrinkle.
You can secure the canopy by using screws, but the plastic is so thin it will usually split around the screw holes after a few flights if you don't enforce them. Even though I have used this method in the past, and it does work ok, here is a better way. I consider this method to be the ultimate way to finish a canopy interior on a plane that is going to be covered with film. Before you start covering, make a second cockpit floor, as well as the front and rear ends. Get these to fit perfect by sanding them to fit the contour of the fuselage. These dummy floor pieces will be used later. Cover the fuselage as always and bring the covering around the canopy area and pull it to the inside area. Terminate the covering by anchoring it to the cockpit floor, front and rear ends also. After it is secured, cut the film so there is about 1-inch left on the over lap all around the canopy area.
A problem you have if you paint the interior of the cockpit is how to terminate the covering without its edges showing. This technique solves the problem because the second set of cockpit floors will cover up the edges of the film. You can prepare the second set of floor material for painting before you install it in the cockpit. Remember that you have already shaped the floor and ends to fit before you started covering the fuse. This is done to avoid scratching the covering with your sandpaper. You will need to seal the floor before painting it so no grain will show, even though a small amount of grain showing will not hurt anything. Two or three coats of thinned epoxy will do a good job. If you want a better finish, us thinned epoxy and fiber cloth. Glassing will give you the ultimate finish with absolutely no grain showing after painting. I always wait about painting the dummy floor until it is installed in the cockpit. I do this because you need to fill the area where the floor butts into the front and back area, sand and paint. Once it is painted and everything looks good, you are ready to install the canopy.
Like I said earlier, you can use striping tape to seal around the edges of the canopy, but there is a better way. If I choose not to use screws to hold the canopy on I will use this technique. Hold the canopy in place, make sure it is balanced on both sides, and mark a pencil line around its perimeter. To get the glue to bond to the cowling, you must sand the outer edge of the canopy, on the inside, with some 400 grit or maybe 320 grit. Stay within 3/8 inch of the outer edge while sanding, this area will be painted over later and the sand marks will not show up. This takes care of the bonding problem for the canopy, but now you have got to improve the bond to the covering. The best way to achieve this is to use a t-pin and punch hundreds of holes into the area underneath the canopy that will be glued to the covering. This is better than removing a strip from the covering. Some instructions will tell you to cut this strip about 1/4 inch wide and remove it so the canopy will be glued to the wood. If you do this, the covering may pull loose from underneath the canopy in the future. By creating hundreds of little holes through the covering and the balsa, the glue will bond the canopy to the wood and also lock the covering in place. By having the pencil mark in place you will be assured of getting the holes under the canopy so the holes will not be seen.
Never use ca glue to install the canopy. You need to be able to move the canopy around for adjustment if needed. Once you have it in position you can use masking tape to temporarily hold it in place. Place some waxed paper over the canopy and start placing rubber bands around the canopy and fuse to really hold it in place. You may need to shim some small pieces of wood under the rubber bands at the edges of the canopy to really push the edges down. I normally use R/C- 56 glue for this job because if I want to remove the canopy, just heat the glue and it will become soft again.
After the canopy sets for at least 24 hours, you are ready for the finishing task. If you really want a nice looking project, do not use striping tape. Paint the outer edge of the canopy to hide the glue underneath. Be sure to use plastic masking tape for this job because it will not bleed at the edges. Sometimes I paint the edges of the canopy before I install it on the fuselage. It is a little easier that way because you don't have to worry about getting paint on the fuse. If you follow these steps I can guarantee that you will have a job that is second to none.
If the fuselage is not covered you may want to use this technique. When you fiberglass the fuse and plan on having a first place finish, this is the way to go. The idea here is to blend the canopy into the fuselage. Place the canopy in position as before and make a pencil mark around the outer edges. Remove the canopy and cut a trench into the fuse even with the pencil mark. Cut the trench deep enough so the edge of the canopy will fit down into it and be flush with fuse. All this should be done before you paint or prime the fuse. The cockpit interior must be finished, of course painted as before, and the canopy can now be glued in place. You can use ca glue here because it is on the outside of the canopy and will not fog up the interior. When the glue has dried, fill around the canopy edges with your favorite filler. I always use epoxy with micro balloons added. You can smooth out the filler so it looks like the canopy is part of the fuselage and sand smooth. You can paint the edges or framework on the canopy when you paint the fuse. You can't beat this technique when it comes to a beautiful finish.
I have used both these techniques many times with good results. You can find faster methods to finish your cockpit, but none that will produce the sane quality of work. Remember when you look at a model plane, what do you see first? The canopy and cowling is what gets my attention, so why not make them stand out with pride in your work and really do a first class job on them. I will have the cowling finishing methods in a later article. If you ever have the inside of the canopy to fog at various times of the year, you can prevent this. Simply drill a small hole in one or both sides of the canopy next to the floor so they will not be noticed. These weep holes will allow the canopy to breathe.
|
|||||||||||||
What To Do With Your Junk Mail
I received this from Wayne Long and it sounds like a good idea to me. When you get ads in your phone or utility bill, include them with the payment. Let them throw it away. When you get those pre-approved letters in the mail for everything from credit cards to 2nd mortgages and junk like that, most of them come with postage paid return envelopes, right? Well, why not get rid of some of your other junk mail and put it in these cool little envelopes! Send an ad for your local chimney cleaner to American Express. Or a pizza coupon to Citibank. If you didn't get anything else that day, then just send them their application back! Just make sure your name isn't on anything you send them. You can send it back empty if you want to just to keep them guessing! Let's turn this mail into a chain letter! Eventually, the banks and credit card companies will begin getting all their junk back in the mail. Let's let them know what it's like to get junk mail, and best of all THEY'RE paying for it! Twice! Let's help keep our postal service busy since they say e-mail is cutting into their business, and that's why they need to increase postage again!
|
|||||||||||||
Dehydration
By Garland Minor
This doesn't have anything to do with flying models but it has a lot to do with spending the day at the field. The hotter days of summer are still ahead of us and this means that we will perspire more while at the field and that of course means our bodies will loose more moisture. "But I got a cooler full of soft drinks!" That's fine if they are caffeine free. A soft drink that has caffeine is almost as bad as drinking an alcoholic beverage. "Why?" you ask. Caffeine is thermogenic, which means it raises your metabolic rate and internal temperature. Caffeine is also a strong diuretic, it causes you to lose more water through urination than what you gained drinking it.
The best thing to consume is just plain cold water. Sports drinks are ok also. But remember that when you get thirsty, you have went too long with out fluid and if you think drinking a tub full of what ever, you will be ok in a few minutes, think again! Your body don't work that like that. Your body just can't process a large volume of fluid quickly enough for rapid relief. Make frequent trips to your cooler and have a few sips of your cold drink quite often.
|
|||||||||||||
New Planes Taking To The Air
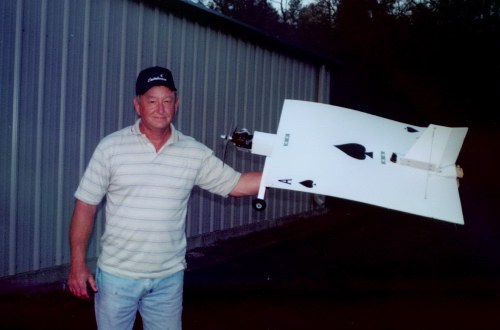
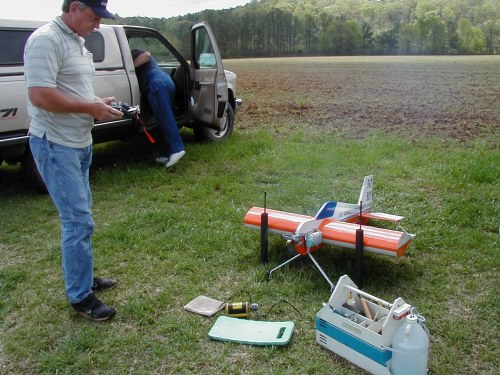
Last month it was the disk plane, this month it is the Ace Of Spades built from coroplast. This one will fly just as well as the disk if not better. It has similar characteristics to the disk plane, but with more wing area, 864 sq inches, it descends with more grace. Hovers well and has a good flat spin and fast rolls. Weight is around 5 ½ lbs. with an Ervine .53 engine. It has the same airfoil on its wing as does the disk plane, almost flat.
 |
|||||||||||||
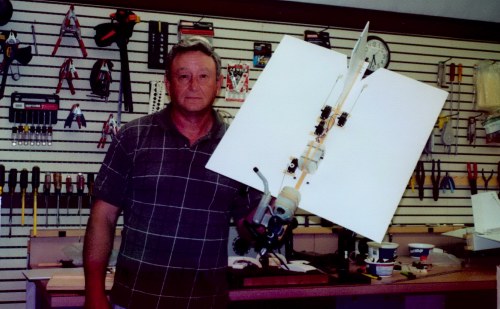
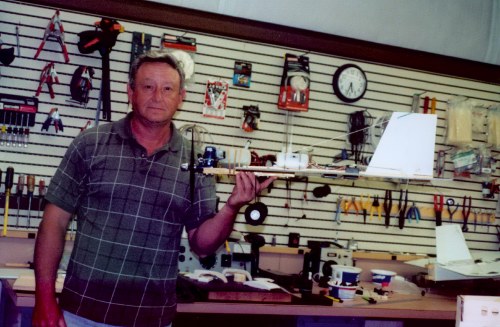
Also this month I have what I call a SPAD Park Flyer. It is 24 inches square and weighs only 3 lbs 3 oz. For power it has an OS .46 LA engine that is just right for the size plane. It has plenty of speed for vertical work. This is the best design I have came up with, it really flies well. It is easy to fly and anybody could fly this plane if they could fly a trainer type plane already. This plane has no fuselage, it is just a flat piece of plastic.
 |
|||||||||||||
Here you can see why it only weighs three pounds and that it absolutely has no airfoil, it has a perfectly flat wing. You can have as much fun with this plane as any you have ever flown and it only cost about $10 to build, minus engine and radio.
 |
|||||||||||||
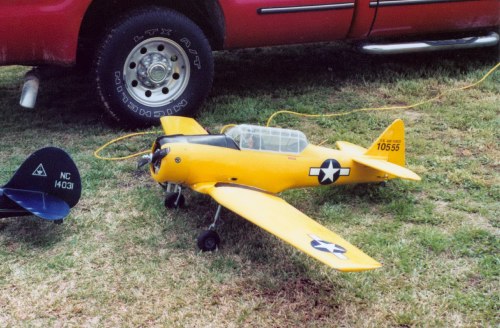
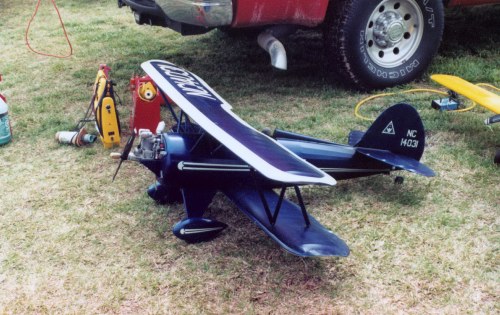
AT- 6 Texan
Loren has brought us two new planes to our field, the AT-6 and the Waco biplane. The AT-6 has a 32cc blower engine and weighs 15 lbs. with an 82-inch wingspan. The Waco has a 1.50 Saito four stroke engine and a 72-inch wingspan. I have seen both of these planes fly and all I can say is that I wish they were both mine. Loren can pilot these planes to make it look easy.
 |
|||||||||||||
Waco
 |
|||||||||||||
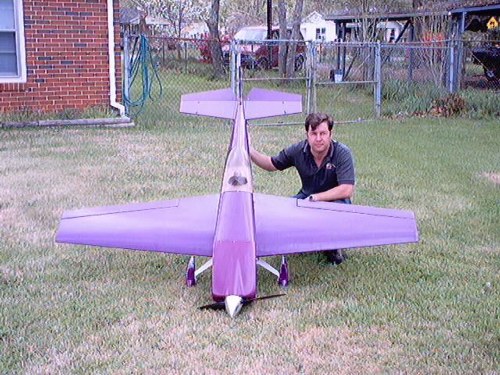
This is Pat's new Staudacher. It has a 90-inch wingspan and will be powered by a ZDZ-80 engine. Pat is in the process of putting the decals on and it will look like a different plane with them installed. This is really a nice plane.
 |
|||||||||||||
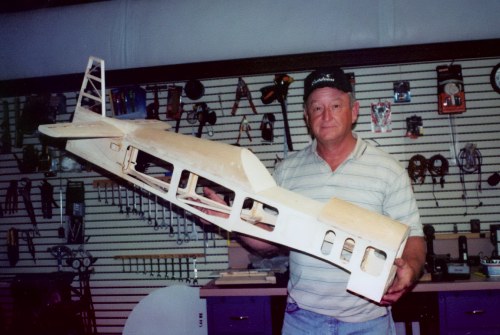
Planes Under Construction
This will be a Midwest Cap 232, 27% scale. Waiting on a Brison 4.2 engine.
 |
|||||||||||||
This will be a 37% Sukhoi with a DA-150 gas engine.
 |
|||||||||||||
This space is reserved for your article or pictures, please send them in soon!
|
|||||||||||||
Before we get started on The End Is Near, here is an e-mail I received the other day in reference to the end is near article I posted on RC Universe. I think this is a serious matter and we need to contact as many modelers as possible and band together to prevent this great hobby from being destroyed. What's happening is just like a various spreading, it will be slow at first, but it will then spread at an exponential rate and eventually it will affect every one of us. So lets have some feedback on this and I would like to thank Dr. Vic for his professional input on the subject.
Here is the e-mail:
I have it from a reliable source that we have nothing to worry about, as the hobby will last forever. I have several flying fields to use and they too will last forever. Of course, I'm being sarcastic because when I tried to warn eveyone about our hobby's longevity being in danger, I was flamed big time and accused of being a "Chicken Little". I was assured by modelers who said that because they had flying fields to fly on therefore in their skewed logic, there was nothing to worry about.
Even now, I dare not say anything on any related forum because I am quite certain that I will be viciously attacked by supposedly friendly modelers. I don't think that industry can/will do anything to solve the park flier situation because right now, the same people are selling park fliers like hot cakes. As you stated, the end is near...much, much too near.
I hear it costs the industry $40-50,000 to bring out a new kit, so I imagine that it will also cost big bucks to develop new electronic technology to solve the frequency problem associated with park fliers. Besides, with the continuing loss of flying sites and the too few modelers in the hobbby, there just isn't enough of a market to make it worthwhile for the industry. Just my .02
Take care,
CCR
http://www.kites.org/rc-instructors
|
|||||||||||||
The End is Near (Part A)
By James Goss
No not the end of the world, instead I am in reference to the end of the RC airplane hobby, as we know it today. It is easy to see that in the near future we are going to have some serious problems if something is not done soon. The problem I am referring to is the new park flyers and their frequency allocations being the same as ours. These little electric planes are going to be sold everywhere it looks like and they are advertised as backyard flyers. Many people will eventually have one of these and the average person will not even think about frequency problems with nearby flying fields. So it is coming for sure, a nice RC plane will be shot down because of these park flyers and it could be yours. Even though their receivers are only good for about a thousand feet or less it is the transmitters that is going to get us. These park flyers will operate on your regular RC transmitter. All you need to do is change the crystal in the tiny receiver to match yours and you are ready to fly. Now by using the regular transmitter its signal will reach our planes in the air for a mile or more to bring us down. Now I realize an experienced modeler would not do this, but as the park flyers are swapped and sold at random they will sooner or later get into the hands of the inexperienced. It is just a matter of time before this happens.
Some foolproof system has got to be devised that will allow these two facets of the RC industry to operate in the same community. The backyard flyers use single tuned FM receivers and will accept our regular transmitters. One way to prevent the park flyers from interfering with us is that we use PCM receivers in our planes. Regular FM transmitters will not drive a PCM receiver. Also a transmitter set for PCM will not drive a standard FM (PPM) receiver. Of course the PCM receivers cost a little more but it would solve the problem as long as the park flyer manufacturers did not choose to produce the park flyer with a PCM receiver.
|
|||||||||||||
The End is Near (Part B)
By Dr. Vic Cestaro
There are some serious technical problems to consider in the park flyer situation, particularly with
frequency sharing. All current systems use standard FM or PM demodulation techniques and that leads to the underlying problem; FM capture. An FM or PM receiver discriminator will capture and demodulate the strongest signal presented to it and ignore any others which are more than 1 dB down from the capturing signal. In other words, if two transmitters are on the same frequency, at the same time, the strongest signal will be the one that is demodulated by the FM receiver, regardless of the mode of transmission (PCM, PPM, NBFM, WBFM). For instance, even if a dead carrier were present on the same frequency; if it is stronger at the receiver than the intended controlling FM transmitter signal, it will capture the discriminator and bring the plane down.
In the case of a model aircraft flying around in the line-of-sight of two transmitters on the same frequency, because of signal phasing through multi-path and other phase-add/phase-subtract situations, at any specific moment, one transmitter will be stronger at the receiver than the other (regardless of transmitter location). This situation changes rapidly because of the aircraft movement causing rapid changes in aircraft antenna orientation to both transmitters, antenna polarization, and changes in
multipath signal strengths. In a typical installation with the antenna running parallel to the fuselage, when the aircraft is moving directly toward or away from the controlling transmitter, the signal appears end-on to the antenna, which now appears to have a very small aperture (minimum signal at the receiver). However, if the offending transmitter is orthogonal to fuselage of the aircraft, the aircraft antenna will have a very large aperture, and the signal from the offending transmitter could be many times stronger than that from the legitimate controlling transmitter, even if the offending transmitter is much farther from the aircraft than the pilot's transmitter (within square law limits for each situation).
There is no easy technical solution to this problem (no amount of encoding/encryption will solve the multiple carrier problem). A strong lobby in Washington is needed to keep unregulated park flyers on a
different band (like 27 Mhz) and off the 72 Mhz aircraft band. Without regulation, I believe the park flyers will eventually kill the hobby for serious modelers, or force many of them to get an amateur radio license and use the 6 meter band. We should all probably boycott the stores and hobby shops who carry the park flyers operating on 72 Mhz. By hitting them in the pocketbook we can probably get their attention. This would also require the support of AMA and the hobby magazines to succeed. I don't
think there is a technical solution to the problem. Sorry...
Vic
|
|||||||||||||
The End is Near (Part C)
By James Goss
I agree with you 100% about the simultaneous operation of the two transmitters. I think the reason that is so is related to the common turn on signal used by the PMC system. The radiated energy making its way to the detector stage is what I am dealing with. I think if each individual transmitter generated its on unique turn-on code then only that signal generated by its host transmitter would make it to the IF amps in the receiver. The detector stage should not even have an opportunity to function because no carrier energy would be present at its input. I think it would be relatively easy to have an enabler circuit at the front end of the receiver that a unique code would turn on to pass the desired data and discriminate against all other signals from other transmitters on the same frequency. We use this technique of enable/disable with high-speed circuits in computer logic so why would it not work here? When a unique address goes on the address bus line in a computer the address decoder turns on or enables the correct buffer and allows data to flow in or out of the address being sought in memory. But of course only one address is clocked on the address line at any one time, it doesn't have to handle multiple signals as our receiver would be doing in the presence of several transmitters being on at the same time. So in our radios by having the turn-on code placed on the front porch of each frame transmitted, how could the unwanted signal, even on the same frequency get through to the detector? If the host transmitter already turned on the enabler and the second signal of the same frequency arrived at the same time then the unwanted signal could also pass. So Dr. Vic I can't keep from thinking about it. You are right in that a system such as this would not work as stated, but there has got to be a way to work it out. Maybe it will come later.
|
|||||||||||||
The End is Near (Part D)
By Dr. Vic Cestaro
By the way, there is an expensive solution to the park flyer problem. I thought of it when I mentioned time-domain multiplexing. Spread-spectrum is the only currently available technology that would solve the problem. I guess you could call it a mix of time- and frequency-domain multiplexing. The military uses it on aircraft for communications security and jam-proofing. It is expensive because it requires random frequency shifting (hopping) at a rapid rate, and synchronization between receiver and transmitter. Some of the current crop of 900 Mhz and 2.4 Ghz cordless phones use a simple version of spread-spectrum in that they shift frequency only if the signal is lost or blocked by another signal. The phone and base require a finite amount of time to search for each other, and that could be catastrophic for RC aircraft.
I see the fast spread-spectrum technology as being the one that will probably be available for TOC and jet flyers in the near future because of the size, speed, and cost of those aircraft and the potential danger to folks on the ground. The pilots who fly these aircraft can probably afford the high cost of such a system. The nice part about it is that it would be compatible with today's systems because they are mutually exclusive (interference-wise). Because of the high transmitter switching rate, standard receivers would not have time to respond to the transient glitch on frequency. Similarly, the spread-spectrum receiver would only momentarily switch to the standard transmitter signal frequency. The
system would fail only in a situation where there were several standard transmitters on at the same time (the system would begin to lose information if a large enough percentage of available frequencies were
occupied by strong signals - I don't know what that number is). However, there is probably no practical limit to the number of spread-spectrum systems that could be on the air at the same time at the same location. If everyone had a spread-spectrum system, we could eliminate transmitter impounding and frequency boards and pins (and the underlying worry about being brought down by a "turn-on"). Just a thought.
|
|||||||||||||
The End is Near (Part E)
By Dr Vic. Cestaro
Well, there would still have to be a detector to detect the turn-on code and then decode it and that would be subject to FM capture law. Even if there were some new type (non-discriminator) higher-order detector (before the IF and detector), once the receiver were enabled by the correct code, any RF on the same frequency would be allowed to pass and FM capture law would again apply. This type of system could work within the transmitters by disallowing a transmitter to be turned on if a signal on the same
frequency were detected. This would require a receiver within each transmitter. With frequency sythesis now becoming available in RC transmitters, I see this as being something we will see within the next
year or two. However, given the real-world situation that would be encountered with park flyers, the transmitters would not normally be within communications range of each other (being below line-of-sight) so this fix would only work for transmitters being used at the same flying site. Computers use time-domain multiplexing and an interrupt handling system to share a common address and data bus, but I don't think that could be a solution for RC.
You're right about this being something to think about. I will also give it some thought. There is probably a solution, but it doesn't seem obvious right now. Having spent several years in the FM communications business, one of the biggest problems still out there is frequency coordination and sharing. Right now common frequency systems have to be more than 40 miles apart and are limited in ERP. Continuous tone coded squelch (CTCSS) and digital squelch have been used for years to keep unwanted signals from keying a repeater transmitter. However, if a properly coded transmitter opens the squelch, any other signal on the frequency will also be gated through (hence, the distance and ERP requirements). This problem has not been solved by two-way communications equipment manufacturers, and so frequency coordination is a requirement prior to licensing. This has created a big-dollar market in registering and selling frequencies when licenses expire and are not renewed in a timely fashion.
The End is Here
|
|||||||||||||
Cutting Balsa and Dumb Thumbs
By Gerald McCuistion
In answer to you message about cutting balsa I use several methods depending on what I am doing. I use a straight edge and the #11 blade the most. I have a 18" ruler with a cork backing that works on shorter pieces quite well. I have used pins when cutting long strips also. I found a balsa stripper in a catalog somewhere I think it is made by Master Airscrew. It uses a #11 blade and has a screw adjustment that adjusts the width of the strip. it works good if used on a flat table and your cartful to keep it tight against the wood. If wasting wood by turning it into saw dust isn't a problem I use my Dremal table saw. This works the best since I found a carbide blade for it. But like you said it does waste a lot more wood than a knife will. Hope this helps.
I have a dumb thumb for you also. I was flying a Great Planes Patriot and an insect flew behind my glasses. It just stayed there buzzing. I thought it was a bee so I tried to make it fly off by striking at it. I got too close and knocked my glasses off. Since I am near sighted I couldn't see to fly my plane. It hit the ground full speed before I could call for help or pick up my glasses. But the worst one was flying my helicopter without pulling the transmitter antenna up.
Happy flying!
|
|||||||||||||
How To Relax While Flying
By Buddy Birdsall
Don't Go To Sleep Buddy!!!
 |
|||||||||||||
This is Buddy's new Edge 540 from Aeroworks
 |
|||||||||||||
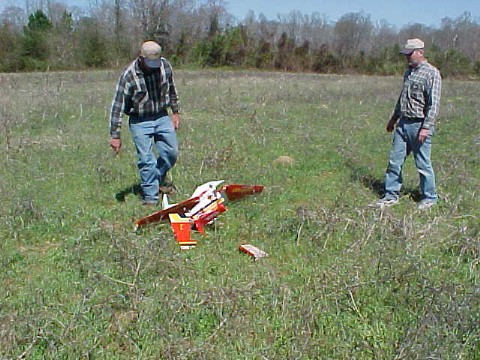
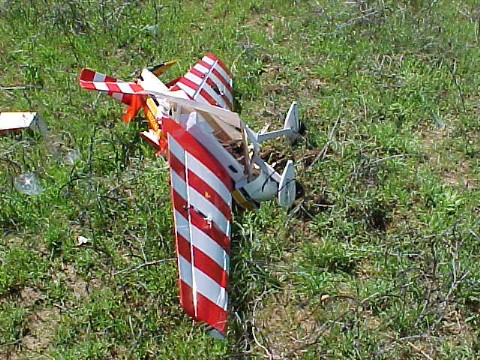
The Mother of all Crashes!
Where did the fuselage go?
All servos were destroyed.
 |
|||||||||||||
When is Tight, Tight Enough?
Have you ever been tightening a small screw and gave it that last little turn of torque and it just kept on turning? Stripped the threads again. Here is some good information sent in by club member Jim Woodard. Thanks Jim!!
Notes:
Torque based on minimum tensile strength of 60,000 psi.
Torque listed will provide at least 60% of the strength of the fastener.
When threaded fasteners are self-locking, tighten to the maximum value in the table.
When lubricants are used, tighten to the minimum value in the table.
Add locking torque of self-locking devices to torque values specified.
The tolerance for tightening to either the minimum or maximum torque value is plus(+) or minus
(-) two (2) inch ounces or plus (+) or minus (-) one (1) inch pound as applicable.
|
|||||||||||||
Retirement Life
By James Goss
I had always wondered what retirement life would be like. I was reluctant to retire at such an early age (53) because I had heard stories that made me tremble with anxiety about the subject. Stories like I almost went crazy with nothing to do, or I had to go back to work before I lost my mind. For some people this may very well be true, but in my case I am happy to say that after a year of retirement I see no signs of this retirement syndrome that so many had told me about. My profession was an Electronics professor for 33 years at Central Alabama Community College. I didn't retire because I disliked my job by any means. I always loved teaching students and seeing them go to work in their field of study was always very rewarding. It was financially feasible at this time to go ahead and retire so I decided to take the plunge.
Of course I had some sad feelings when I vacated the job I had been going to for 33 years. It was compatible to loosing a close friend or relative. Oddly enough this feeling only lasted about five minutes and I was ready to start my new life as a man without a job. What was it going to be like getting up each morning and not having to be somewhere at a specific time? I could do what I wanted to do and when I wanted to do it. I didn't know if I could handle this new life style or not, but I was sure glad that I had the opportunity to try it. Actually I haven't missed going to work at all and it is strange that I hardly ever think about my old job. I figured I would be thinking about it every day and dreaming about my profession every night. Even though I enjoyed my job very much I guess I have mentally blocked any residue of that era and am now thinking only about the future.
My wife Mary has been a house mom for the last 30 years and has to adjust to my new schedule also. It really doesn't seem fair because I have gotten to retire and Mary still does the same job she has always done. By and large she is happy with the situation here at home and plans on us having a nice long retirement together. I have not been one to travel over the years other than business related trips and I don't plan to start now. One of the first questions people ask when they find out I am retired is What places are you going to visit while you are retired? I guess some people think retirement automatically means traveling. I don't have any plans to travel anywhere that I know of other than visiting my close family members. Of course I will be going to RC related events because this is now one of my main interest.
Having a good hobby such as RC will keep me occupied for years down the road. I like nothing better than to build and fly radio controlled airplanes. This hobby has captivated me for the last 30 years or so and its fascination never ceases to amaze me. There is always something new to build and try out at the field. There is nothing more exciting for me than to test fly a new plane for its first time, especially a new design. Most will fly ok but every now and again one will crash on the first flight and we go right back to the building board and start all over again. Crashes are unavoidable at times and sooner or later if you fly on a regular basis you are going to have a hard landing (crash). Modelers that have been in the hobby for any length of time have learned to except this and just pick up the pieces and keep on going.
By and large I can't see any disadvantages for retirement life as long as you have your finances in order. Here is something that is puzzling to me. I do not seem to have as much free time in the day as I did before I retired. I have heard others also make this statement before I retired and I thought, What could they be talking about? Well now I am there and I can see that it is indeed a true statement. Being retired makes it easy to get new projects started so you go into what I call overload. Projects here are in reference not only to models, but also those projects around the house and anything else that you are involved with. So it doesn't take long to get too many irons in the fire. To answer the question, How do I like retirement life is easy. If I had known how nice retirement really is I would have retired at the beginning of my work career instead of the end. If you are wondering about having anything to do when you retire and you are a modeler, you haven't got anything to worry about because you are going to love it.
The Beginning
|
|||||||||||||
Will this Plane Fly?
By James Goss
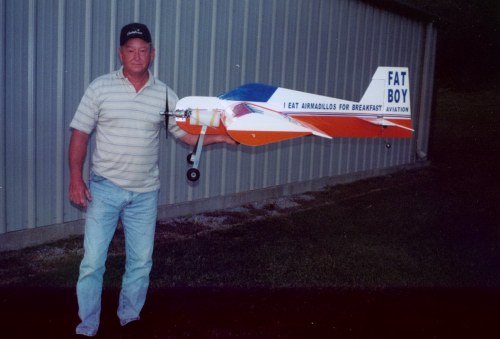
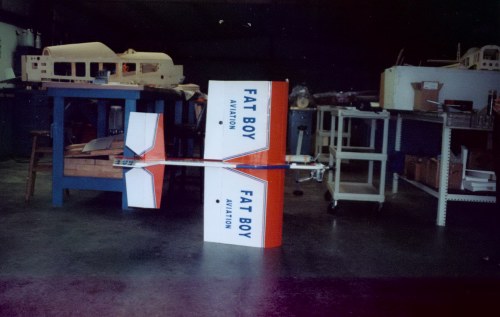
Is this plane going to fly? I have not flown it yet and thought I would get your thoughts before I try it out. What makes it unique is its wing, take a close look at the wing tip. The wingspan is 41 inches, chord is 21 inches, and is 6 inches thick at the spars. I call this plane Fat Boy because of the really thick wing. The picture doesn't show the true size of the wing, it is huge. It is a wing with a basement. The plane weighs 9 lbs and has an OS .91 FS for its power. More than likely it will require a 1.20 or larger engine if it does fly. I have been building fun fly planes with thicker and thicker wings so I decided to go all the way with a 6-inch thick wing. I wanted this design to be a really good slow aerobatic plane. The fuse is 12 inches high at the cockpit area and has a ½ inch aluminum channel at the bottom to keep it straight with no warps. The fuse is about 53 inches long. I have Fat Boy balanced at about 23% so I think it is going to be tail heavy for its first flight, but I didn't want to add any more weight. If the .91 gets it off the ground I am sure it will be a marginal performance.
So see if you can predict if this plane will fly or not and tell me what flight characteristics it will have. Send in your vote and I will publish the results next month.
|
|||||||||||||
The Fat Boy
The first thing you want to know is which fat boy am I referring to, me or the plane?
 |
|||||||||||||
This photo shows the mass of the wing and the large fuselage.
 |
|||||||||||||
I bet you have never seen a plane that could do a knife edge on the ground.
 |
|||||||||||||
Danny Prince is Coming Home
Club member Danny Prince is coming home from Turkey! In this letter he is describing his last days on the job and how nice it was to be coming home. We have all missed Danny and his giant gas planes at the field.
That is right. The math suggest that we will be there about 12. We are
wheels up here at 0500, it is a 15 hour return flight( + or - winds) that
makes it 2000 turkey time, and then the 8 hour difference in times makes it
1200 Alabama time. We had a good tail wind on the ride over and it was 12
hours almost to the minute. Not too bad for a almost 8000 mile trip.
That is if they can get it fixed. The last word I had on ours is it has
become spiteful and will not retract the landing gear, which is not as bad
as will not extend the gear which is a real ugly thing. But still it would
take a week to fly the dirty thing home with the gear down. They thought
they were going to have to put the ole girl up on jacks to fix the gear and
that is a major ordeal, but they left one guy working on it, and hopefully
he got it fixed yesterday.
My god I would hate to walk back. I have worn out a pair of shoes. They gave
up the ghost yesterday, right in the middle of a rain storm. I stepped on a
rock, and said ouch, it went thru the sole of my shoe. Oh well, I can hold
them together with bubblegum and bailing wire for another day.
I do plan on bring ole blue home, if I can prime her up.
My next door workers here is xpl, they doing all the movements. I knew one
of them before we came and have gotten to know the other one while we have
been here. So they were in a pinch yesterday, and I offered to help them do
the baggage for those arriving and the ones departing. The first shirt
offered his help as well. We went out to meet the 2 jets and after we
unloaded the first one it started lighting. Then it became a race , every
time we drove out to the airplane, the MOCC would call on the radio ,
lighting within 5 miles, leave the flight line, back to the hangar, then it
would rain, then back out there. I finally got tired of all the going and
coming, so I just rested in the ladder truck beside the jet and waited until
they came back.
We got the sencond jet unloaded, all 150 + bags and on the truck, sorted
out. So here we go to tent city, three of us. We got caught by 3 fighters
taxing out. We had to yield and they did the turn right in front of us. A
pretty awesome sight to see every hard point covered with a love letter to
Sadam, pointed right at you. Anyway they went on down the taxi way for the
pin pulling and finial checks.
When we got to tent city, the freaking bottom fell out and we had their
baggage in a uncovered truck, trying to get it to them and finally just gave
up and ran for cover, we were all three wet as rats out for a sunday swim!
It would stop raining, we would reload the bags, and then here it would come
again, take them off again. I'll never tell who didn't get a covered truck,
but somebody in XPL messed up!! haha
Well to make a long story short, I left here at 10 am, and we got done with
it at 5:30pm. Missed lunch, ruined a uniform, blew out my only pair of
shoes, got soaking assed wet, and threw about 5 tons of bags.
These people from Miss, pack like they are here for the rest of their life.
It ain't full if the zipper will still close, put another hound dog in that
bag, never know when we might go coon hunting! Look Maude I think that thar
mule will fit in that bag! Somebody brought a pizza, it was just a little
soggy by the time they got it!
After we got them delivered, then we had to pick up all the outgoing bags
and get the departing jet loaded. While it was fun (bull shit), I have no
plans of volunteering today for our bags!!
Sorry to write a book, but bored, packed up and came to work too early, so I
write. hahah Since I did write a book I cc'd several people.
See you'all Sat
|