Cow Patty News
Monthly Newsletter
February 2002
The Anniston RC Flyers

God Bless Amereica
What is in the newsletter this month ?
|
Janruary Club Meeting Minutes
President - Cecil Ledbetter
Vice President - Lin Smith
Secretary - Glenn Burks
Treasurer - Jerry McCuistion
Newsletter - James Goss
|
Notice
Due to the cost I am no longer sending out hard copies of the letter. Most all club members are now on line or will be soon. If you know of a member that is not on line would you please run him a copy of the letter and get it to him. Thanks! James Goss
|
The AMA Magazine
By James Goss
I have finally found another good use for the Model Aviation magazine we get each month with our AMA membership other than just reading it. As you already know we are required to place our name and address or our AMA number on or in our planes, just in case they get lost. If we do not follow this guideline our AMA insurance may not pay off. The address label on the Model Aviation already has our name and address as well as our AMA number. Take your x-acto knife and cut the label out (if it will not pull off) and glue it in your fuselage. It makes a neat name tag ID.
|
Our Frequency Board
By Jerry McCuistion
I thought it would be a good time to review the procedure to use for our frequency pin board at the Eastaboga field. Since it is renewal time and we also have some new people that might not have read how it is supposed to work. First of all transmitters are to be put in the rack when not in use. When you get ready to fly look at the slot above the frequency you use if their is no AMA card there put yours in the slot and take the pin. If the buzzer doesn't sound you are good to go. You can take the pin with you or lay it behind the card or phone jack.If you take it please remember to put it back when finished flying. Don't put it in the charge jack on your transmitter. This has happened and some transmitters were damaged. When finished flying put your transmitter in the rack and return the pin to the phone jack and take your AMA card with you. If you go to fly and the frequency is in use you can put your AMA card in the slot above the card of the person flying. this tells him that someone is waiting on the frequency when he returns his pin to the board. If you pull the frequency pin and the board starts buzzing this means that several other pins are pulled and they are in the order that can cause third order interference between the transmitters if you fly.
What happens when we don't follow this procedure is people will put their card on the board when they fly for the first time and not take it off. This not only blocks the next person to fly on this channel it can make the board sound when someone else try's to fly on a different channel if it is spaced to cause a third order interference problem. This isn't much of a problem when just a few are flying but when a bunch of folks show up and several are on the same channel it can cause long waits to fly when not necessary. Also when we get into the habit of not putting our transmitters in the rack and putting the pin back someone might leave one turned on causing a crash. This is a good system and has worked well for years but we must rember to follow the rules to prevent crashing someone's plane. Happy flying!
|
Elmer's Glue
By James Goss
Elmer's all-purpose wood glue is familiar to all of us modelers in the R/C hobby. I have always used it as primary and secondary glue for all size models. When cured it will bond balsa and ply as good as any glue. Test it by bonding two pieces of half-inch balsa together, let it set over night and try to pull them apart. The wood will let go before the glue will. Some modelers will not use it because it is a water base and they think it might let go if it gets wet. Just the other day I saw where a modeler said he would not use white glue on large Robart hinges in his giant scale planes because he thought that the due on the grass might get on his hinges and they would pull out. To test his concept I glued two ½ inch pieces of balsa with a moderate amount of Elmer's. I let it cure for 24 hours and then placed it under water for three days. When I removed it from the water the balsa was really water logged, but you could not pull the two pieces apart. This was amazing to me because on two flat surfaces I thought it probably would pull apart. So when used on our models there is no chance that the glue joint will get as wet as the test balsa did. I feel just as confident when I use Elmer's on my planes as when I use epoxy. As a matter of fact, some of the giant scale kit manufacturers recommend using carpenters wood glue instead of epoxy on their formers.
For example, when building a fuselage you can tack glue all the formers with ca glue to hold then in place until you get them all set in place. Apply Elmer's to all joints and then wipe the joint with a paper towel. It is important to wipe the joints, not to just remove the excess glue, but to force the glue into the joint and under the formers. When you tack the joint with ca you just put a spot here and there so as to not block the joint access for the primary glue. If you were going to use epoxy you would follow the same procedure.
Elmer's glue is so much faster than epoxy and it cost less to use than does epoxy. Don't need any mixing cups and cleanup is with water, can't beat that! I still use epoxy for all power gluing. I give the name power gluing to all the up front components that really need to be strong, such as the firewall, landing gear blocks, motor box, and so on. When using Elmer's glue the most common mistake is to use too much glue. This will actually weaken the joint and create a long curing time. You would be amazed at how little glue is actually required to do the job. When bonding two flat pieces of balsa I spread the glue on both pieces of wood, I then wipe it with a paper towel and remove most of the glue, the wood is almost dry, this will make the best bond you can get.
|
Technical Tip
By James Goss
Here is a technical tip for making it easier to fiberglass the midsection of your wings to get that extra strength needed for those high G-Forces. Most kit manufactures, but not all, will supply the glass cloth so you can ca or epoxy it where the two wing halves meet in the center of the wing. I would not use anything less than five ounce cloth for this job. The cloth will usually be folded into a small plastic bag and full of wrinkles. When you try to glue it down a lot of effort is required to keep the wrinkles flat on the balsa. With epoxy you are wasting your time trying to glue it down, those wrinkles will pop back up every time. If you prepare the cloth ahead of time by using your heating iron set for high heat, you can iron all the wrinkles from the cloth. Just place it on a flat surface and iron as you would any cloth. It will be as flat as a pancake and the wrinkles will not come back. If you haven't tried this you will be amazed at how well it works.
|
Water On Fire
By James Goss
If you have been into radio-controlled airplanes for any time at all, you have learned that water in your fuel is not a good thing. Methanol will soak up water like a sponge. This is why we must keep our fuel container closed at all times. By the time our fuel gets down toward the bottom of its container, we have acquired a good bit of moisture in the jug. A lot of our poor run conditions are a direct result of this unwanted moisture. I was thinking a while back that it would be really nice if we had an inline moisture trap to remove moisture and pass the fuel. I just haven't gotten around to experimenting with this project yet. If we can't get rid of the water in our fuel, why not use the water for fuel. Now I know you are going to laugh at this idea, but it really does have some possibilities.
About three years back, I believe it was in 1998, I was working on the idea of using water for fuel in a gasoline engine. I built a system that would indeed produce fuel from water. The idea has been around for many years and is known as an electrolyzer. The electrolyzer is a device that you can put water in and get hydrogen gas out. Hydrogen was discovered around the year 1500 and was generated when sulfuric acid and iron were brought together. Hydrogen is the lightest of all our elements and is very flammable. Remember it was used in the German dirigible Hindenberg that exploded in 1937 and killed about 60 people. At that time the United States was the only producer of helium gas, which is the second lightest element on earth, and would not provide it to Germany. So hydrogen got a bad name after that accident and anytime we hear the word hydrogen we think of explosions. And rightfully so, hydrogen will explode, I have had some first hand experience with hydrogen gas exploding, just ask my wife Mary.
The early airships were driven by huge diesel engines turning props. As the diesel fuel was used by the giant engines, the ship would become lighter and tend to rise up more readily. Some hydrogen gas would be allowed to escape to counter this extra lift. The German engineers got to thinking that the hydrogen was being wasted so they started venting the hydrogen through the engines. This gave them about 30% more range on each flight. Since then this concept of using hydrogen to fuel an engine has became a reality. Believe me, there will be no energy shortage in the future as long as we have water. Of course if we had no water, we wouldn't need energy anyway. As our oil supply slowly diminishes, we will see hydrogen take over the role as the energy king. There is too much profit in oil at this time and water is almost free for the taking. Believe me, if a fellow such as myself can produce hydrogen in his home workshop, you know it can be manufactured in industry much cheaper than gasoline. With all the research, locating, drilling, pumping, hauling, refining and distribution, needed to maintain our gasoline supply, hydrogen can be generated for 1% of what it costs for gasoline production. Not much profit there for the big oil companies, so it will be a while in coming. So let me say again, don't worry about us running out of energy in the future, water will burn.
Can you imagine us being able to run our model engines off of water instead of the fuel we now have? I am getting ready to start back with some experiments to do just that. Let me tell you about the electrolyzer I have built. Most electrolyzers operate from pure dc power at low voltage and high current. The concept here is to use unfiltered dc, known as pulsating dc, to power the unit with low current and voltage. I am not going into long details of how to build the electrolyzer. If anyone is interested I will gladly furnish this information. My system is pretty large as far as electrolyzers go. It will produce eleven gallons of Brown's Gas per minute. Noticed I called it Brown's Gas, not hydrogen gas. Brown's Gas, named after Yull Brown the inventor, is different from regular hydrogen gas. In a regular electrolyzer the water is split into hydrogen and oxygen atoms with most of them reforming or recombining with each other to make water again. This recombining is changing the individual atoms back into di-atomic molecules. So in a regular electrolyzer the hydrogen and oxygen must be kept separate or you will end up with water again. This is hard to achieve in the simple electrolyzer that uses pure dc for its power.
By using pulsating dc voltage to drive the electrolyzer, the separated gases do not tend to recombine into diatomic molecules; they remain in a monatomic state. This makes it really easy to capture the gas. The output gas from my system carries both hydrogen and oxygen in a ratio that burns quite well. An electrolyte must be used in the electrolyzer to increase the conductivity of the water. I use sodium hydroxide, which is not expensive or hard to come by. Once you place the electrolyte into the electrolyzer, you never have to put anything into the electrolyzer other than water. One gallon of water will drive a torch for forty hours, one week of welding, and then simply add another gallon of water and you are ready to go again.
Unlike oxygen and acetylene welding systems that need two hoses, Brown's gas only need one hose because it already has the hydrogen and oxygen mixed together right out of the electrolyzer. I run the electrolyzer tank pressure at about 50 psi and use a regular oxygen and acetylene number 1 or 2 torch handle. The pressure on the tank is self-generating and I have a pressure switch to keep it constant. The first time I tried to light the torch I thought it was not going to light. I was holding it close to the ground at the time and I noticed a shadow of heat rising. The torch was burning and I didn't realize it. I had forgot that you can't see a hydrogen flame. The same with an alcohol flame. I brought a piece of paper over to the torch and the invisible flame set it on fire immediately. I then knew for sure that I was burning water. It was so fascinating that I just set there for about an hour watching the shadow on the ground. This much energy from water, just think of the possibilities. I then used the torch for melting pieces of metal, silver soldering, and brazing metal together. I made a video of the machine in action and showed it to my students at work.
It's good to know that our children and grandchildren will have an unlimited supply of energy so their life will be as convenient as ours. Can you imagine what life would be like if all of a sudden we had no oil, natural gas or coal for fuel? Well one day it will come to pass and it probably will be sooner than you think. By that time the transition will have already occurred, and the future generations will be using hydrogen , the sun's energy, and many other things that we have not even thought of at this time.
Some problems encountered while trying to run our model engines with Brown's gas will have to be solved, but I think they can be overcome. The first and most obvious is how do you lubricate the engine. You can't mix an oil with a gas vapor. The oil will have to be injected into the engine by a separate means, a pressurized oil pump for example. The next question is will the glow plug ignite the hydrogen gas and will the hydrogen react with the glow element to keep it hot? With the fine electronic ignitions we have today, changing to a small spark plug, about the size of the glow plug, will be simple. Brown's gas is about seven times more ignitable than is gasoline. Actually the gas engines will be easier to convert over to hydrogen. Timing will have to be changed, but with the electronic ignitions that will be no trouble at all. The next question is how do you store the hydrogen fuel on the plane? Look at it this way, it will make your plane weigh less. We may be able to have a system that will generate the hydrogen on demand. This method sounds the best because you would not have to have a large pressurized storage tank onboard.
By the way, with one gallon of water you can fly your plane for one year or more. Also there is absolutely no byproducts coming out of the exhaust other than water vapor. After the Brown's gas goes through your engine, the hydrogen and oxygen recombine to form water. Capture this water and use it again. Another interesting fact I noticed while my torch is burning is that you can touch the side of the torch tip and it is not very hot to the touch. Maybe our engines will run a lot cooler! One of the weirdest things about this fuel is the fact that the torch flame will not heat water very well. Also different metals cause the flame to be at different temperatures. This has been a really interesting project to experiment with and I look forward to reactivating it when I retire in June. So let me say again that seeing water burn is one of the most unbelievable things you will ever see.
The Beginning
PS. I have now retired from teaching, but I am so actively engaged in building and flying models I don't have any time to experiment. I guess I will retire again in order to finish the projects I have started..
|
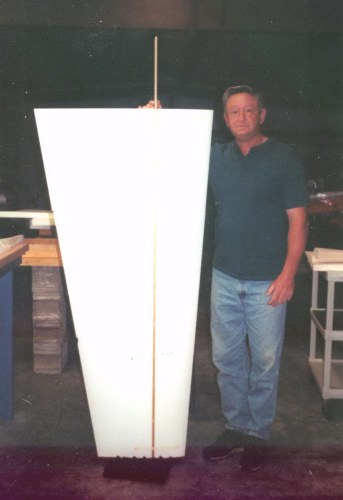
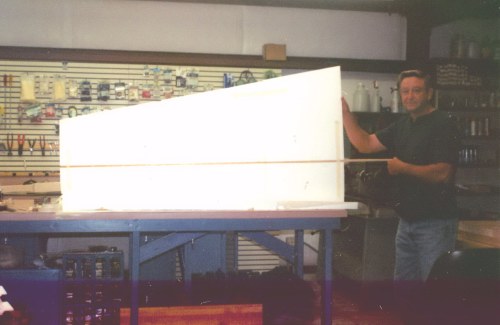
Update on the half scale Cap 232
Here is the right wing panel and you can see how huge the plane will be with both wing panels in place with a 13-inch fuselage in between them. This picture was taken before I sheeted the wing with 3/32 balsa. The hardwood spar can be seen running the full length of the wing plus 13 inches beyond the root of the wing. You can't see it in this picture, but the spar is nearly five inches wide at the root of the wing. This panel is now complete and I am working on the other panel as I write. Everything else is ready to go and I should be able to start putting all components together for a test fit within a month or so. I am dividing my time between three planes being built at the same time. This half scale Cap, a Lanier 37% Sukhoi with a 120-inch wingspan, and a Midwest 27% Cap 232 with an 80-inch wingspan.
 |
 |
Partial Built Kits
By James Goss
I was thinking the other day about how we could get more interest in the kit-building end of out hobby. The ARF(Almost Ready to Fly) and ARC (Almost Ready to Cover) are really taking off and it is easy to understand why. Very little time and skill is needed to assemble an ARF, more skill on the ARC is needed for sure, but the ARC still saves many hours of work. I don't think they are just a fad either, they are here to stay. Now don't get me wrong, it does take some skill to assemble an ARF and set it up to fly. What I am thinking about is more of a partial ARC kit. Most builders do not like to build either the wing or the fuselage or tail sections. In my case I have always liked to build the fuselage better than the wing or tail sections. I still like to build wings, but not as much as the fuselage. So why nor have a partial kit that comes with your choice of having the wing, fuse, or tail already built and you build the rest (your favorite parts). It would cost more than a full kit, but less than a full ARC. I think more builders would go for this and stay in the kit-building end of the hobby. What do you thing? James Goss
|
Rebuilding Your Model
By James Goss
I think we will all agree that rebuilding your model is not as fun as the first go around. Each rebuild that you do is always different from the previous in some way or another. I have had crashes that I thought would take weeks to rebuild, but when I got started it was not as bad as it looked and would only take a few days to get it back in shape. Other times a simple mishap in landing that should only take a few hours to repair would end up requiring several days to repair. You never know until you get started and check all the structural damage that is hidden from the eye. I guarantee that you will always find some if you look hard enough.
It's funny how some crashes are all clean breaks and others are splintered into hundred of small mangled pieces of balsa. What causes some to splinter so badly and some not to splinter at all? I think the main deciding factors are how well the plane is glued together and if it has proper bracing in key places. If the gluing is strong enough to not let go, then something is going to break elsewhere during a crash. I have found that an inferior glued model may survive a crash with less damage than one that has good glue joints. Of course we need to keep in mind that the crash may have been caused by the poor glue joints in the first place. As an example I will use the crashed plane that I am now working on. This plane went into the ground at full speed and almost at a ninety-degree angle to the ground.
This kind of crash normally produces the most severe damage that can be imagined. The fuselage only took about two hours to repair and the wing about 30 minutes. I could not believe how everything went back together with ease. The rubber bands really saved the wing, just like a weak glue joint giving under stress. The sides of the fuselage had absolutely no damage at all. The firewall had very little glue on it so it gave away immediately on impact and was pushed to the rear about three inches. This is what really saved everything else. Even the fiber engine mount was still in good shape. The breaking loose of the firewall dissipated all of the crash energy. It took about ten minutes to restore the firewall. I do not know who built the plane, but they used ca glue on the firewall and that should never be done. Always use epoxy, or at least I have always thought that you should. A breakaway firewall may not be a bad idea! Have it strong enough to support the engine and then give if it receives a direct blow. This would act like a big shock absorber. We have breakaway engine mounts to protect the engine so why not have a breakaway firewall.
I had much rather have the firewall move back during a crash and still be in one piece than to have it come apart and take out the fuselage sides as well. Mounting the ¼ inch firewall by using epoxy on all sides to anchor it to the fuselage for a .46 size engine may be more than we need anyway. I am sure someone can design a firewall system that will uncouple itself from the fuselage on impact. If nothing else, use nylon bolts of the proper size to strip away and allow the firewall to travel straight back into the fuselage. It is a lot easier to replace a couple of formers than to rebuild the front end of your airplane. We complain about the ARF's not having good glue joints like our homebuilt planes. Could it be that an ARF will survive a crash better because they don't have superior glue joints, who knows? So the next time you build your favorite plane, be sure to use very little glue and if it crashes you may not be saying YEEEEEOOOOOWWWWW!!!
|
Inconveniences In building Models
By James Goss
Now don't get me wrong, I really love to build model planes and fly them with my friends at our local flying fields. There is nothing that I like better, but what I am talking about here is some of the inconveniences that we run into while building a kit, or an arf. I am not talking about the expected hassles, you know the ones I am talking about here, and we all have these. Here are some of the common things that we all expect to happen on every project: Such things as gluing your fingers to the plane, gluing your hand to your face, pressing your finger through the sheeting, building two right wing panels, gluing your eye shut (Cecil), cuts and stabs with your hobby knife, burning the **** out of your fingers with your heating iron, ca fumes in the eyes, electrocution from that faulty line cord on your Great Planes slot machine, building firewalls upside down, getting the thrust angle backwards on the firewall, letting the drill bit go just a little bit too far, fog in your canopy, forgetting to glue a former, spray cans of paint that will not spray or either puts out large globs of paint, putting hinges in the wrong location, ca tip always has a clog in it, paint peals off with the masking tape, having both ailerons going in the same direction, and yes; even having a prop on backwards. What else can go wrong? I guess that when you can build a model and not have any of these problems to plague you, you can be called a master modeler. I always have a calamity of events to happen on each and every project I start. These type of inconveniences do not bother me anymore because I have grown accustom to them. I take them all to be part of this illustrious hobby we are in.
If you haven't had all of the above experiences, then you haven't been in the hobby but for a short while. Just give it time and they will all come around sooner or later. Here is an example of the type of inconvenience I am referring to in the title of this article. You have finally bought that arf you have been wanting on for some time now, and it is almost ready to take to the field. You just know that it's going to fly like a blue streak when you get it in the air. You have been thinking that this is a really nice arf and it is going together very fast. Boy, I may just start building these arf planes instead of kit planes. Honey, it looks like I will have it ready to fly tomorrow, I said to my wife. All I like is to install the fuel tank and this baby will be ready to go. The fuel tank came with the kit, as did everything else that was needed to build the plane. I am using a gas engine on this plane so I followed the instructions for assembling the gas and not the glow version. It says to use the gray stopper because it is for gas and the black stopper is for glow. So I reach over to get the stopper and I see only one black stopper in the bag. Where is the little gray stopper? I start looking high and low for it, but it is simply not there. Now I start to really panic, without the gas stopper there will be no new plane in the air this weekend.
Now I am not a person that likes to use profanity, but if I was, I could have out-cursed a sailor for the next five minutes. Here I am, ready to go flying the next day and now because of this little stopper I was grounded. There was not another gas stopper to be found anywhere in my shop. After I calmed down a little I called the company and sure, they said they would get it out right away, and they did, I got it in the mail in just three days. This was still a real inconvenience to wait even three days though. How would they like to wait three extra days for their money? All the companies that I have contacted in reference to missing parts have always been very nice and prompt to deliver, with no questions ask. This is fine and good, but still they had missing parts to begin with, even if it was only one small stopper. Over the years I have had missing parts from some of the best-known kit manufactures around. You would think that the packing team would have a check and double check system that would assure them of a 100% complete kit. Missing wood parts is not quite as bad in my case because I keep a good supply on hand. I know this is not the case for a lot of other modelers. If it's your first or second kit you will not have very much stock to fall back on, so any missing parts here is really an inconvenience to us. If you build arfs only, you will not have any material at all left over from your previous kits. I would like to see the day when a manufacturer of good quality kits could guarantee us modelers that all parts would be in the box when you opened it, or they will send you a free kit. I realize that this may be a difficult thing to do, because somebody could easily take advantage of this deal. I do know that most modelers are good honest people and would never do anything like this just to get a free kit. If the kit manufacturer did have this guarantee they could reduce the price of the kit by an average of at least $5.00. This is because they would now make sure that everything is in the box and would not have to re-ship parts at their expense. It takes a lot of time from a company's workday, starting with the phone calls, locating the parts, packing and shipping for the second time around, and then they send you the wrong part again. Now we have got to do it all over again.
Can anybody think of some situations where you had to notify a kit company of some missing parts, and when you received them they were still the wrong parts? Did you really blow up and go berserk, or did you just laugh it off and say God bless those people? I guess receiving the wrong part twice would require us to call it inconvenience squared. If you have had this inconvenience squared experience, let me know and we will have a section in the newsletter devoted to this topic. I bet that most all of us have had it to happen at least one time in our modeling career, so think hard back over the years and jot it down on paper.
|
Redundant Systems
By James Goss
This article will describe some of the methods you can use to improve your radio systems safety or reliability. Reliability in this case is referring to redundant backup systems (superfluous backup). Redundant simply means having more than is really needed to do a specific job. Backup systems are normally used only on the large expensive planes such as giant scale, but can be used on any size plane. If you have a really nice small plane that you love to fly, then why not use some added protection. For example, if you use two servos to control a surface instead of one, you have a redundant system. If you use two batteries instead of one, you have a redundant system. Of course weight and available space inside the plane is the main concerns we have with small planes. With large planes, like 60 sizes up to giant scale, there is no reason not to have some type of backup onboard. Cost may be a concern for some, but if your model costs $1000.00, surely you can afford and extra battery. The battery is not required to be as large as your main battery, just so it has the same number of cells in it. This is a decision that one has to make, do I want a plane that weights a few ounces lighter and cost just a little less, or do I want to feel safer while flying the model?
If your flight pack battery fails during flight, your plane will probably do one of three things. Depending on the type of battery failure you have will determine how your plane responds. One possibility is that your plane ceases all functions and comes down to earth with no control at all. The receiver has lost all of its input voltage from the battery, and is receiving 0 volts instead of the 4.8 volts it normally operates on. For this situation to occur, an open has developed between the battery and the receiver. It could be a broken wire, a bad solder joint, or a defective switch. In some cases I have known of the switch being turned off in flight due to extreme vibrations from the engine. I have found that anything mechanical in nature can, and will fail more often than a component that has no moving parts. So this makes the switch the number one component to suspect in a failure of this type.
The next possibility is that the receiver is receiving voltage from the battery, but the voltage is lower than normal. This may give you many different flight responses, but here is one. The symptoms for low voltage would be that the plane is flying ok when near the field, but as it moves away from the field it starts to have a mind of its own. The problem will come and go, you will think you are getting some hits from other radios in the area, so you shout out does anyone have channel ** turned on? Then you notice that as the plane comes back toward the field you have full control again. Of course there could be a lot more symptoms for this type of fault, but you can get an idea of what I am talking about here. The problem could be a defective cell in the battery, or a high resistance connection along the current's path from the battery to the receiver. A plug is making contact but not good contact, it has some resistance at that point which creates a voltage drop. This voltage drop will be subtracted from the battery's voltage and the receiver will have less voltage to operate on. During this time the solid-state devices inside the servo will be functioning, but with less amplitude. The servos will move slower and have less power output to the control surfaces. Remember that power varies with the square of the voltage. If you half the voltage, the power in watts will be reduced four times, not two as you might think. Any voltage loss at all will reduce your power output a great amount. So again, any problem with the receiver's voltage supply can be put into three groups: no voltage at all, low voltage, or an intermittent voltage. An intermittent voltage means that the supply voltage is coming and going at random. We hope that it is off and on at a high rate so we only get a glitch in our controls, but it could be at any time interval.
There are several ways to achieve battery backup, but I feel the one with the least number of components would be the best choice. Fewer components mean fewer things to go bad. The easiest way to add on a second battery would be to plug it into any unused channel on the receiver. It would be important to also have a second switch for this backup battery. What you are trying to establish is two complete paths for the current to flow from the battery to the receiver. If either path is broken, the other path will provide the receiver with its needed current. The backup battery can plug into any unused channel because all channels have a common voltage bus and are connected in parallel to the battery when the switch is on. If all channels are in use, you can use a wye harness, but you would be adding a connection that is common to both batteries, so if the common wye connector goes bad, it would still shut current to the receiver off. This is what you are trying to do away with in the system, any component that can stop current flow to the receiver.
We call it a backup battery, but it will be used at the same time as the main battery. It is not switched on and off like the name would imply; it is in parallel with the main battery during all of your flight time. Some elaborate systems will switch a second battery on if the main one fails, but here again you are using a lot more components, and components do go bad. Keep it simple! Jomar (EMS) has an electronic switch that monitors the main battery for a fault condition. If a fault occurs in the primary battery, the primary battery will be disconnected and the backup battery will come on line to keep you in the air. The unit sells for about $50.00.
The backup battery's current rating can be smaller or larger than your main battery, but it must have the same number of cells as your main battery pack. For example, you would not want to use a 4-cell and a 6-cell (4.8 volt and 6 volt) in parallel. This would produce internal current flow between the batteries, even if there were no load connected at that time. So if we were using two 4.8-volt batteries, and one is rated at 600-mah, and the other is rated at 1200-mah, the system will work fine. With a fresh charge on both batteries, they will share in providing equal currents to the receiver. As they both discharge, the 600-mah battery will try to reach its discharge state first. At this time it starts to act as a load to the 1200-mah battery and the 1200-mah battery is now furnishing all the load current plus maintaining the charge on the 600-mah pack so its voltage will not drop off. As long as the 1200-mah can supply the load current, the terminal voltage on both batteries will be maintained at 4.8-volts. When it can no longer supply the demand, the terminal voltage will drop and the receiver now receives less than needed voltage to operate. Time to recharge both batteries, but it's better to charge them separately. If you charge both batteries in parallel from the same charger and they are a little different in mah ratings, the one with the lowest mah rating will become charged first. It may now become over charged while the other battery, which has a larger mah rating, is still being charged. If you use switch harnesses that have charging ports built in, then it is easy to charge each battery by using two wall chargers at the same time.
Some modelers will not use this method of backup because they feel that if one of the batteries has a cell to short while in flight, it will load down the other battery and the overall voltage will drop. I agree that this is possible, but the likelihood of this happening is very slim, especially it you check your battery pack before each flight with your loaded voltmeter. When a cell is going bad, it will probably do it over a period of time and this will show up on your meter as reduced voltage when a 250-ma load is placed across it. This is exactly what your expanded scale voltmeter does, it connects a load of about 250 ma across the battery each time you measure the batteries voltage. So I would feel safe by using this method because I always load check the batteries on my giant scale plane before each flight. It is far more likely that you will develop a fault in the switch or associated wiring, rather than in the battery while the plane is in the air. So even though one of the batteries can affect the other if a fault occurs, I feel that we are increasing the reliability of the system overall by at least 30% to the good.
The next method for paralleling the two batteries is to place a diode in series with each battery lead. The diode can be placed in either the negative or positive lead of the battery. These diodes will act as blocking diodes and will not allow battery A to load down battery B if a cell becomes shorted in battery A. Likewise, battery B will not load down battery A if a cell in battery B becomes shorted. By placing a diode in series with the battery there will be a .6-volt drop across the diode. The diode requires .6 volts for its forward bias needed to turn it on. This voltage will be subtracted from the battery voltage and the receiver will receive .6 volts less. Using Schottky diodes will create less voltage drop and have less power loss. Here again, placing more components in line with the current path may be asking for more trouble. Diodes do go bad, they can short or they can open. If one of them shorts, we are back where we started from, if one opens we loose that battery. So if I were going to use two batteries in parallel, I would just use two switches and two batteries, with one battery plugged into the receiver battery jack, and the other plugged into any unused servo port on the receiver.
What is really getting popular today with the giant scale planes is a redundant system that uses two switches, two batteries, and two receivers. I feel that using twin receivers is going to give us the ultimate backup system for R/C. Again I am calling it a backup system, but they are used simultaneously, one is not in reserve waiting to be used if the other one fails. Most pilots will place one aileron and one elevator half on receiver A. The other aileron and elevator half will be placed on receiver B. The rudder and throttle can go on receiver A or B. With this setup, if either switch, battery or receiver goes bad, we still have half control of the main control surfaces.
I noticed at the Tournament of Champions this year (2001) twin receivers were very popular. Out of 21 contestants for the title, all but four used twin receivers. The ones that didn't use two receivers said that two receivers created more components and a higher chance for a fault to occur. My logic is a little different from this. When using one receiver, if it goes bad, your plane is coming down for sure. When using two receivers, if that same receiver develops a fault, we still have half control of the most vital surfaces, the elevator and ailerons. Still having some control of the plane should allow us to land with minimum damage. So there is more chance of a fault to occur when using two receivers, but your probability of landing the plane in one piece has increased by 100%. I would feel better about the reliability of my radio system if I knew there was a twin receiver system in operation.
How many of you have actually had a crash that was due to your radio equipment? The thing is, a lot of times when we crash we can't determine if the radio was at fault or not. I am sure that most of the time it is simply pilot error in my case, but they are those times that I was left wondering. Could it have been an intermittent bad connection in the battery line or in the switch assembly? I will never know for sure. On planes that we invest a great deal of money into, why not go ahead and use some type of added protection. Like I stated above, if you have hundreds, or in some cases, thousands of dollars in your plane, investing a few more dollars may be a very wise decision. Just think about how long it takes to rebuild that plane, if it can be rebuilt. It's funny, but rebuilding is not as fun as the first build of the project. Same thing when you build two identical planes in a row. With the first go around there is some unknown aspect involved and some mystery as to what the outcome will be. On the next one it is just all work because we already know the outcome.
Another system that is sometimes used with two batteries is known as an isolator. The isolator allows you to use two batteries, one for the receiver and one for the servos. The theory here is that if a servo goes bad and loads the servo battery down; the receiver will still have its regular voltage to function normal. Also, low voltage on a servo means that it might move slower and have less power output, but low voltage on the receiver might mean that you have no control of your plane. I can see the advantages of an isolator when using this logic. These systems are totally mechanical in that they have no electronics involved. I think they should be called an octopus instead of an isolator because they have so many connectors involved. I would not think of using this system because of the increased probability of having a faulty connection at one to these many plugs.
Using multiple servos on one control surface is also getting popular with the large planes. Some pilots are using as many as four of five servos on the rudder and two or three for the elevators and ailerons on the 40% and up planes. Keep in mind that I am not talking about using two push rods connected to one servo like a lot of the sport planes are doing now. This only prevents flexing of the push rods. I am talking about having two or more servos with their push rods connected to the same control surface so the total output power from the servos will be added together. This arrangement will work fine unless one of the servos develops a problem. If one of the multiple servos stops working, it will immediately become a load for the other servo that is working with it. Now, not only does the surviving servo have to operate the control surface, it also must operate the faulty servo as well. This can really place a heavy load on the flight pack and drain it in a hurry. I guess this is why some of the Tournament of Champion guys will use two 3600 mah battery packs. At any rate, using multiple servos does have its advantages and disadvantages.
Using two servos on split surfaces such as the elevators does not present this problem of loading. Here, each side of the elevators operates independent of each other. If one of the servos go bad, you still have the other elevator half to fly the plane and without extra load from the bad servo.
Here is a diagram of a simple isolator. You can see that the positive lead coming from battery A is not used by the servos. The servos pick up their power from battery B on the voltage bus in the isolator.
 |
What would you like to see in Our Hobby?
In this section I would like some of you to tell us what you would like to see take place in the near future for the R/C hobby. This can deal with any aspect of the hobby. I personally would like to see several changes take place in respect to the building phase of the hobby:
So send in your want to see wishes and we can start to work on them immediately.
|
I Hope the Newsletter Continues to Flourish
As I stated last month this edition of the newsletter, with me as the editor, will probably be the last. I have enjoyed getting the letter ready each month for the last year, but it does take a lot of time, especially when I provide all the articles. If just half the members would donate a little time and place an article or two during the year it would make the editor's job a lot simpler. Two of the members did contribute to the letter and they did a great job, so I want to thank Steve and Jerry for their help. Whoever takes the job over I will be more than happy to help them get started. I will also continue to write articles every now and then. So this is James Goss (AD4RH) signing off for now.
Update
Well it looks like nobody wanted the editor's job after all. It must not be a very prestigious position among us modelers. I am going to try and keep the letter going for another year with your help. So send in those thoughts and we will have some news to print each month. I am no longer sending out hard copies of the letter due to cost. Most all club members are now on line or will be soon. If you know of a member that is not on line would you please run him a copy of the letter and get it to him. Thanks! James Goss
|