Cow Patty News
Monthly Newsletter
December 2001
The Anniston R/C Flyers

God Bless America
   |
What is in the newsletter this month?
|
Minutes of Club Meeting
November 5, 2001
|
Getting a New Hobby
Do you know this fellow? I have recently become bored with my old hobbies and I think it is about time to get a new hobby. I have decided to build a model airplane and learn to fly it at the local flying field just down the road. I have been watching the guys fly their models and it doesn't appear to be that hard to fly them. It sure looks like they are having a lot of fun; it must be a really good hobby. I think I will get an aerobatic plane for my first model so I can do some loops, rolls and inverted flying. I stopped by the field the other day and talked with some members about joining the club. Everyone was real nice and they gave me all the information I needed to get into the club. One of the guys at the field informed me that I needed a trainer plane to start with and gradually move up to a more responsive type plane after I can takeoff and land the trainer. A trainer plane sounds like it would be a little slow for me so I think I will just skip the trainer and go with a fast aerobatic plane. When I bought my fishing boat I didn't have to get a trainer boat, or a trainer gun when I started hunting, so why would I need a trainer plane to fly?
I found out the other day that I could get a nice low wing plane with all the equipment I will need to get in the air from the local hobby shop for only $650 dollars. It's called an ARF plane and all I have to do is open the big box and glue a few things together. I figure it will take about two or three hours at the most and I will be ready to go fly. That is a lot less money that my fishing boat cost and about half the cost of last years hunting season. I can have it ready for this Saturday and I will try to get to the flying field early before anybody else arrives. I can try a few aerobatic maneuvers and be warmed up when the rest of the fellows get there. My wife should really go for this hobby when I tell her how much money we will save next year.
 |
New Planes in the Air
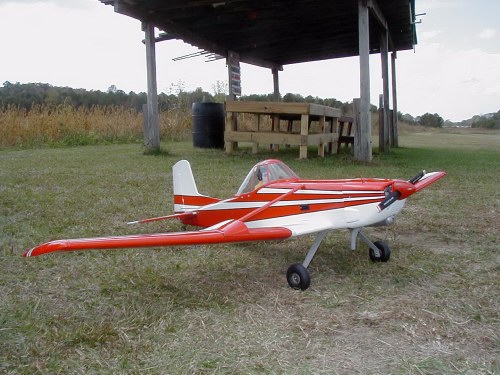
 This is Jim Woodard and his new Long John 120 with a Ryobi 31 cc engine. I got to see Jim's plane fly at the Munford field on Oct. 20. It was a beautiful day to fly and Jim's plane had several good flights. The Ryobi 31 seems to have plenty of power for this plane and Jim put it through the paces. Gas engines really get good mileage and have little to clean up when you are through flying.
This is what Jim had to say about his plane:
Bob Shapiro at Texas Twins RC Aircraft in Florida shipped the plane for free! The Ribs are laser cut and the rest is hand cut. One neat thing was that He offered to cut the firewall and formers as you need,to accomodate various engine mount widths. Also note there was a review in RCM on the 40 size Long John and some tips were found there which can be read or printed on his site. The kit went together pretty quickly. I am thinking about building a 20 size Long John and installing a 40 or 47,,,,,
For the wing,, It builds flat and is one piece. I used Titebond for the laminated main spars and Zap thin for the ribs and braces, 30 minute epoxy was used on the center section ribs because it was to have the front alignment dowell,and rear blocks for the mounting screws. (Note that the center ribs and tip ribs are thicker that the other ribs. Wing tips and braces are then added. I made the servo mounting plates and added triangle stock to reinforce.
The fuselage is simple box construction built upside down. I sheeted the bottom of the fuse and waited until I had cut and trial fit my servos for the rudder and both elevator before sheeting the top.
The tail feathers are built over the plans, stick balsa sheeted. I am using a Ryobi 31cc with conversion parts from www.jagengines.com I sent them my flywheel for machining and they did a good job. It was fun to transform the engine from a string trimmer to an airplane engine..
As for the specs: W.S. 81
Weight 11.5
Length 55
Hitech Flash 5 with HS300 servos x 5 + 1 Hobbico 1/4 scale servo (rudder)
I used 4-40 threaded rods, alum tubing and Du-bro heavy duty clevases (SP).
I covered it with White Monokote and trimmed it with Metalic Copper and Goldberg stripe tape.
12 oz sullivan tank with gas conversion kit. I run Amsoil at about 50 to 1
|
This is Jim Woodard's stepson with his new plane.
Here is a photo of Matt Wheeler, he is my stepson since June, 2001. Age 9. He is from near Toronto Ontario Canada. I purchased the Apache II in mid June and between The RAMM's field here in Montgomery, and the TRCC in Munford, He solo'ed in September. (He has been rough on the nose gear). I now have to buy a new radio system on another channel so we can fly at the same time. FYI, his trainer uses a Fox 40 Delux and runs great! He can start it himself.
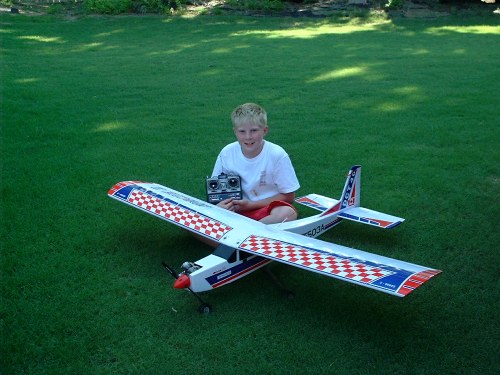 It is really nice to see pilots this young flying at our field. I guess Matt is about the youngest pilot we have had at our field in a long time. He will be teaching us old guys some new tricks before long. We all congratulate you Matt on your solo, this is a real achievement. James
|
  |
This beautiful plane belongs to Joe Hayne and was built and set up by Dr. Vic Cestaro.
 Here is what Dr. Vic had to say: This plane is a Kyosho Cessna 188 Agwagon - engine is an OS46FX, and the radio is a five channel JR. The wingspan is 69 inches and the weight is about 5 pounds. The instrument panel was made one instrument at a time from 1/16" black plastic and laminated scanned instruments (I scanned some actual aircraft instruments, radios, and GPS displays from Flying magazine and reduced them to scale for the cockpit). Some were made from an instrument kit (I don't remember where I got it). The pilot is a Virtual Reality 1/6 scale from Don's Hobby Shop. Total assembly time was exactly 40 hours. I flew it Sunday (and got to make the first dead-stick landing with it), and it is very smooth and stable probably due to the dihedral and long wing. The airfoil is semi-symmetrical. Does nice axial rolls and big loops. The right wing drops first in a power-off stall, which occurs suddenly without any mushing. Overall, a very nice airplane that is relatively easy to fly if
you don't let it get too slow.
|
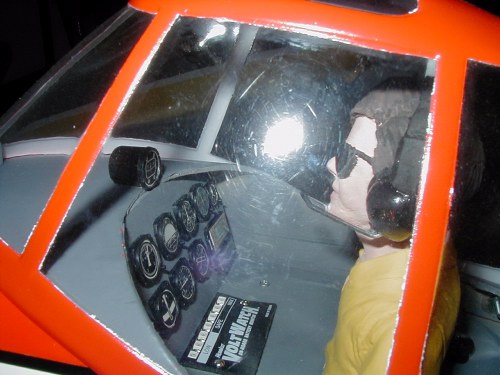 Thanks Dr. Vic for the pictures and information. Details of the cockpit like this makes me set down and cry when I see how nice it is.
|
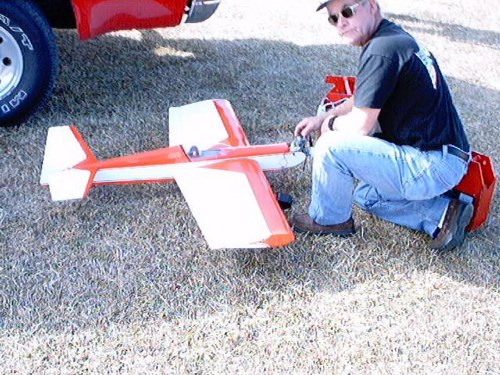
This is my new profile and it really does fly good. It has a YS-120 FZ four stroke engine and it will pull out of a hover with ease. This is the best knife edge plane I have ever owned, it will hold a knife edge at any speed.
 |
   |
After seeing Gene's witch fly the other day I had to have one. This one took about two weeks to get ready. It weighs 13 lbs and I am going to fly it with an OS .91 engine. I may have to rebuild it and shed a few pounds. The fuselage is built from 2 inch square PVC gutter down spout, it doesn't weigh much more than balsa. The tail section is built from cora-plastic which is a little heaver than balsa would be. The witch is three layers of 3/4 inch polystyrene laminated together with contact cement. The cape frame is out of 1/2 inch aluminum channel and Mary made the cape for me. As you can see it is almost life size. I will let you know how it comes out.
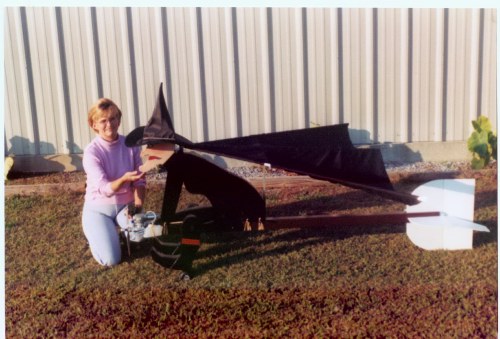 I have now flown the witch and it does fly. Needs a little more work but now that I know it will fly I don't mind the effort.
|
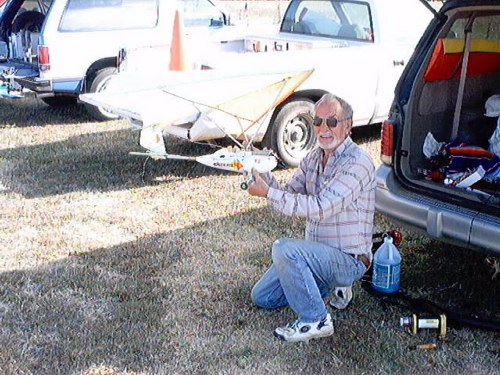
This is Terry's kite plane, it has an OS .10 FP engine with a 2-ounce fuel tank. After he gets it trimmed out it really does fly well. It is about like flying a glider and it uses three channels for control. The little .10 engine has plenty of power and he gets a lot of flying time from the small tank. This plane is very unique and I would love to have one.
 |
Here is Loren with his new Sig Something Extra. He is powering it with a Saito .52 four stroke engine and this little engine is full of horse power. This engine really sounds good in the air and it will take this 5 lb 3 oz plane vertical with no problem. Loren also found this plane to be a great glider. The other day at the Munford field Loren took the extra about 10 miles high and cut the engine. He flew for the rest of the day, or at least it seemed like he did before it came back to earth.
 |
   |
Technical Tip (Soldering)
By James Goss
What type of soldering equipment do you have around your work area? Sooner or later you will need to do some soldering in this hobby and having the right soldering equipment will help. Basic soldering is an easy skill to learn and most people can solder with a little practice. There are two basic types of soldering equipment, the pencil or soldering iron, and the soldering gun. The soldering pencil is called a pencil because it is a long and slender tool shaped like a pencil. Pencil type irons come in sizes between 15 and 60 watts on the average, but can be larger in size. Pencil type irons are good for small jobs and are good for production work because they stay hot and ready to go when you need them. It takes a while for these to heat up because they have a heating element that has to heat up and transfer the heat to the tip. It takes a few minutes for the tip to reach its operating heat, but when it does, it is just as hot as the bigger soldering guns. The difference is that the pencil's tip will drop in temperature when placed on an object to be soldered as compared to a gun. The low wattage element can't supply enough heat and will allow the tip to drop in temperature. Remember that this type of soldering device stays hot so be careful where you lay the pencil down and don't burn its line cord or your hand.
A good solder to use with the pencil iron is a 60/40 tin and lead. I like to use .030-diameter rosin core solder. This solder melts at around 370 degrees F. The rosin is a cleaning agent that is activated by heat and will allow the solder to bond to the base metal. Rosin core solder should always be used in our hobby, never acid core. I saw a pushrod the other day that a friend of mine had used acid core solder on. The rod had corroded and broke under load, it was on his elevator so he had a hard landing. Acid core is fine for sheet metal and radiator repair, but not around electrical devices because of corrosion.
For soldering large music wire a soldering gun makes the job much easier. A soldering gun operates on a different principle than does the soldering pencil. The gun has a transformer in its handle that transforms the 120 volts AC down to less than four volts, but delivers around 40 or 50 amps to the soldering tip. So it is the circulating current through the tip that heats it. Current flow through a resistance will create heat. Most soldering gun tips are equal to 10-awg copper. You can make your own tips from number 10 awg solid copper building wire and they will heat just as well as the store bought ones.
To solder large music wire start by sanding the wire with some 150-grit paper to get it shinny. Then clean the wire with alcohol several times to remove all oils. Place some flux on the wire in addition to the flux in the core of the solder. You can buy rosin flux (past) in a small can at any hardware store. This past will really allow the solder to bond to the music wire and will not come loose in the future. I like to use a 210-watt Weller soldering gun for large jobs such as this because it is quick and efficient. Weller makes one of the best guns on the market for the type of soldering we need to do in our hobby. A gun such as this will come up to heat in a few seconds and will maintain that heat a lot better than a pencil.
For a really strong connection with music wire try this. Overlap the wires a couple of inches after they have been prepared as above. Wrap the two wires with some small copper wire over the two-inch overlap, keeping it tight as you go. You can get the small copper wire by stripping some 12-awg stranded wire and removing one strand. Fill the wire with flux and apply the heat. You will see the solder wick throughout the connection. When the wire is full of solder remove the heat and allow it to cool. You will have the best connection that can be made with solder.
Always keep the soldering gun tip tight. Heating and cooling over and over will cause a loose connection at the tip. This is the most common trouble when a gun stops heating. Also clean your tip often because the flux residue will build up on the tip. You can clean the tip by brushing it on a wet rag of sponge between each solder job.
|
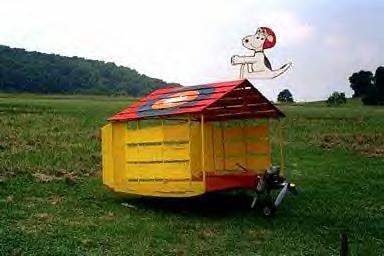 I wonder if this is a birddog house? I guess it is true what they say about anything will fly if you have enough power.
|
Most Wanted Man by the Modeler
 It is always nice to see the UPS man pull up in his big brown truck packed full of goodies. That special plane you have been waiting for has finally arrived. The UPS truck that brings things to my house has a unique sound of its own. I can be anywhere in my house or shop and hear that truck when it pulls in my drive. Usually by the time I get to the door he has gone and a big box is sitting in the garage just waiting to be opened. It's just like a child on Christmas morning opening a big gift. I guess I will never outgrow this feeling I get when a new plane arrives, actually I don't want to outgrow it, how about you???
|
CA Hinges
By James Goss
I think of ca hinges as being the eight wonder of the world, how did I ever get along without them? Not all modelers will agree with me on this topic, just the other day I had a fellow modeler comment that he would never use ca hinges. The last plane he bought had ca hinges on all control surfaces, the first thing he did was to cut them all and install conventional epoxy hinges. I agree that conventional epoxy type hinges appear to be more secure than ca, but over the years I have had more conventional hinges to go bad than ca type hinges. That is until I had five ca hinges on one aileron to rip out on a large 60-inch profile. I noticed the plane had a little different sound and also that it would fall out of a hover a lot sooner than before. When I brought it in for a landing I was shocked to see five of the seven hinges on the right aileron had ripped in half and the aileron was just hanging on at the root of the wing by two hinges and the aileron pushrod. It was like the tip hinge broke first and then the next, and the next, and the next, right on down the line until it got to the pushrod. This plane had many previous flights on it and I always check things out before each flight, so I know all five hinges broke during the last flight.
Even with this problem I am still an avid user of ca hinges on all my small and medium size planes. Of course giant scale planes needs special attention when it comes to hinges. Nothing will change my mind about them being the best thing that has happened to model airplanes. What really sold me on them is the fact that I can completely cover the plane and then cut the slots and install the hinges with a few drops of ca. I can hinge a complete plane in about 30 minutes or less instead of four or five hours like I have been known to spend on some planes. You have just got to love the electric slot machine for cutting the hinge slots for ca hinges. This is one tool that really works! I like to use it while resting on a large two-inch thick foam-pad; this really stabilizes the whole operation.
Another use for ca hinges is to beef up the screw holes in cowlings and canopy installations. I have found them to work better than glass cloth because they are so neat and thin, they are also much stronger than fiberglass cloth. You can count on a plastic cowling breaking at the screw holes if you fly the plane a lot and this is the best way I have found to combat this problems. They are also good for adding strength to balsa joints. For example, I have a friend that uses then on the balance of a rudder. If your plane ever tumbles on take off or landing and hits on the top of the rudder's balance, it will more than likely break at the junction of the overhang. Splitting that junction and installing a ca hinge will really beef it up.
Most modelers install ca hinges by placing a pin through the centerline of the hinge. This will prevent the hinge from being pushed forward when the two surfaces are put together and will ensure that both surfaces have equal hinge material to grip. I have used this method for years and it really works fine. Here is a caution when using this method. I have determined why I had five hinges to go bad at the same time. When I placed T-pin in the hinges I used large 1 ¼ inch T-pins. You do not want to use these larger pins. They make a hole so large that it weakens the hinge; always use the smallest pins you can fine. Some modelers prefer to use a pencil mark instead of pins. This is ok but it will not hold the hinges in place during installation. If you have some special use for ca hinges that you have found to work for you let us know about it.
|
How do you Finish the Cockpit?
By James Goss
I have seen many beautiful model airplanes over the years that I could truly say I wish that was my plane. It was evident that the builder had spent many hours getting everything just right. There are two main components of a finished model that really stands out, and has the greatest impact on the overall looks of the model. These are the cockpit and engine cowling. I consider these to be a separate component from the rest of the plane and should be treated as an individual project when it comes to finishing them. If you end up with defects in either one, no matter how perfect the rest of the plane is, the job will now be less than it could have been. Of the two, I would say the cockpit is the greatest challenge to get right and this article will deal with how you can improve this task.
The method you choose for the cockpit will depend on what type of finish the fuselage will have. If it is glassed and painted you will use one method, if it is covered with a film you will use another method. Since film is the most popular way to finish a model at this day and time, I will discuss it first. No doubt the most common approach with film is to glue the canopy to the film after the interior of the cockpit has been also covered. Then run some pin stripe tape around the edge of the cockpit to hide the edge line. This method does look nice when finished and I have used it many times over the years. A big disadvantage of using this method is that wrinkles may develop where you covered the inside floor area and you have no access to remove them. They become part of the interior and just get worse as time goes on. I remember on one plane, I think it was a twin dualist 40; I had these wrinkles to develop on the first hot day of the season. They really made the job look second rate. I decided to use a magnifying glass to cast a hot spot on the covering through the plastic canopy. To my surprise the magnifying glass did work. I thought, hey this is a great idea, about that time I burnt a hole in the covering. If you use this trick be careful, once you burn a hole in the covering, the hole looks worse than the wrinkle.
You can secure the canopy by using screws, but the plastic is so thin it will usually split around the screw holes after a few flights if you don't enforce them. Even though I have used this method in the past, and it does work ok, here is a better way. I consider this method to be the ultimate way to finish a canopy interior on a plane that is going to be covered with film. Before you start covering, make a second cockpit floor, as well as the front and rear ends. Get these to fit perfect by sanding them to fit the contour of the fuselage. These dummy floor pieces will be used later. Cover the fuselage as always and bring the covering around the canopy area and pull it to the inside area. Terminate the covering by anchoring it to the cockpit floor, front and rear ends also. After it is secured, cut the film so there is about 1-inch left on the over lap all around the canopy area.
A problem you have if you paint the interior of the cockpit is how to terminate the covering without its edges showing. This technique solves the problem because the second set of cockpit floors will cover up the edges of the film. You can prepare the second set of floor material for painting before you install it in the cockpit. Remember that you have already shaped the floor and ends to fit before you started covering the fuse. This is done to avoid scratching the covering with your sandpaper. You will need to seal the floor before painting it so no grain will show, even though a small amount of grain showing will not hurt anything. Two or three coats of thinned epoxy will do a good job. If you want a better finish, us thinned epoxy and fiber cloth. Glassing will give you the ultimate finish with absolutely no grain showing after painting. I always wait about painting until it is installed in the cockpit. I do this because you need to fill the area where the floor butts into the front and back area, sand and paint. Once it is painted and everything looks good, you are ready to install the canopy.
Like I said earlier, you can use striping tape to seal around the edges of the canopy, but there is a better way. If I choose not to use screws to hold the canopy on I will use this technique. Hold the canopy in place, make sure it is balanced on both sides, and mark a pencil line around its perimeter. To get the glue to bond to the cowling, you must sand the outer surface of the canopy, on the inside, with some 400 grit or maybe 320 grit. Stay within 3/8 inch of the outer edge while sanding, this area will be painted over later and the sand marks will not show up. This takes care of the bonding problem for the canopy, but now you have got to improve the bond to the covering. The best way to achieve this is to use a t-pin and punch hundreds of holes into the area underneath the canopy that will be glued to the covering. This is better than removing a strip from the covering. Some instructions will tell you to cut this strip about 1/4 inch wide and remove it so the canopy will be glued to the wood. If you do this, the covering may pull loose from underneath the canopy in the future. By creating hundreds of little holes through the covering and the balsa, the glue will bond the canopy to the wood and also lock the covering in place. By having the pencil mark in place you will be assured of getting the holes under the canopy so the holes will not be seen.
I never use ca glue to install the canopy. You need to be able to move the canopy around for adjustment if needed. Also the ca may fog the inside of the canopy and it will be there from then on. Once you have it in position you can use masking tape to temporarily hold it in place. Place some waxed paper over the canopy and start placing rubber bands around the canopy and fuse to really hold it in place. You may need to shim some small pieces of wood under the rubber bands at the edges of the canopy to really push the edges down. I normally use R/C- 56 glue for this job because if I want to remove the canopy, just heat the glue and it will become soft again.
After the canopy sets for at least 24 hours, you are ready for the finishing task. If you really want a nice looking project, do not use striping tape. Paint the outer edge of the canopy to hide the glue underneath. Be sure to use plastic masking tape for this job because it will not bleed at the edges. Sometimes I paint the edges of the canopy before I install it on the fuselage. It is a little easier that way because you don't have to worry about getting paint on the fuse. If you follow these steps I can guarantee that you will have a job that is second to none.
If the fuselage is not covered you may want to use this technique. When you fiberglass the fuse and plan on having a first place finish, this is the way to go. The idea here is to blend the canopy into the fuselage. Place the canopy in position as before and make a pencil mark around the outer edges. Remove the canopy and cut a trench into the fuse even with the pencil mark. Cut the trench deep enough so the edge of the canopy will fit down into it and be flush with fuse. All this should be done before you paint or prime the fuse. The cockpit interior must be finished, of course painted as before, and the canopy can now be glued in place. You can use ca glue here because it is on the outside of the canopy and will not fog up the interior. When the glue has dried, fill around the canopy edges with your favorite filler. I always use epoxy with micro balloons added. You can smooth out the filler so it looks like the canopy is part of the fuselage and sand smooth. You can paint the edges or framework on the canopy when you paint the fuse. You can't beat this technique when it comes to a beautiful finish.
I have used both these techniques many times with good results. You can find faster methods to finish your cockpit, but none that will produce the sane quality of work. Remember when you look at a model plane, what do you see first? The canopy and cowling is what gets my attention, so why not make them stand out with pride in your work and really do a first class job on them. I will have the cowling finishing methods in a later article. If you ever have the inside of the canopy to fog at various times of the year, you can prevent this. Simply drill a small hole in one or both sides of the canopy next to the floor so they will not be noticed. These weep holes will allow the canopy to breathe. Thanks for reading this!
|
Hard Landings
This was the result of a mid-air collision between two identical planes belonging to Pat Thomas and James Goss. Pat's, the purple one, was covered in Monokote. The pink one, belonging to me, was covered in ultracote. The planes were hovering at about 75 feet in the air when they hit. It is amazing that my plane survived with only a crushed leading edge sheeting on the right wing and a cracked fuselage. When they hit, the jolt turned off my receiver. My plane came down in a slow spin and hit on its nose. Before the mid-air my landing gear was bent a little from their normal position. After the mid-air I told Pat he gave my plane a good wheel alignment, they were as straight as they could be.
 |
 |
 |
Computer Sounds
By James Goss
Have you ever wondered what all those crazy sounds are when you sign on to the Internet? When you click on AOL, or whomever you use, you start to here electronic tones being generated by your computer. The first sounds you hear will be your modem dialing. When the destination modem picks up the line, your local modem sends out a standard signal tone (a carrier tone) and is relatively low in frequency. This lets the remote modem know another computer is calling it. If the remote modem recognizes the carrier, it sends out an even higher-pitched tone to let your modem know it has a contact at the other end. Once your modem recognizes the remote modem it sends out a Carrier Detect (CD) signal to the serial port. These mutual carriers are then modulated to exchange data.
While all these strange sounds are taking place the two modems are deciding the transmission speed to use, the proper size of data packet to use, the signaling bits on each end of the words (turn on and turn off bits), whether or not parity error checking will be used. Parity is a system for checking the number of ones and zeros; it is either even or odd. If odd parity is used then each word transmitted will have an odd number of ones in it. If even parity is used the transmitted word will have an even number of ones. Sometimes when a word is transmitted from one modem to another the total number of ones will be changed because of a glitch on the phone line. As an example if your machine transmits a thirteen bit asynchronous word with seven ones in it and when the receiving modem receives the word it has eight ones in it, the receiving modem will tell your modem to send it again.
So while you are waiting for your computer to get on line, just set back and enjoy all those crazy little sounds. Remember that a lot of data is being transmitted back and forth during this time, as you are getting ready to access to the world.
|
The Talladega and Anniston R/C Club Picnic
 November 3, 2001 will be a day I will always remember; this was the day for our combined Talladega and Anniston R/C picnic. I was worried because we had postponed it several times and it was getting late in the year and cold weather was around. Luck was on our side and the day was absolutely beautiful. Sunshine and warm temperatures all day long provided us all with a wonderful time. It could not have been any better and everything went like clock work. There were several members that could not attend because of being out of town or sickness in their family. I would say about 75% of both clubs were in attendance and this is a very high number for an outing such as this. In all there were about fifty people at the field and this included members and their families.
For me the day started about 5:30 am when Mary and I started getting things together. I went by Cecil's house to pick up his grill on my trailer and we arrived at the field around 8:00 am. Cecil and I were the first to arrive and we couldn't believe how pretty the day was starting out. We were expecting rain around dinner so we were content that we had a good-looking morning. We got our shelters set up next to our shed so there would be plenty of shade throughout the day. Loren was the next to arrive and around 9:00am the cars started to come in pretty regular. Soon Pat arrived with his grill and set it up along side Cecil's grill in the rear of the shed. It wasn't long before planes were in the air. By 11:00 am most everyone was there so Cecil and Pat fired up the grills. Mary set the tables up and did a really fine job keeping everything moving. George said grace and the crowd started eating around 11:30. Most everyone brought a side dish and we had some really good food on the table.
About 1:00 pm we started the fun fly events that included a spot landing, a timed event, and a bomb drop. We had eleven contestants to enter the events and Pat Thomas was the big winner along with Loren, Jerry and Ken. Everyone in the contest had lots of fun and even the spectators enjoyed watching. Cooper Crossley and Jack Holland did a great job running the contest. I am sad to say we did loose two planes during the day, Pat lost his giant profile and Neil lost his G-Trick. By 4:00 pm most of the members had called it a day and was on their way home. By and large it was a real success and I hope we can do it again next year.
Here are the members in attendance at the picnic:
Cecil Ledbetter
James Goss
Pat Thomas
Ken McCuistion
Jerry McCuistion
Gene Morris
Michael Murray
Danny Prince
Loren Hanson
Terry Walton
Dr. Vic Cestaro
Cooper Crossley
Joseph Hayne
George Langham
John Mahaffey
Dr. Barksdale
Jack Carlson
Terry Carlson
Mike Phillips
Jack Holland
Neil Cobb
Tracy Cobb
Doug Golden
|
The Well is Running Dry
By James Goss
I am really enjoying getting the newsletter ready each month, but as you have noticed most of the material is from my thoughts. I am sure you are getting tired of reading the same type things each month and would like to see a different style of writing. What the newsletter needs is more input from the members. Several members have had articles and they were very interesting to read. If each member would write just one article each year we would have an abundance of variety. It doesn't matter what you write about just so it relates to the hobby or club in some way. Just write it and e-mail it to me or hand it to me in hard copy the next time you see me. It is always interesting to read about a plane you have built at one time or another, or a new engine you have acquired, or a new tool you have discovered. It will take very little of your time and you will be helping the club keep the newsletter alive and kicking. I think the newsletter helps us all stay in touch with the club and know what is going on if we happen to miss a club meeting. It doesn't matter if you write one page, one paragraph, or one sentence, the club will really appreciate your effort. Thanks!
|