Cow Patty News
Monthly Newsletter
November 2001
Anniston R/C Flyers

God Bless America
What's in the newsletter this month?
Warning!!! Advance Notice!!! This is a special Halloween edition of the newsletter, hope you do not get scared easily. Best if viewed with your spouce or friend at your side for safety reasons. The author is not responsible for any undue stress this edition may bring upon you.
Happy Halloween!!!
|
   |
Club Meeting Minutes
November meeting will be held at Ryans due to time change and cooler weather. Remember that our club meetings are always on the first Monday of each month. Please try to attend some of them if you can.
|
 |
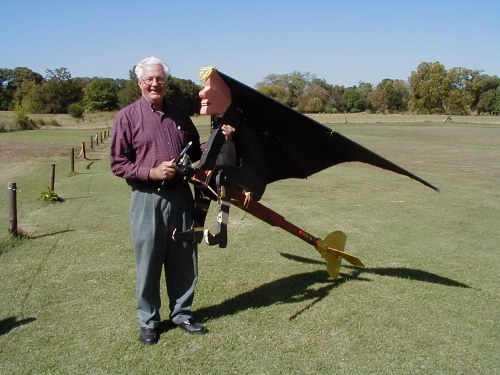
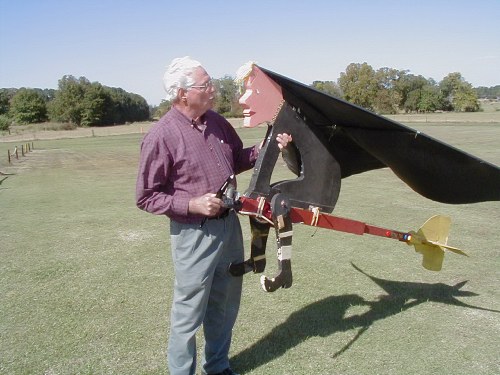
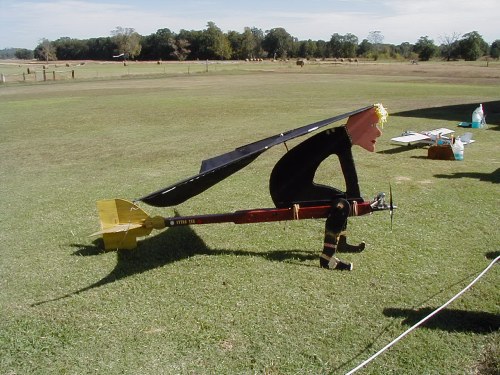
Flying Witch On a Broom
You know its getting close to Halloween when the witches start flying on their brooms. This flying witch was built by Gene Morris and is powered by a Saito 91. Even though it is quite large in size it has a weight of only 5 pounds. It is made of all balsa and foam with a few brass rods in her cape. The witch is flown with elevator and rudder, Gene has the rudder on the aileron control stick. It is fun to watch her fly around the sky with her cape flopping in the wind, talk about flutter! Gene controls it as much with the throttle as he does the rudder and elevator. When he gives it more throttle it goes up as if you had given it up elevator. If you haven't seen Gene's witch fly on her broom you have got to see it. Maybe we can talk Gene into flying it at the charity fair on October 27.
 |
  |
  |
 |
  |
Gyros : Part Two
By James Goss
Gyros have been around for many years and you probably remember your science or physics teacher in school holding up a rotating bicycle wheel demonstrating gyroscopic action. The new generations of gyros have really changed since the day of the totally mechanical gyro. Today we have the Piezo Gyro and the AVCS Gyro, I will tell you about these a little later. I have recently become interested in gyros because I would like to use them to improve the hovering of my airplanes. The trend today is to hover your plane while descending toward the ground and finally touching the rudder in the grass and then go vertical. Hovering is probably one of the most impressive 3-D maneuvers a pilot can perform. The term 3-D describes any maneuver you do with your plane while it is stalled.
Up until a few years ago a stall was something you didn't want your plane to encounter because a stalled airplane will not fly. Now here we are trying to stall them on purpose. Some of the best maneuvers can be had when the plane is stalled, throw the sticks to the corners and watch it spin and tumble. Now I will admit that you are taking a chance with your plane each time you deviate from the normal flying patterns and enter the 3-D realm, but I will be the first to tell you that it's a lot of fun and puts the fun in fun-fly. I don't guess I have any planes that I would not try to tumble or spin at one time or another. Even my giant scale planes get their chance to spin and tumble every now and then.
The question comes up that if you are using a gyro to hover, or in any maneuver, are you really flying the plane. Full-scale planes use gyros and you think of the pilots as flying them so why not the same logic with R/C planes. My answer to this question is yes; you still must input your controls. Did you know that you are using a feedback system each time you fly your plane. Your servos have internal feedback systems that tell the dc motors to stop when they reach their destination. The gyros are very similar in that they generate and error correction voltage when the plane's heading change. So just think of a gyro the same as you do the servos, a tool that improves your airplanes flying capability. The gyros only slow down the fall out from a maneuver, you still have to make constant decisions as to what input is needed. It can best be described as flying your plane under water. The movements will be slower, but they still occur, you just have a little more time to think. By practicing hovering with the aid of a gyro you will soon be able to hover without them, but never as well because the gyro can respond much faster than the eye to hand response of any human. No human can move that rudder and elevator as fast as a gyro feedback system. Believe me when I say that seeing a 37-40% planes hover two feet off the ground while doing torque rolls all the way down the field is impressive in anybody's book.
Gyros are not just for hovering; they help stabilize your plane during all maneuvers such as tracking through a large loop, a slow roll, knife-edge flight, and any others you can think of. The better gyros can be switched on and off from your radio transmitter. As an example you are going to install a gyro on your rudder to aid in hovering your plane. If you are using a gyro that is not switched, and they can be got for about $60, you will plug the gyro into the rudder channel on your receiver and plug the rudder servo into the gyro. You can now adjust the gain and centering controls with a small screwdriver. That's all there is to it. If you are going to use a better gyro, one that is switched on and off by your radio, there is another connection to make. You still plug the gyro into the rudder channel on the receiver and plug the servo into the gyro just as before, but now you also plug the gyro into channel five, or any channel that is controlled by a switch on your transmitter. In flight when you want to turn the gyro on and off, simply activate switch five on your transmitter. You may want to switch the gyro on and off in flight because some maneuvers that you like to do may be altered. Remember that the gyro tries to keep your plane on the same heading at all times and some 3-D maneuvers requires a constant heading change.
The Piezo gyro works on the Piezoelectric principle. When a mechanical pressure actuates a quartz or ceramic crystal, the crystal will generate a voltage in proportion to the force applied. The voltage will only be generated while the force is being applied. When the force is removed the voltage dampens back to zero. The force that acts on the crystal being used in our planes is the centrifugal force exerted on a body in motion. When the plane turns off it's heading the inertia of the crystal produces a force that excites the crystal and an alternating voltage is produced, then amplified, then compared to a reference voltage, and finally an error voltage is created that tells the dc motor in the servo which direction to move. All this happens in a very short amount of time. A human might make one or two corrections per second as compared to hundreds of corrections generated by the gyro.
The newest gyros are called AVCS gyros. This stands for Angular Velocity Control Systems. On the same chip they have integrated electronics and micro mechanical machines that work together and makes an extremely accurate device. This is what the manufacture says about them:
AVCS systems far surpasses piezo-crystal heading hold systems for stability and drift cancellation. Forward, climb, descent, knife-edge and other flying attitudes are maintained even when the wind shifts. Very low drift SMM (Silicon Micro Machine) gyro sensor practically eliminates trim changes during flight. Conductive resin case improves EMC resistance (electrostatic and electromagnetic wave interference).
Setting up the gyro can be a little tricky if it is your first try. You will need a computer radio so you can adjust the ATV on channel five and mixing of other channels may be required if you want to use the knob on your transmitter to adjust the gain. The gyro operates in two modes, normal and AVCS. You can arrange it to be in normal mode when the channel five switch is to the rear and in the AVCS mode when it is to the front or vise versa if you like. If you set the ATV to less than 40%, that channel will be turned off. To set the gain you must set the ATV from 60 to 120%. You must be careful in the AVCS mode because in that mode your rudder will not automatically return to its neutral position, it will hold its position until the plane responds to its new heading. The normal mode is best for most of our aerobatics because the rudder will return to neutral after each deviation in heading. You should never take off in the AVCS mode.
It has taken me a little while to become somewhat familiar with gyros, but I have had a lot of fun doing it. I finally got it working right last weekend and it was very windy that day. Even in the high wind I had some very nice hovering. The wind would blow the plane backwards for a great distance while in a true hovering position, very unusual to see. I believe gyros are well worth the effort and I know they are a lot of fun when used on one axis such as the rudder. So if you want to try something new, install a gyro on your rudder, elevator, or ailerons.
|
    |
Welding Aluminum
By James Goss
There is one area in model airplane building that most of us is lacking when it comes to equipment needs. When it is time to modify or repair our mufflers and landing gear we are limited as to what we can do. It is sad that we must buy a complete new muffler simply because part of it has broken off in a hard landing. For example you have spent $100 for a Pitts muffler and the down pipes broke off in a nose over during landing. The pipes are still in good shape they just popped out. Your choice is to take it to a welding shop or buy a new muffler. It would be nice if you could repair it in your shop to save time and money. Some of us would like to be able to design and build our own mufflers as well, especially for large gas engines. It would be a simple task in most cases if we were set up to weld aluminum.
As you probably already know welding aluminum requires special equipment. Although aluminum can be welded with oxy-acetylene equipment, it is difficult because of the following: Compared to other metals aluminum has a very low melting point, about 1220 degrees F. Due to its light color there is no indication when the melting point is reached, when the metal begins to melt it collapses suddenly. When hot, aluminum is very weak and flimsy. For these reasons aluminum is normally welded with Gas Tungsten Arc (Tig) or Gas Metal Arc (Mig) welding equipment. These are some expensive pieces of equipment and I don't have any of them in my shop.
A while back I came across a system that will weld aluminum and is not expensive at all. You use regular propane gas in a torch like you can buy at Wal-Mart for about $10. The system is called Dura Fix Aluminum Welding Rods and you can get about 32 rods for about $30. These rods work better than the older rods that I have tried a few years back. They are larger in diameter, 1/8 inch, and they can really fill open holes with ease. If you had a hole in your muffler that you wanted to fill, for example you moved a down pipe over to another location and the hole is ¾ inch in diameter, it can be done with ease. Simply heat the surrounding area around the hole, you do not heat the rod just the work area. When the temperature reaches 732 degrees F the rod will begin to melt and flow over the hole. As the rod melts move it around the hole in a circular motion and you will be amazed how it fills the hole. I don't know how big of a hole you can fill, at least 1 inch I would think. You use the same procedure for welding butt joints, do not heat the rod or it will break off in small pieces.
What is really amazing is the fact that the weld is much harder and stronger that the original aluminum. Just try to drill it and you will see how hard it is. Try to pull it off and you will pull a plug of base aluminum with it. It is ideal for our hobby and I plan to use it a lot. The key to a good weld is cleaning the base aluminum before the weld is attempted. A nice brass brush comes with the kit and is really all you need to clean most jobs. If the aluminum has a lot of oil on it I would recommend cleaning it with alcohol first, even though the 732 degrees will burn off most oils. If anyone is interested in these rods give me a call for the phone number.
|
  |
Learning to fly should not have this much pain involved!
 And I thought I had it hard learning to fly model planes.
|
To Run or Not to Run
In the last newsletter we debated the question of running the fuel out of the engine at the end of the day. Some say it is not a good policy and may damage your engine to run it dry. Here is what Jerry McCuistion has to say:
In the last news letter you brought up a question about whether running the fuel out of your engines would cause damage. I have been running mine out for many years since reading a Clarence Lee article years ago. I have had to replace bearings from time to time but they were usually due to the ball retainer coming apart. in any engine I took apart after running it dry it still had a lot of oil in the crankcase. Whoever came up with this suggestion seems to have forgotten that the oil isn't completely burned up in the engine. When the methanol is burned it still leaves some oil behind. In an engine with ball bearings it needs very little oil to lubricate the rotating parts. It would seem the cylinder and piston would be more apt to be damaged than the bearings.
We had a new Coke truck come from the factory once that they failed to put oil in the front hub on. It was driven from Louisville KY to Washington NC and from there to Douglasville GA before the wheel locked up. This was just with the oil that was on the bearing when it came out of the package. See you at the field, Jerry.
Thanks Jerry for you comments, I think you are right about the oil. Maybe we can hear from some other members on this topic. James
|
  |
The Best Cutting Board
By James Goss
What do you use as a cutting board for cutting balsa and film coverings? I have tried several different backboards over the years and found that some work better than others. For the last few years I have been using hard rubber mats about 1/8 inch thick. They work nice and will last for many years, but they still are not ideal for the job. The rubber mats are also good about holding your work in place. The problem with cutting boards is that as you cut through the work piece you also cut into the backboard, this is what dulls your blades so fast. Also if the cutting board will allow the blade to penetrate its surface the blade will try to pull the film down into the cut line as the blade cuts into the cutting board. This will produce a stretching of the material and result in a rough cut. I have known for many years that the absolutely best in the world cutting board is glass. Your hobby knife will not cut into glass because it is so hard; it just glides across its surface and gives you the best edge cut in Monokote and Ultracote that you will ever get. I forget where I heard about using glass as a cutting board, but somebody really knew what they were talking about when they told me to use plate glass. Remember that cleaner cuts will enhance your overall covering job. It is straight lines and clean cuts that really generate a professional covering job.
I had been looking for some large plate glass when a home improvement project guided me to what I was looking for. It was time to change our front storm door so I immediately decided to remove its plate glass. It measured 6 feet 3 inches long and 32 inches wide and was free for the taking. This was just right for one of my cutting benches in the shop. The edge of the glass would not overhang the edge of the bench, which meant that I would not have to cut the glass. Cutting glass has not been one of my better skills in life. With the glass installed on my cutting bench I was ready to try it out. I found a piece of scrap Ultracote for the first cut. I could not believe how easy the knife cut through the covering. The glass really reduces friction and produces the perfect cut. You might think that cutting on glass would dull your knife quicker, but it doesn't. I can guarantee that you will not find a better cutting backboard anywhere. Glass is the way to go for a professional cut in film covering and in balsa as well.
Now I realize that my cutting board is large and everyone may not have room for a glass sheet that size. Ounce you install a sheet of glass this size your bench can only be used for cutting and no heavy work of any kind. A smaller piece of glass will also work just fine. If you have some old glass shelves around they will work great. Mary has just discarded a glass whatnot shelf from our den that had ¼ inch x 3 feet x 12 inch shelves. These would be perfect for a portable cutting board. By them being ¼ inch thick they are plenty strong for transporting around your shop.
|
  |
How Do You Rip Balsa?
By James Goss
What method do you use to rip balsa stock? Any time you scratch build a plane you can't get around having to rip balsa. Well you can if you buy all the little narrow pieces from the hobby shop, but you can rip them yourself and save money in the process. A band saw or small circular saw is good for this job and a lot of modelers use them for that purpose. I never use a band saw to rip stock up to one inch thick instead I prefer the knife. A knife will give you a clean rip and without all that saw dust to breath. Balsa dust is so fine compared to other types of sawdust and will get into your lungs before you know it. It can't be good for your respiration system. Even with a mask it is hard to keep the dust out. Working with balsa just about every day now I have found it to be quite irritating to my eyes as well. So using the knife to rip balsa is the tool of my choice.
The problem with using a knife to rip balsa is trying to keep your straight edge from moving during a cut, especially when trying to rip a very narrow piece of balsa. Using a very thin straight edge will allow you to tape it to the balsa. I always use a 2-inch wide 48-inch long flexible metal straight edge and use masking tape to tape it to the work on the backside. The tape will not allow it to move as the knife follows the grain down the length of the balsa. This works great until you get down to a narrow piece of balsa such as a 1 inch wide or less. With wood this narrow you can't tape the straight edge to the balsa anymore because the wood is narrower than the straight edge and the knife blade will follow the grain and veer or swerve off the straight heading. This has aggravated me for years and I have finally solved this problem. This is how you need to modify your straight edge to make it the perfect ripping tool. Remember you are using a 2-inch wide, about 20-gauge sheet metal, straight edge. Being 2 inches wide will give you plenty of room for holding as well as taping it in place. If you drill four equally spaced holes about ¼ inch from the edge of the straight edge you can then place pins through the straight edge and into the wood. The pins will not allow the wood to move and you will have a nice straight rip. The holes need to be the exact size of your t-pins so there is no play or movement between the holes and the pins. This is so simple why didn't I think of it sooner?
The pins will hold even in a piece of 1/16 balsa, it doesn't take much to keep everything in place. Of course the thicker the balsa the better the pins will hold. As the balsa gets thicker you will need to keep your knife at a 90-degree angle to the board to prevent a tapered cut. I rip up to 1- inch balsa by making the first cut very shallow just to mark the wanted cut line. Each pass go a little deeper, don't try to cut thick balsa on the first pass or your knife will have a mind of its own. This method is fast as well as neat and will give you a professional cut.
You may not have thought about it but a ¼ inch sheet of balsa cost about $1.63 for a 4-inch wide, 36 inch long piece. By cutting it with a knife you can get 16 each ¼ inch square sticks from it. A ¼ square balsa, 36 inches long will cost about 25 cents. 16 will cost $4. You are saving $2.37. If you cut it with a saw you would not get 16 pieces because of the saw blade width. The blade will take up about two sticks in sawdust. So ripping your own stock you will save about $10 on an average kit. Maybe you had rather pay the $10 than to bother with ripping the stock, sometimes I do just that. But there is always that time when you need that special size cut and you need it today and not next week. This is when ripping your own balsa really pays off. I have seen times when I would have paid ten times the price for a piece of balsa if I could have gotten my hands on some.
Being able to rip in a good straight line is also necessary when you are sheeting your model. How many times do you receive balsa sheets that have true edges? Before you can join the sheets together you must cut true edges because of the warps and bows that comes in the sheets. This technique works great for this application also. Remember if you don't true up the edges of the sheeting before gluing them together you will have to force them together and this will always result in a crooked sheet.
|
 |
Technical Tip
When using ca glue do you always put the top back on after each use? If you are going to use the glue during the next few months, leave the top off and the tip will not get clogged as often. After I open a 2-ounce bottle of ca I never put the top back on, it is always ready to use when I need it. If the glue starts to thicken up after three or four months simply add a few drops of acetone and it will become thin again. The acetone does not alter the characteristics of the glue. Until you open a bottle of ca keep it in your freezer. I have kept ca in the freezer for years and it is good as new when I need it.
When using Elmer's glue, or any other similar glue, for sheeting and other large area demands where you must paint it on in large amounts, you can thin it with water. It mixes excellent with water and only takes a few seconds to mix.
Of course epoxy will thin with alcohol. You can mix epoxy and thin it with the same amount of alcohol as you have epoxy. For example, use one ounce of epoxy and one ounce of alcohol. The mix will be water thin and will cover five times the area that it would have if you had not added the alcohol.
|
   |
October 27 Fun Fly
Are you worried about your AMA insurance covering you when flying at a field other than your regular AMA field? Here is what the AMA had to say about this topic:
Mr. Goss:
AMA coverage applies anytime, anywhere - it is not limited to model flying
at contests or on the club field. It even applies to flying at public
demonstrations and air shows. Model flying MUST be in accordance with the
current Official AMA National Model Aircraft Safety Code in order for AMA
Liability to apply.
For more information go to AMA's website www.modelaircraft.org, Membership
Services, PDF Documents. Document #503 is the 2001 Insurance Summary and
document #105 is the Safety Code.
In addition we would be glad to review a demonstration site diagram if you
can provide a field layout. Our fax number is 765.289.4248.
Karen Holler
Special Services Department
Academy of Model Aeronautics
765.287.1256 ext. 252
So as long as we fly by the AMA rules we can fly anywhere we like, even if you have a field at home you will be covered as long as you abide by the rules. So don't worry about being covered at the charity fun fly on Mud street on Oct. 27, come on out and have some fun. Free food to all pilots from 8 am - 4 pm. See you there! James
|
   |
New Planes in the Making
Pat Thomas has a Staudacher with a 90 inch wingspan ready to be assembled. It will be powered with a ZDZ 80 gas engine. The Staudacher is an ARC kit and will be covered by Cecil. Sould be ready in a month or so.
I have a couple of large profiles ready to cover. One is a 60 inch and will carry a 1.20 4-stroke. The other is a 41 inch and will have a .91 4-stroke. I am also building a flying witch on a broom and I have several others in the final stages. The 1/2 scale cap has a fuselage now with the tail sections being built.
|
  |
The Trouble with Profile Planes
By James Goss
When I first saw a profile plane about ten years back I thought it was a strange looking plane and that someone couldn't afford to build the whole plane. It looked a lot like a control line plane and I never did get efficient in the art of flying those. At the time I didn't have any idea that I would grow to love these crazy looking planes as much as I do today. I have built many of them in the past and I am involved with several on the building board at this time. I guess some of the main reasons for liking them deals with the way they are built. That flat fuselage is easy to build and uses less material compared to a conventional fuselage. The wing is no different form any other wing; the same building techniques are used as in regular models. I really like the low wing loading; most of my profiles weigh less than five pounds with a few at 7 lbs.
Most people look at a profile plane and think they are really fast to build and they are to a degree, especially if you cover the fuselage before you mount the wing. I do not prefer to cover the fuselage before mounting the wing, I like to install the wing, get a good glue joint between the fuselage and wing, and then cover the whole plane as a unit. I think you will get a more pleasing finish this way because the covering on the fuselage and wing will blend together and lines will not show as readily. It does take a lot more time this way but it is worth it to get a quality covering job. Who would have thought that a profile could take longer to cover than a conventional plane?
What I really like the most about profile planes is the accessibility that you have to all the components. Having the fuel tank visible makes it really nice to check on your fuel level in a low fly-by and also for troubleshooting. In the past I always placed the servos inside the wing, but now I mount then outside the wing, which is much faster and also allows easer troubleshooting. The receiver and battery pack still go inside the wing under a hatch cover plate on the bottom of the wing. One thing that I would recommend is to place your on-off switch on the top of the wing instead of the bottom. You will find that it is much easier to access it that way. If you place it on the bottom of the wing it is harder to find and in some cases you must pick the plane up to activate the switch. Also double the wall thickness of the ribs that are on either side of the battery. With the many crazy maneuvers we do with these profile planes the battery really gets thrown around so have it secured so it can't go through the ribs. I have had this to happen on two of my profile planes.
I could go on all day talking about what I like about profile planes, but what I really wanted to tell you about in this article is a common trouble we have with profile planes. The fuselage tends to break at a point just rear to the wing when you have a mild crash or hard landings. You will see a wrinkle in the covering form at this location, which is an indication that the fuselage is cracked. Usually a little thin ca glue will give you a temporary fix and keep you flying for a while, but it will break again. The question is do you build the fuselage solid or do you stick frame it? I have used both methods and like the solid the best. It does weigh a little more but by having it solid it allows you to use some pretty good techniques to add more strength to it. One is to laminate the fuselage out of two sheets of balsa instead on one. I like to use two 3/16 sheets and laminate them with a heavy fiberglass cloth and epoxy resin in between the two sheets. Be sure to use epoxy resin because it is not brittle like polyester resins are and will take more bending before breaking. This also helps out with another problem, warping of the fuselage. If you build the fuse from solid balsa it may or may not warp as the humidity changes from day to day. The fiberglass seems to help in that area.
The latest technique I have started using to strengthen the fuselage is to install a piece of 5/8 inch channel aluminum down the length of the fuselage about midway of the wing back to the tail. The channel aluminum will not allow any side motion of the fuselage while under load and only adds about three ounces of weight. The fuselage that I am now building weighs 1 pound and two ounces. To install the channel I cut a 5/8 slot into the fuselage and use epoxy to glue the channel in place while it has 120 pounds of weight on top of it and is resting on a very straight work surface. I feel that the aluminum channel adds more strength than other material such as hard wood dowels or hard wood in general. I will probably stay with this technique in the future because it seems to be one of the best methods I have come across. With the large engines I am now using on profile planes in order to get good hovering capabilities the fuselage must be able to handle that extra power.
So if you plan on building a profile plane in the future be sure to give it a strong fuselage. If you have never flown one of these planes you don't know what you have been missing. You will try some of the maneuvers with these planes that you would never have thought about trying with your more expensive planes. Even though they are cheaper you will still get attached to them. Flying low to the ground and doing 3-D maneuvers it is only a matter of time before the ground gets in your flight path. Go ahead and build two while you are building so you will have a backup profile.
|
   See you at the Field
|